DIY moonshine still with drawings. Distilled water at home (distiller) Homemade distiller for moonshine
 Live Journal
 Facebook
 Twitter
As it turns out, the moonshine department is very popular among subscribers. And if earlier the topics concerned mainly individual parts, today we will tell you how to make a simple moonshine still with your own hands.
To begin with, it’s worth deciding that moonshine brewing is the production of alcohol by distilling mash at home. Alcohol is always produced using the same technology, regardless of the scale - for home production or industrial production. Starch or sugar-containing raw materials are produced, to which water and yeast are added. During the fermentation process, the so-called an artificial world where single-celled fungi live. The result of their vital activity is ethyl, methyl, propyl and other alcohols with the addition of aldehydes and acetone.
Since all products, except ethyl alcohol, are harmful to humans, the task of moonshine brewing is to obtain pure ethyl alcohol in a non-lethal concentration. For these purposes, rectification is carried out, that is, the product is divided into several fractions. You can buy or, but it’s much easier and faster to make the simplest moonshine still.
The simplest moonshine still

In order to make such a design, you will need only 2 plates of larger and smaller diameter (in Fig. 2 and 4) and a saucepan (in Fig. 3).
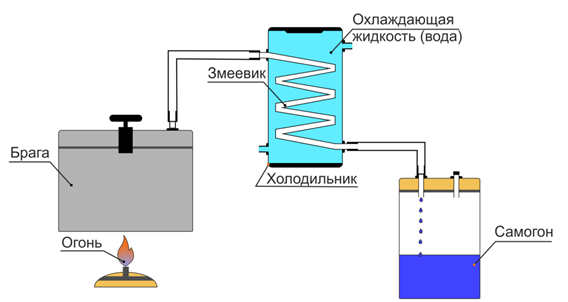
This design works as follows. Braga is poured into the pan. A plate of smaller diameter is placed on top of the spacers so that it does not plunge into the boiling mash. A larger diameter plate is placed on the pan, into which cold water is poured.
During the boiling process, alcohol vapors are released and settle on a small plate. As a result, you get a minimum amount of moonshine (from 1 liter of mash no more than 80 ml) with a high concentration of fusel oils. To be honest, such moonshine is not only dangerous to take internally, but even used externally. This method was very popular in the Soviet Union during the Prohibition era. It is clear that the number of poisonings with such a surrogate was close to the absolute majority, which is where the belief that moonshine is pure poison came from.
In this case, it is not moonshine that is dangerous to health, but the concentration of hazardous substances - fusel oils, acetone and aldehydes. Only double and even triple distillation can produce a product that is pure and safe for life and health.
We have provided this information only to describe previously existing methods. We do not recommend making such a device at home - you will not be able to drink, and the smell in the apartment will linger for at least a week.
How to make a simple moonshine still
In this case, the design includes a distillation cube and a refrigerator. This is also a simple option, but it allows you to get a high-quality drink.
Always distill the distillate at least 2 times and use a steamer. This way you will get rid of harmful fusel oils as much as possible. Afterwards cleaning with charcoal is necessary.
Alembic

Any enameled or stainless steel container with a tight lid is suitable for this. The latter should close so tightly that it is not knocked out by excess pressure from the inside.
The second prerequisite is the presence of an outlet pipe through which steam that has not yet been divided into fractions will move. For this purpose, a through hole is made in the lid and a fitting is screwed in.
The third condition - tightness - smoothly follows from the first. If you ensure that the lid is securely fastened to the cube, the seal will be ensured. Some people cover the lid with dough, others use silicone gaskets. We recommend using pressure cookers. The price of the simplest model is 1500-2000 rubles. If you plan to brew moonshine more than once, it makes sense to buy it.
However, the pressure cooker has one serious drawback - its volume. The maximum we have seen on sale is designed for 6 liters, so you will fill the mash with 4.5 liters (no more than 2/3 of the volume). This yields a little less than a liter of moonshine. It won't be enough, but it's enough for home use.
If this volume does not suit you, buy a special distillation cube with a capacity of 10 liters or more. The average price is 3200-4000 rubles.
A milk can with a lid that screws on tightly will be an affordable and suitable distillation cube. It will really need to be coated with dough after pouring the mash, but this is even a plus - the house will smell not of fusel, but of fresh baked goods.
How to make a still in just half an hour - video
Fridge
The refrigerator in the moonshine still is divided into 2 main types depending on the method of water supply:
- filler (storage);
- flow-through
The first option is very, very bad in terms of making moonshine. Such a refrigerator can only be used if there are big problems with water in the house. The operating principle of such a refrigerator is based on immediately pouring cold water and replacing it during the brewing process.
What's wrong with this refrigerator? The fact is that the water still heats up, even if you change it often enough. The warmer the water, the slower the separation into fractions occurs, the less, accordingly, you will get the finished product.
A flow-through refrigerator is connected to a water supply and the entire time cooking is in progress, water passes through it, physically not having time to heat it to a critical limit.
.jpg)
A flooded refrigerator can only be used if there is no real possibility of connecting the water supply.
Coil
An essential element of any refrigerator is a coil - a glass, copper or stainless steel spiral tube through which alcohol-containing vapors move from the distillation chamber to the receiving container, simultaneously being divided into vapor and liquid fractions.

Some moonshiners prefer to use laboratory coils made of glass. Let’s say right away that our kitchen is far from a laboratory and people walk here unprepared for such almost sterile conditions. And glass things tend to break. It is best to use a copper coil, which has a high degree of heat transfer, is safe to use and costs literally pennies.
.jpg)
A refrigerator with a copper coil includes the following required elements:
- container for water;
- coil with 2 fittings - vapor inlet and moonshine outlet;
- 2 fittings for inlet/outlet of running water for cooling.
The photo shows examples of the simplest and therefore most effective refrigerators.


In the video you can see how to make the simplest refrigerator based on a corrugated gas flexible pipe. Just 1 hour and you can start working.
Final assembly
Actually, at this point the production of the moonshine still is almost completed. All that remains is to put all the components together.
For connection you must use only (!!!) silicone hoses. It is prohibited to use PVC hoses when distilling alcohol; this is very, very dangerous.
.jpg)
In order to distinguish a silicone hose from PVC, it can be set on fire. There will be no smell when burning. At the same time, the hose itself is pleasant to the touch.
Sukhoparnik

No matter what anyone says about the necessity or uselessness of this detail, we insist that the product must be as clean as possible. Not like rectified alcohol, it really is practically poison, but in such a way that in the morning you can clearly remember the events of the previous evening.
A steam steamer is used to separate fusel oils from alcohol-containing steam and prevent the ingress of mash residues into the finished product.
You can purchase a ready-made steamer, which will cost 1800-2200 rubles, or make it from an ordinary can.

Take a 1- or 2-liter jar with a screw-on lid. Make holes in the lid for two fittings, inlet and outlet.
.jpg)
Connect two hoses to the fittings - one comes from the distillation cube, the other goes into the refrigerator.
It is best to make a steamer from stainless steel and provide for draining fusel oils. When distilling a large amount of mash, the latter begin to move, negatively affecting the taste of the final product.
Now the simplest moonshine still is ready!
For those who still have questions - video instructions from experienced moonshiners
How to make a simple moonshine still with your own hands
Nowadays, given the large amount of counterfeit alcohol in stores, more and more of our compatriots are leaning towards making moonshine at home. Nowadays, the law does not provide for punishment for moonshine brewing for personal purposes, so this is a good solution for those who want to have 100% high-quality alcohol at their feasts. Today, stores offer a huge variety of different moonshine stills, ranging from the simplest distillers to almost professional home mini-distilleries. The price also ranges from quite acceptable to very impressive amounts.
But still, for a novice moonshiner it is better to use a homemade moonshine still. Firstly, it will be cheaper than buying ready-made equipment. Secondly, without much understanding of moonshine equipment, you can ruin expensive equipment, and in the process of making a moonshine still, you will begin to understand what is needed for what and how exactly distillation occurs. Thirdly, and this applies not only to beginners, when buying a homemade moonshine still in finished form, you will not be sure of its quality or you may even run into a fake.
In this material we will try to reveal in as much detail as possible all the intricacies of how to make a moonshine still at home. We will consider the classic version of the distiller. Using it, you are unlikely to be able to make exclusive or exotic drinks like Calvados or whiskey, but it is time-tested, simple, reliable and inexpensive to assemble.
Design of the simplest moonshine still
The simplest scheme of a moonshine still consists of a distillation cube and a refrigerator. The mash boils in the distillation cube, and alcohol vapors settle in the refrigerator, resulting in the formation of moonshine. However, this simple moonshine still will saturate the drink with fusel oils and other harmful impurities. To get rid of them, you need to add something else to the design, or, as it is also called, a reflux condenser. We will tell you how to make a moonshine still from available materials, with minimal financial investment.
Alembic
So, the first element we will look at is the distillation cube. A distillation cube is a container in which the mash will boil during the distillation of moonshine. What can it be made from?

Most often in old, still Soviet devices, there is an aluminum cube. The distillation cube was made from a flask or can, in which milk was previously transported. It is not recommended to use such material for the manufacture of a moonshine still, because aluminum partially reacts with various acids and alcohol in the mash. In addition to the fact that unnecessary impurities appear in moonshine, with frequent use the aluminum still begins to leak after a short time and fails.
Enameled dishes. This material is neutral to acids and alcohol. If used carefully, without hitting or scratching, it can last quite a long time even with frequent use. However, it is quite difficult to seal a moonshine still from a pan well. Craftsmen have also learned to make cubes from a milking machine tank for cows, but this option is unlikely to suit a city dweller.
The most reliable option is food-grade stainless steel. Such a cube will serve for a long time; it does not come into contact with the mash, which eliminates additional harmful impurities in the finished product. However, cubes made from this material are quite expensive, and often ordinary galvanized steel is sold under the guise of stainless steel, and this is also not so durable.
You can also use a copper container as a cube, but as a rule, this is too expensive an option for a moonshine still.
The volume of the distillation cube must be selected according to the volumes in which you intend to produce moonshine. Ideal for household needs from 25 to 35 liters.
It is important to follow one rule! Never fill the still completely, it should be filled to about 80%. This is done for safety reasons, so that when boiling, the pressure in the cube does not exceed the permissible value and the cube does not burst. When choosing a container for the distillation cube, pay attention to the width of the neck. It should be large enough to make it convenient to pour the mash and wash the cube after distillation.
Don't forget about the size of the container either. The cube must be placed on the stove, be stable and not interfere with access to the entire apparatus.
You can make an electric moonshine still. For him, a distillation cube is made from a pressure cooker. It has a small volume, but it has its advantages - there is no need to use a stove, since it has its own heater, and it is initially sealed. You only need to make a hole in the lid for the steam outlet tube.
A milk can, preferably made of steel, is best. This is the simplest option. Just be sure to change the rubber gasket under the lid to silicone, because alcohol vapor absorbs harmful substances from rubber. This will certainly affect the quality, taste and smell of the finished product.
How to do it yourself: remove the rubber gasket, then apply silicone sealant to the edges of the lid and leave to dry. Repeat several times. Place cellophane on the neck of the can and close the lid. Keep it this way until completely dry. This will make an excellent silicone seal.
Moonshine still refrigerator
The refrigerator in the moonshine still plays a very important role - it is in it that the alcohol vapors condense and the finished product flows from there. To make a refrigerator, it is enough to understand how the principle of its operation works.

There are two types of refrigerators: direct-flow and coil. A straight-through refrigerator consists of a straight metal tube that is placed inside a pipe with a wider diameter. Water flows continuously through this pipe, acting as a refrigerant. You can make a simple refrigerator for a moonshine still with your own hands from a copper tube with a diameter of up to 10 mm and a polypropylene pipe with a diameter of more than 20 mm. Fittings with plugs are screwed onto the polypropylene pipe, and holes are drilled into them with a diameter similar to that of a copper pipe. The copper tube will need to be inserted into these holes and seal the cracks. The copper tube is connected to the distillation cube, and the fittings are connected to the water tap.
Coils are made of glass, copper, aluminum or food grade stainless steel. Copper and aluminum have good thermal conductivity and are easy to make a coil from. But they have disadvantages - they are oxidized by alcohol vapor, so they must be cleaned with vinegar or citric acid after each distillation. It is impossible to make a glass coil yourself; you can buy it in a special store. However, they are very fragile, so it is not recommended to use such devices. Food steel does not oxidize and does not release any substances into the finished product, however, the thermal conductivity of steel is three to four times lower than that of copper. The best option is a copper coil. In some countries, copper is even the only permitted material for the manufacture of distillers. But it must be constantly cleaned.
The longer the coil tube, the more contact there is with the cooling element, but tubes that are too long have poor performance. The optimal option is 1.5-2 meters. The inner diameter of the tube is approximately 8-12 mm.
The copper tube must be twisted in a spiral with a small distance between the turns. The coil itself is lowered into a reservoir with a coolant, usually water. Systems can be closed - the water is constantly in the tank and does not circulate, and open - the water is constantly moving. A closed refrigerator is easier to manufacture and uses less water, but its characteristics are worse - even if you change the water regularly, it heats up quickly enough, as a result of which alcohol condenses poorly. Therefore, the losses of moonshine are quite large. An open system is more difficult to manufacture, but moonshine condenses better and its quality is higher.
The simplest and cheapest option is to wind a copper tube into a spiral with an outer diameter of approximately 100 mm, and use a 110 mm piece of sewer pipe as a reservoir. Drill two small holes on the sides of the pipe for silicone tubes leading to the coil, place the spiral inside and close the pipe on both sides with special plugs. They also drill holes for the cold water supply and outlet hoses. The structure must be connected to the water supply in such a way that cold water flows in the opposite direction to the movement of steam.
These elements are designed to clean steam from fusel oils and other harmful impurities. The principle of operation of the device is that the condensation temperatures of these impurities are lower than the condensation temperature of alcohol, therefore, alcohol vapors passing through these devices are cleared of fusel oil vapors.

A steamer can be made from an ordinary glass jar with a screw-on lid. You need to drill two holes in the lid for inlet and outlet of vapors, screw the fittings into them and connect the hoses. After which the lid is screwed onto the jar. The inlet tube must be lowered below the outlet tube by 15-30 mm. Alcohol vapor will escape through the outlet tube, and fusel oil vapor will settle on the walls of the jar. A steamer made in this way is easy to clean and rinse.
The bubbler performs the same function as the steam steamer. The difference is that the alcohol vapor passes through a layer of water. In a bubbler, the inlet tube descends almost to the bottom of the jar, not reaching 2-3 cm. Before distillation, cold water must be poured into the bubbler. The outlet tube must not touch the water.
How to assemble a simple moonshine still
Assembling the device is very simple. A hole must be drilled in the lid of the distillation cube to which a tube must be connected to allow steam to escape. This tube is connected to a steamer or bubbler, and from there it is connected to the refrigerator. A refrigerator with an open cooling system must be connected to the water supply and drain. A container for the finished product is placed or connected under the outlet tube of the coil. The assembly of the moonshine still is completed.
Pay attention to the material from which all connecting hoses are made. It is best to use food-grade silicone; it does not react in any way with alcohol vapors. The main thing is not to confuse it with PVC pipes, which begin to melt from the high temperature and harmful impurities are added to the alcohol vapor. You should also not use rubber, due to the fact that alcohol vapor absorbs harmful substances from this material.
It is not recommended to seal the entire structure tightly after assembly. The tubes must be made easily removable, and the connection must be airtight. If you make the tubes non-removable, then servicing, washing and moving the assembled device will be very inconvenient.
If you wish, you can install thermometers on the still or the distiller itself to make it easier to monitor the temperature of the process.
That's all, the home moonshine still is ready. Now you know how to make a moonshine still with your own hands. You can put in the mash and start distilling; you can get your high-quality alcohol at home.
If you still have questions about making a moonshine still, you can look at photos and videos that explain each step in detail. Descriptions and drawings of all devices can be found there.
Do-it-yourself moonshine still is an original Russian, traditional creation of folk thought. Craftsmen manage to make installations that ensure the production of a final product that is not inferior in quality and purity to industrially produced strong drinks. With the right choice of design and careful manufacturing, you can get a fairly simple device for use that can meet your own needs for high-quality and cheap alcohol.
If you assemble the device according to the instructions below, you will be able to produce alcoholic drinks that are head and shoulders above the quality of store-bought counterparts.
At its core, any moonshine still is a home device for distilling raw materials with alcohol content into a high-strength alcoholic drink (moonshine). As a starting product, you can use any mixture that contains ethyl alcohol - this is mash, low-quality wine, alcohol with impurities (raw), etc.
The purpose of using a moonshine still is to produce an alcoholic drink with an ethyl alcohol content of at least 60-70%. At the same time, the final product must be free of impurities that are dangerous to humans, spoil the taste and impart an unpleasant odor.
The operating principle of a moonshine still is based on the fact that alcohol actively evaporates at temperatures at which water remains liquid. As is known, evaporation of water occurs when it boils, i.e. at a temperature of about 100 ºС, while alcohol begins to turn into steam already at a temperature of 55-60 ºС. The intensity of its vaporization increases with increasing temperature.
In the moonshine still, it is necessary to ensure a temperature above 55 ºС, but below 90 ºС.
- Alcohol vapor must be removed from the surface of the water, and their transformation back into liquid is ensured by condensation, i.e. contact of hot steam with a cold surface.
- The final stage consists of carefully collecting the resulting droplets of alcohol, after which it can be purified from harmful impurities.

The classic design of a moonshine still should include such basic parts as an evaporator and a condenser.
- The evaporator is a container where the raw material is heated to the desired temperature.
- A condenser is a container with a cooled surface on which condensation is released.
Additional but necessary parts in the design of the device include an element for removing alcohol vapor from the evaporator, a container for collecting condensate and control devices.
In addition, it is important to ensure proper heating of the raw material into the evaporators and constant cooling of the condensing element. Cleaning is ensured by filters and the addition of various sorbents.
What is taken into account when designing
According to the principle of operation, homemade moonshine stills are classified as distillation-type devices, i.e. use the mechanism described above, in contrast to the industrial production of alcohol, where distillation columns are used, based on the separation of raw materials into fractions. When designing a moonshine still, the following main characteristics are taken into account:

Structural elements
A homemade moonshine still can have different shapes and sizes. Its design can be very simple, made temporarily from improvised means, or quite complex, with process control. The device must include the following required elements:

Making an evaporator
How to make a moonshine still with your own hands? The solution to this problem begins with the creation of an evaporator, i.e. distillation cube. Most often, ready-made containers with a volume of 15-30 liters are used for this purpose.

Stainless steel
The best option is stainless steel intended for food purposes. You can successfully use ready-made household vessels made from this material. Homemade containers are made from stainless steel sheet 1-2 mm thick using welding. When forming a homemade tank, it should be remembered that during operation, in addition to high temperature, excess pressure is created in it, which can reach 0.5-0.7 atm, which requires particularly high-quality welds.
The manufacture of a distillation cube is carried out in the following order.
- A container of the required volume is taken ready-made or welded.
- An important condition is the presence of a flat bottom if it is installed on a tile or burner.
- A cover is installed on top, in which a hole is drilled to attach a coil or steamer.
- With an internal diameter of the coil tube of 11-13 mm, a hole with a diameter of 22 mm is drilled and a pipe thread (half an inch) is cut.
- The lid is installed on the tank with the joint sealed.
In the case of a collapsible structure, rubber gaskets are used, and in the manufacture of a stationary structure, sealing is ensured by silicone sealant.
During the distillation process, it is desirable to control the temperature that is provided in the evaporator. To install a thermometer, another hole is drilled in the lid of the distillation cube to insert a thermocouple or install a thermometer.

A convenient option for a distillation cube is a pressure cooker. It has one important drawback associated with its small volume, but for your own needs it is quite suitable. The main advantage of this design is the presence of good tightness. Modification is required only in the part of drilling the hole in the cover. A completely ideal option is a multicooker, which provides heating and maintaining the temperature in a given mode.

Making a capacitor
A do-it-yourself condenser or refrigerator for a moonshine still includes 2 main parts - a coil and a cooling source (cooling compartment). The quantity and strength of the final product depends on the correct functioning of the refrigerator.
The coil can be made of non-ferrous metals, stainless steel or glass.

The dimensions of the tube for the coil are selected according to the following parameters:
- Inner diameter. Increasing it leads to an expansion of the contact area with steam, which increases the productivity of the device, but affects its dimensions and significantly complicates manufacturing. The recommended inner diameter of the tube is 9-13 mm.
- total length. Here again there is an alternative. A longer length increases the condenser area, but at the same time the resistance to flow increases, which slows down the speed of the process. It has been practically established that the optimal length is in the range of 1.6-2.2 m.
- Wall thickness. The smaller this parameter, the easier it is to cool the system, but the strength of the element decreases. The use of a tube with a thickness of 1-1.2 mm is considered normal.
The cooling compartment must ensure that heat is removed from the coil in a constant manner. In principle, cooling can be provided by ice, air or water flow. The most commonly used is water.
There are 2 options for submitting it. Is it a closed or open system.
- In the first case, the container is filled with cold water. Cooling occurs until it warms up, after which the coolant is replaced with a new portion.
- The second option is considered more effective, because cooling is provided by running water.
Step by step
The manufacture of the refrigerator is carried out in the following sequence.
- A metal tube of the optimal size is filled with sand to prevent deformation and is wound in the form of a spiral onto a cylinder with a diameter of about 30-36 mm with a turn pitch of 11-14 mm.
- The sand is poured out and the spiral is washed under running water.
- Next, the cooling compartment body is made from a metal or plastic pipe with a diameter of 76-82 mm. Connections for supplying tap water are installed on the compartment body.
- Then part of the coil is passed inside the compartment, the ends of which are hermetically sealed.
Both ends of the coil remain free, one for connection to the distillation cube or steamer, the other for discharging the finished product.
Anyone can make a distiller with their own hands. With the help of this device, the liquid is purified as efficiently as possible and then used for its intended purpose. The distiller removes various impurities from the liquid. Treated water does not even contain microelements. You can make hydrolates using a distiller, and evaporate essential oils from herbs in addition to water purification. A homemade distiller will differ in appearance from industrial devices, but the performance characteristics will be equal. The transition of a liquid to another phase state is called distillation. Condensation of steam can turn into liquid or into ice, this is the solid phase.
Distiller
The scope of application of the purified liquid is quite large:
- Distilled water is used in medicine to make medicines;
- in industry, treated water is used for various devices that can only operate on purified water;
- car batteries run on distilled water;
- This water is also used for domestic purposes.
- Some people take purified water in small quantities, but it is not advisable to do this frequently.
A self-made distiller has some advantages. This device is made from safe materials, which can effectively purify liquid from various impurities. The distiller does not require much energy to operate, and it is very easy to use. Water purification and supply can be adjusted automatically. The distiller may also have additional functions. There is no noise during operation of the device. But such a device also has disadvantages. The distiller can be large in size and you need to monitor it very carefully, since such a device will require the use of a gas burner, this is necessary so that the water begins to evaporate at a high temperature.

The necessary materials need to be collected and prepared to make a distiller yourself. You can easily make your own liquid purification device, but first you will need to familiarize yourself with the design. To boil water, you need a container, to cool the steam, you need tubes, and for processed moisture, you need a receiving vessel. This design of the distiller is the most primitive and can be done very quickly with your own hands. Liquid purifiers of a more complex design have various filters and additional elements; making such a device will not be so easy.
DIY distiller
Before you start designing a distiller. It is necessary to understand the operating principle of this device. An outlet tube is inserted into a container intended for boiling water, and the second end of the tube is attached to the receiving vessel. Water turns into steam when its temperature becomes too high. The steam begins to turn into water, passing through the tubes and cooling, it is this moisture that collects in the receiving vessel. A distiller works on this simple principle.
What is needed to make a distiller:
- You need to find a small diameter tube made of a safe material. It will be used to cool the steam. A tube made of copper or brass is most suitable for this.
- The container for boiling water must be airtight. An ordinary kettle can be used as such a container, but you will have to seal its spout. You also need to pay attention to the volume of the container.
- An ordinary glass jar can be used as a container for collecting purified water.
You will need various clamps, clamps, a rubber hose, and wire. And pliers will be needed as a tool. The stainless steel tube should be of high quality. It is important that the metal does not begin to rust or corrode. Due to constant moisture and high temperatures, the tube may be negatively affected. The device will gain high strength if you use high-quality material. There is no need to clean a stainless steel tube to remove limestone deposits. A non-working pressure cooker can be used instead of a kettle to make a distiller with your own hands. The pressure cooker seals tightly and hermetically, which is a huge advantage when making a liquid cleaner. In order to insert the tube into the pressure cooker, you will need to make a hole in the lid, but this will not cause problems. The work of making a distiller with your own hands consists of several stages. It won't be difficult to do it.

DIY distiller
The coil is made from a pipe, it is bent in the form of a spiral. Without much effort, you can make a spiral from a plastic pipe; making a spiral from a metal material will be more difficult. You can make your work easier and buy a factory-made coil; a soldering iron or welding will not be needed if you use this option. The pipe is connected to the containers using a clamp. A rubber hose is sometimes used for these purposes. Using a clamp or wire will help create a seal for the connections. It is worth remembering that the device may explode if there are plugs in it, so there should not be any. This completes the manufacture of a distiller with your own hands. The manufacturing process has some nuances, but in general making a distiller is simple.
It is necessary to take into account that all connections must be sealed. Also, do not forget that all elements of the device will be very hot during operation and should not be touched. It is necessary to follow certain rules and safety precautions when manufacturing and using the distiller.
The direction of the steam must be correct, it must flow from top to bottom. Thanks to this, the device will work more efficiently. The device must be kept clean, but it does not require special care. Before making this unit, you need to draw the correct drawing and only then start manufacturing. Calculations must be as accurate as possible and there should be no errors. Ordinary ice can be used to quickly cool the tube in which the steam condenses. The plastic bottle must be placed on the tube and secured, carefully sealing the inlet and outlet openings. If the plastic is heated strongly, the holes are well sealed.
You can also take a large saucepan, which will serve as a distiller at home. Small dishes are placed in it on a durable stand; it is advisable to use a wooden stand. The raw materials are placed in a large pan, the entire structure is covered with a bowl, which is placed upside down. Cold water is poured into the dish or you can put ice. This is one of the simple ways to make a distiller with your own hands.

If you need to make a distiller to obtain essential oils, then it is done as follows. A large saucepan is placed on the stove; a heat-resistant ceramic or glass container is placed in the saucepan. There must be sufficient space between the walls of the containers; the raw materials are placed in this space. Various plants, herbs, and flowers can be used as raw materials for essential oils. It is better to choose a large pan so that you can process large volumes of raw materials at a time. A smaller container located in the pan is filled with water so that it is pressed to the bottom. The raw materials from which the essential oil is obtained should not be higher than the container level, this is very important. To collect essential oils, place a plate on top of the container. She should press tightly against her. The plate should have protruding edges. The liquid must be brought to a boil and covered with an iron lid, then reduce the heat and continue to keep the container on low heat. You can put ice on the lid to cool it down. It is necessary to monitor the water level in the distiller so that it does not boil away; if this happens, then you need to carefully add new distilled water. This distillation takes approximately 3 hours. The essential oil is on top of the liquid after this procedure and must be removed carefully. The hydrolate remaining after essential oils can be used for various purposes. You can also make scented candles or soap from this water.
For many, it is necessary to purify liquids from various impurities, volatile components, hydrogen sulfide, chlorine, and heavy metals. The water must settle for at least eight hours before it is sent to the distiller. Then the sediment must be drained and the water condensed or frozen. Making a distiller at home is very simple, and all harmful impurities are removed from the liquid. The required amount of water must be poured into the pan and covered with a cone-shaped lid. It is necessary to prepare a clean container. After the water boils in the pan, droplets will begin to collect on the inside of the cone-shaped lid, and they need to be poured into a clean container.
Water can be of varying degrees of purification. Distillers became famous not so long ago; previously, water was purified from various impurities by boiling, a kitchen filter, bottled water and liquid purified by reverse osmosis are still pure. But the best purification is provided by a distiller; with its help, all harmful impurities evaporate from the water. Anyone can make a water purifier at home. There is nothing complicated in making a distiller with your own hands; you just need desire and a little free time.
The first home-made moonshine still was made so long ago that no information has been preserved about its inventor. They were able to distill other liquids already in the early Middle Ages. Then alchemists used the principle of distillation to obtain more concentrated essences and only then paid attention to the consumer properties of the alcohol-containing distillate.
General description and principles of operation
The first distillation apparatus was an alambik - a copper vessel with a gradually narrowing neck, turning into a tube for removing wine vapors. Such designs are still used to obtain distillate from wine. But grain is best distilled in units of a more advanced design.
The operation of a homemade moonshine still is based on the principle of evaporation of different liquids at different temperatures. At +75°C, ethyl alcohol and other light fractions of mash evaporate. At +85°C the evaporation of heavy fusel fractions begins. Water vapor appears at a temperature of about +100°C.
The mash is poured into the distillation cube, where it is heated to approximately +90°C. It makes no sense to bring it to a boil, because then water vapor will enter the final product, which will reduce its strength. To reduce the water and fusel content, heavy fraction traps are installed between the cube and the refrigerator. High-boiling liquids in a steamer condense faster than alcohol vapors, which reach the refrigerator and turn into liquid already in it.
To eliminate the light and harmful fractions, it is necessary to separate the first portion of the liquid coming from the coil: cut off the “heads”. After this, few harmful impurities remain in the heating mash, and a product suitable for consumption begins to flow from the refrigerator tube.

Device and design
A homemade distiller can consist of 2 blocks:
- distillation cube, or container for heating alcohol-containing raw materials;
- refrigerator, or coil, where alcohol vapor condenses.
From the refrigerator, the finished moonshine enters the storage container.
There are many improved units that are equipped with additional devices: reflux condensers, dry vaporizers, etc. All of them serve for additional purification of alcohol vapors from heavy fractions. The operating principle of any moonshine still design remains the same as in a primitive alambic.
The simplest moonshine still from a saucepan
Before you make a moonshine still from a saucepan with your own hands, you need to purchase additional materials that will be required to remake the container:
- several clamps (4-6 pcs.);
- a piece of plywood slightly larger than the diameter of the pan lid;
- rubber tube;
- a fitting for a pipe with a diameter of ¾ inches and a piece of metal tube 30-40 cm long;
- copper tube with a diameter of about 1 cm, a length of at least 2 m;
- a plastic sewer pipe with a diameter of at least 5 cm and 2 plugs for it.
For a distiller made with your own hands from a saucepan, you need a container with a capacity of at least 20 liters, with a wide rim along the upper edge.
To prevent alcohol vapor from being lost, place a thin rubber or silicone tube cut lengthwise on the side of the pan. Cut a circle from plywood, the diameter of which is equal to the size of the lid. Make a hole in the center of the circle for the fitting. Construction clamps will help you press the lid while the device is operating: their lower jaw will rest on the bend of the side, and the upper jaw will rest on the plywood circle.
A hole is made in the lid for the fitting, and a part with a sealing gasket is screwed on. A straight metal tube is vertically connected to the fitting - a simple reflux condenser. Its upper end is connected to a thin copper tube using an adapter. Part of this tube will then need to be coiled. The diameter of the coil is slightly smaller than the purchased plastic sewer pipe with plugs.

After assembling the distillation cube, you need to make a refrigerator:
- make a hole in the wall of the plastic pipe;
- in the first plug make 1 hole closer to the edge, in the other - 2 holes on both sides of the center of the round part;
- pass the copper tube from the distillation cube into a plug with 2 holes and roll it into a spiral, leaving a free end for discharging the moonshine into the bottle;
- place the coil in a plastic pipe (the hole on it should be at the end farthest from the coil inlet);
- close the plug at the inlet, put another one at the outlet, with 1 hole into which to pass the end of the copper tube of the coil;
- connect a hose of a suitable diameter to the hole in the pipe wall, and install another piece into the free hole in the plug;
- Position the refrigerator at an angle, supply water from the water supply to the lower hose in the pipe wall, lower the upper pipe (in the plug) into the sink.
When cold water is supplied to the refrigerator container, alcohol vapor will condense in the coil tube. Warm water is discharged from the top hose into a sink or bucket.
Improved model
In the improved model there are no differences in how to make a distillation cube. But instead of a saucepan, you can use ready-made containers with a lid seal: milk flasks, pressure cookers, multicookers, etc. All containers need to be slightly altered by installing a pipe or fitting in the lid to release alcohol vapor into the tube leading to the refrigerator.
In this case, the cleaning process is improved. The simplest reflux condenser is a vertical pipe, as in the previous device: high-boiling and other impurities condense on its slightly heated walls and flow into the cube. Sometimes twisted wire is placed inside the reflux condenser or ribs are welded on, which create additional area for trapping heavy fractions.
Another improvement is the steam tank. It serves the same purpose. There is nothing complicated about how to connect a moonshine still through a steamer, even at home:
- make 2 holes in the lid of a simple glass jar;
- 2 tubes are tightly inserted into them, through which steam will flow from the distillation cube;
- getting into the jar, heavy fractions condense on its walls, flowing to the bottom, and saturated ethanol vapors remain volatile and, due to the pressure created in the container, go into another hole with a tube.

Sometimes home craftsmen install 2-3 steamers connected in series, achieving an even higher degree of purification of moonshine. A type of device is a bubbler.
The design of the latter involves the passage of steam bubbles through the liquid. The inlet pipe is made longer, almost to the very bottom of the can. The outlet protrudes 1-1.5 cm above the inner surface of the lid. It is important not to mix up the hoses when connecting: steam from the distillation cube enters the long tube, and goes to the refrigerator through the short one. If connected incorrectly, the hermetically sealed glass container will be torn apart by steam pressure.
All-metal device of block construction
Anyone with skills in working with metal can assemble a moonshine still from copper with their own hands, using the principle of a block system. This design involves installing a single compact block on a hermetically sealed lid, in which a reflux condenser and a refrigerator are already located, and if necessary, additional filters such as a steamer or bubbler can be added.
The design of a moonshine still of this type is not particularly complex, since its main components remain the same. When trying to independently assemble a block unit, you can use the circuits of industrial distillers (Magarych, Mercury, etc.), in which the coil and reflux condenser are located in a single block installed on the lid of the mash tank.
- Magnetic storms – schedule for September
- Pisces horoscope for the last week of February
- Days of special remembrance of all the dead: calendar
- Horoscope - Pisces Health horoscope - Pisces
- Examples of the use of the word intelligence in literature
- What is the military police and what are their powers?
- “Danger of direct collision”: who will get the oil fields of Deir ez-Zor