Ways to hide pipes in the bathroom
 Live Journal
 Facebook
 Twitter
Modern and high-quality repair is beauty in everything. To achieve this, during the repair it is necessary to hide the pipes in the bathroom. But for this you need to follow some rules in order to do everything correctly.
What should be remembered?
Before you start, remember these simple rules:
- The minimum number of pipe connections is the key to success. This is achieved through proper planning of wiring and equipment placement.
- It is equally important to make small hatches so that the valves, taps and counter are always at hand.
- It is recommended to use joints made of the same material as the pipes, with sufficient safety margin.
Wiring blocking rules
It is important to take into account the specifics of each room and the type of wiring. But how to hide the pipes in the bathroom in the wall so that it is safe and in the future they do not start to leak? If the wiring is easy to get to, then, accordingly, it is easy to make repairs. Immured pipes, including sewer pipes, are difficult to repair in a screed or wall, since you will have to drill holes to access them.
Allowed for immuring:
- Steel pipes with welded joints.
- Brazed copper.
- On metal-plastic pipes there are press fittings that are crimped with construction tongs.
- Press fittings under cross-linked polyethylene.
Prohibited for immuring:
- Threaded pipe connections.
- Threaded type fittings, which are assembled using keys on metal-plastic components.
The Best Ways to Seal Water Pipes
Preparatory activities
The most common ways to hide pipes in a bathroom are:
- Wall.
- Screed.
- Drywall.
If it was decided to remove pipes into a wall or screed, then before that it is necessary to plan everything and take into account many details, draw a wiring diagram, determine the number, diameter and type of pipes. The fewer bends, turns on the pipes, the longer their service life will be.
Before drawing up a diagram, decide on:
- route and pipe diameter;
- the type of walls, whether they are allowed to be ditched or not;
- elements and technical characteristics of the screed.
Wall
Before you hide the pipes in the bathroom into the wall, you need to start chasing (creating recesses) of the walls. It is forbidden to horizontally ditch walls if they are panel type or brick with a width of half a brick. Otherwise, cracks and chipping may occur. Strobs are usually made with a grinder, after which it is necessary to expand the space in the places where the cuts are made with a chisel, chisel, sledgehammer or hammer. To get to the adapters and control valves, well boxes are being built.
Screed
The main advantages of this method are convenience and practicality. There is no need to chisel walls, and water and sewer pipes are laid along the shortest route.
Proper pipe laying involves the full capacity of the pipe in the screed and another residual layer to seal and level the surface. We must not forget about the thermal expansion of pipelines, this can be avoided by using the corrugations in which they lie. For small rooms, this rule is not mandatory, but it is not recommended to use hot water until the screed is completely dry.

If it is planned to make an electric underfloor heating, then pipes are laid around the entire perimeter, however, if it is possible to lay a layer using tile-type glue, wiring is not allowed around the perimeter.
Drywall
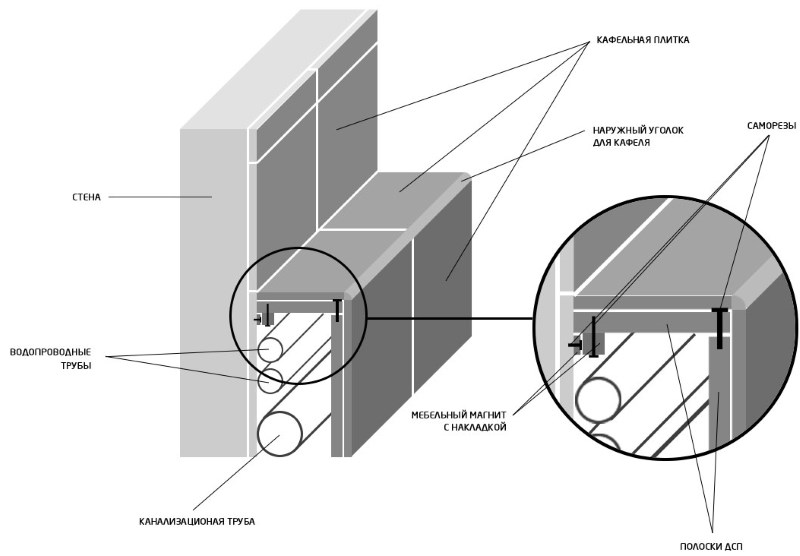
How to close the pipes in the bathroom with drywall? A box is one of the best ways to disguise them. But, alas, this method is not always appropriate in small bathrooms. Under the blocks it is possible to hide both water mains and a sewer pipe.
At the time of purchase, it is advisable to consider a moisture-resistant drywall type.
When using rack profiles, please note that it is forbidden to lay pipelines inside them, otherwise it is possible to spoil the surface of water communications. Always measure the distance from the walls to the pipes and record or photograph when you lay the pipes so that there are no problems in the future.
An easy way to sew pipes under drywall
The following will describe a relatively easy way to sew up pipes in a bathroom. The main advantages of this option are low cost and ease of installation. It is especially appropriate to close up pipelines in large bathrooms and in rooms where a major overhaul begins and it is possible to determine all the nuances in advance.
When using steel pipes, they are cleaned of the old paintwork and applied fresh. In addition, you should plan the future location of waterways, take into account the thickness of the finishing material and walls, and acquire tools and materials.

Before closing the riser in the bathroom and pipelines, build a frame, following this pattern:
- Using a level and a plumb line, you need to mark where the future wall will be.
- Fasten the profile with dowels according to the marked marks.
- Fasten the rack-mount profile with screws.
- Transversely reinforce the structure with crossbars.
Having dealt with the frame, we will begin to sheathe it with plasterboard in the following sequence:
- Prepare stock material.
- Fasten the sheets with self-tapping screws.
- Cut off the excess parts of the sheets with a jigsaw or saw. If the length is insufficient, do not allow the joint to coincide with the transversely fixed crossbars.
- Make an inspection hatch and holes for pipelines.
- Unnecessary slotted holes located between the ceiling, floor and walls should be foamed.
- Mount the hatch door so that it is possible to reach the riser and valve.
- Outside, cover the blocks with putty, and glue the joints with a sickle.
- After the putty dries, sand and prime.
- Take care of the exterior.
Now it has become clear how to close the pipes in the bathroom. But, so that later there are no difficulties, and the repair is of high quality, never forget about the reliability of the entire structure when you are engaged in piping and sealing. Also consider all the nuances: the specifics of the premises, personal wishes and financial capabilities. By following the recommendations and doing the work carefully, you can achieve good results.
- How to make a drain in the bath with your own hands
- Water ball valves: types, classification, device and principle of operation
- Sewerage in a private two-story house - scheme
- Piping in the bathroom: diagram and installation principle
- How to hide pipes in the bathroom with your own hands
- Repair and replacement of drain fittings of the toilet bowl
- Plastic pipes for sewerage in a private house: reliability and quality