Self-connecting the washing machine to the sewer - 3 common options
 Live Journal
 Facebook
 Twitter
This article was written for those who are ready to connect the washing machine to the sewer with their own hands. This decision is certainly worthy of respect, but it has its own nuances. I will tell you about 3 options for implementing this simple task.
Preparation is the key to success
The drain connection is important, and we will talk about it in great detail, but first, I will briefly tell you how to install the washing machine.
Of course, each new unit has detailed instructions, I will not retell it, but only outline the most important, fundamental points:

- If the car was brought into the house from the cold, give it a couple of hours to warm up to room temperature. Modern electronics are quite moody and can malfunction;
- Any new unit of this size is equipped with various types of seals and supports. They are needed so as not to damage the equipment during transportation. In the washing machine, in addition to the cardboard box itself and the foam seal, there are often several supporting wooden bars at the bottom, such as a mini-pallet. So you need to completely remove it;
- It doesn't matter if you bought a front-facing or vertical machine, the working tank in these units is, figuratively speaking, in a suspended state. And so that these suspensions do not break off during transportation, the tank is fixed with several re-bolts.
They must be unscrewed, otherwise the device will break down at the first start and the warranty will be invalid, since this moment is stipulated in the instructions. By the way, the instructions must contain a diagram with the locations of these bolts. The holes from the bolts are plugged with plugs that come with the kit;
- The socket must be, as they say now, of the European type, that is, with grounding;
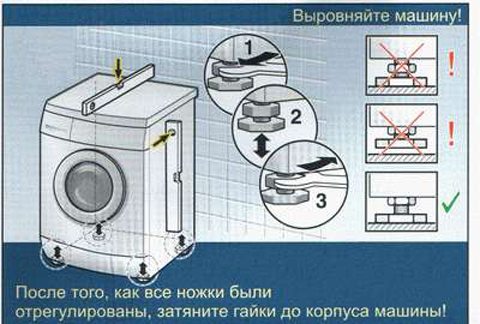
- At the last stage of preliminary preparation, the legs are screwed in, and the apparatus is positioned clearly along the horizon. It is desirable to exhibit using a level.
Do not rush to throw away everything that you removed from the device during preparation. This is especially true for the re-bolts for fixing the working reservoir. After all, perhaps the time will come and you will need to transport it somewhere again.
Since we have to deal with plumbing work, then we need to prepare the necessary minimum of tools.
As a rule, any good owner always has this minimum somewhere in the pantry.

- You will definitely need pliers and a pair of high-quality screwdrivers, cross and straight;
- The above mentioned re-bolts, in different models of washing machines, may differ in the configuration of the heads. Therefore, if you do not have a complete set of keys, it is better to inquire about this moment in the store and immediately buy at least 1 of this key;

- If a capital drainage installation is planned, then it may be necessary to cut the sewer pipes to size. Professionals use a pipe cutter for this, but personally, when I faced such a problem, I cut the pipes with a hacksaw for metal;
- Of course, all the parts in the kit come with gaskets and seals, but I always recommend that you additionally coat these seals with silicone sealant. You don't need to spend money on a large construction tube with a gun, a small tube is enough.

Drain connection options
Now in stores, for washing machines, you can buy drain hoses of different lengths. So I do not advise you to buy a hose that is too long. The fact is that the pump that pumps the drains is optimally designed for the length of the hose that comes with the machine.
The relatively safe maximum is 3m. If you put the hose longer, the pump can quickly burn out.
Option number 1: for the lazy and in a hurry
For people who are absolutely far from plumbing, who are in a great hurry to connect a washing machine, there is the simplest way that does not require any financial and labor investments. Now all caring manufacturers complete their units with a semicircular nozzle on the drain hose.

You just need to take this nozzle, put it on the edge of the drain hose and simply throw this "hook" over the side of the sink, bathtub or toilet bowl. But in the literal sense of the word a connection, this option cannot be called it rather an alternative way of draining.
In addition, it has a number of unpleasant disadvantages:
- With constant, active use of the machine, your snow-white plumbing will need to be washed often. After all, drains with detergent eaten into acrylic or enamel pretty quickly;
- Small bathroom sinks may not be able to withstand the high pressure and volume of drains. And while you, for example, watch TV, dirty water from the sink will pour out onto the floor;
- During draining and spinning, the pump works in jerks and it is possible that, due to these jolts, the light plastic hose will simply jump off the edge of the plumbing. Plus this hose can be helped by children or pets;

For those who are currently using this drainage method, I can recommend tying a plastic nozzle on a hose to a faucet in a bathroom or sink with a chain. The attachment has a special hole for this attachment.
- Do not forget that while the wash is in progress, you will, at least, be very uncomfortable or even impossible to use the plumbing for its intended purpose;
- And then, it's just not pretty.

I think you are convinced that this simple and quick method is only suitable as a temporary option. For those who are used to doing everything conscientiously, I propose to consider the following two methods.
Option number 2: connection to a siphon
Connecting your washing machine to a siphon under the sink isn't much more difficult. To do this, you only need to buy a mixer with an outlet for such a drain and a small tightening metal clamp three-quarters of an inch. Moreover, now most mixers already come with such a pipe.

You will need to remove the plug from the branch pipe and lubricate it with silicone. Then pull the end of the drain hose onto the branch pipe, with the clamp fitted in advance and tighten the clamp with a screwdriver or pliers.
But there are a couple of drawbacks in this way of inserting, although they are not as radical as in the previous version:

- Firstly, when the water is drained, a loud gurgle will constantly be heard from the sink, and nothing can be done about it. You may not believe it, but from my own experience I know that there are people who are very annoyed by this;
- Secondly, it is desirable that the diameter of the drainage pipe is at least 50 mm. The fact is that in the kitchen, according to modern standards, it is allowed to install a drain with a diameter of 40 and even 30 mm. And with such a volume, when the water is discharged, your drains will rise, and after leaving, leave a dirty sediment at the bottom of the sink.
Option number 3: tie-in to the sewer
Connecting the drain of the washing machine to the sewer directly is considered perhaps the most correct solution. But with this option you have to tinker a little. If you or the person who installed the sewerage system in your house pre-installed a pipe with an extra branch under the drain for the machine, then everything is simple.

You need to buy a rubber O-ring and remove the plug from this branch. Then lubricate this ring with silicone and insert it into the sewer pipe. Further, the edge of the drain hose from the machine is inserted into the central hole of this O-ring, only you need to insert it to a depth of no more than 50 mm.
If there is no extra branch from the sewer pipe, then you will have to buy a plastic tee in which this branch is and install it yourself. Do not be alarmed, it is not scary.
As a rule, the sewer line that goes to the bathroom and kitchen has a diameter of 50 mm. Next, you will need to decide where exactly the tie-in will take place and replace the tee.

That is, you disconnect the siphon pipe, pull out the old pipe, change the rubber gasket and insert a new tee into the place of the old pipe. Naturally, after that, put the drain from the siphon in its place and, using the technology described above (through the rubber ring), cut the drain of the washing machine into the sewer.
Important little things to know
To begin with, the hose from the machine should not lie on the floor. On the back side, in the upper corner of almost any machine, there is a special ring or hook on which the hose should cling after exiting the unit. And from there, the drain is sent to the tie-in into the sewer.
The edge of the drain hose, no matter if you hang it on the bathroom or embed it in the sewer in another way, should be at least half a meter from the floor level. This requirement is mandatory for all units that do not have a so-called check valve.

Many newer models are already equipped with this valve. For all other devices, you need to buy and install it separately. Don't worry, the price of this important detail, even for the most greedy traders, does not exceed 100 rubles, and if you walk around the market, you can find it for 60 - 70 rubles.
Now there are several types of such valves. Personally, I prefer to take models with a locking ball. Below is a general diagram of such a mechanism.

Most often, these valves are used for direct tapping into the sewer pipe. But there are fixtures for mounting next to the siphon. Moreover, in this case, it is absolutely not important at what level this tie-in occurs, here you can connect to the sewer pipe even at floor level.
I had a case when a friend bought a new washing machine. And he inserted the drain hose into the same place where the old machine was cut, that is, into the sewer outlet located under the bathroom.
The old device worked with this, but for the new one I had to buy a separate check valve. Otherwise, the water from the working tank would immediately go down the drain. Agree, it's easier to pay a maximum of 100 rubles for a valve and put it on in a few minutes than to make a separate new conclusion.

There is a common misconception that if you bend the drain hose of the washing machine in the shape of the letter "S" and fix it like that, you can do without a check valve. Do not believe it, you will simply make an extra water seal, it won’t get any worse, but it’s better too.

Conclusion
I told you about the options that are designed for different professional skills and financial capabilities. Now you have the right to decide for yourself what suits you best. In the photo and video in this article, this information is shown clearly. If you still have questions on the topic, write them in the comments, I will help as much as I can.

- How to make a drain in the bath with your own hands
- Water ball valves: types, classification, device and principle of operation
- Sewerage in a private two-story house - scheme
- Piping in the bathroom: diagram and installation principle
- How to hide pipes in the bathroom with your own hands
- Repair and replacement of toilet cistern drain fittings
- Plastic pipes for sewage in a private house: reliability and quality