How to hide (close) pipes in the toilet
 Live Journal
 Facebook
 Twitter
Our comfort is provided by engineering systems, and their component is pipelines, so pipes in our home are inevitable. But their appearance, even the new ones, only changed, is far from the most attractive. Therefore, there is a natural desire to hide them. We will talk about how to hide pipes in the toilet today - it is in this small room that there are usually the most of them.
You can hide the pipes in the toilet in different ways, but most of the methods involve creating walls from different materials. If you have chosen this method, it is better to replace old pipes with new ones in advance - both plumbing and sewage. It’s definitely not worth hiding old communications behind the wall, it’s better then to choose a lightweight option that will provide access to pipes at any time.
How to make a drywall box
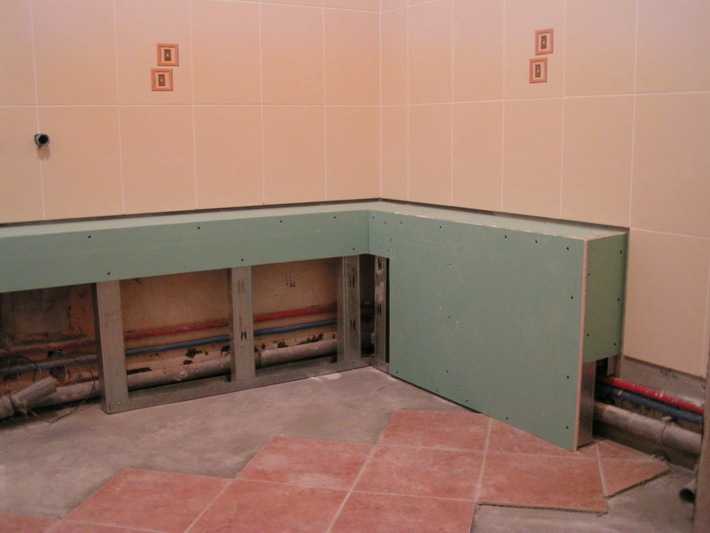
You can close the pipes in the toilet by making a drywall box. This is perhaps the most popular solution. This is because the technology is very plastic, you can hide pipes of any configuration. Another nice bonus is multiple finishing options: lay tiles on glue, level the surface with putty, then paint or paste wallpaper.
The pipe box in the toilet can be vertical or horizontal - this does not change the essence
Peculiarities
If you have chosen to close the pipes in the toilet, there are several points that you need to consider. The first - to all key nodes - counters, filters, etc. you need to have access. It is desirable that access to stopcocks be quick. There are several options:
- make one panel folding or turning (hinged);
- part of the panel can be removable, fastening with a pair of self-tapping screws and / or magnets;
- put a hatch (plastic or invisible hatch for tiling.
You can, of course, make the structure non-separable, but if necessary, you will have to break everything, then restore it, and problems happen even with new pipes.

The second - the tile, if you finish it, it is better to glue it on a special glue, and not put it on a mixture of cement and sand. A thinner layer of glue is required; its mass is less. Under such conditions, it will be easier to remove / lift the cover.
Work order
First, decide what your box will look like. It is advisable to plan everything so that it not only closes the pipes, but, if possible, also carries a functional load. For example, if the pipes run down along the wall on the right or left, which happens if it is installed in the toilet, the box can be made a little higher, and various necessary little things can be placed on its upper part.

If you close the risers that run in one of the corners behind the toilet (the layout of standard Khrushchev toilets), it makes sense to close not only that corner, but to sew up the entire wall, making a locker out of it. Shelves can be open or closed (with or without doors), but in small apartments this is very convenient.

Having decided on how your box will look like, markings are applied to the walls and floor. Then take galvanized drywall profiles. Down and on the sides there is a bearing profile - PN (UW) - without curved sidewalls. Since the structures are small, a profile of 50 * 40 mm is sufficient. A rack-mount profile goes to the jumpers - PS (CW) - its width is also 50 mm, and the depth, if desired, can be small.

Jumpers are cut to size (with scissors for metal) and fastened with self-tapping screws. With a small distance - up to 50 cm - one from each end is enough, with a larger beam, put two. The installation step of the racks is about 60 cm, the jumpers are approximately the same step. In the place where the door is attached (if provided), a reinforced double profile is placed.
The assembled frame is sheathed with drywall, cut to size. They are fixed with small self-tapping screws with a screw at the end (TEX 3.5 * 9.5 mm). Fasteners are installed around the perimeter and in places where jumpers / racks go, the step is 20 cm. When twisting, you need to make sure that the hat is a little buried in the drywall, but does not break through the cardboard.
After sheathing, finishing work comes, and they depend on the chosen finish. For painting and wallpapering, the box is completely puttied; for laying tiles, only the screw heads are covered with putty.
What else can you make a box for pipes in the toilet
Not everyone likes to work with drywall and profiles for them. In this case, the frame can be assembled from dry wooden bars. If desired, they can (and in principle should) be treated with antibacterial compounds - so as not to rot.
Instead of drywall, you can use OSB, moisture-resistant plywood or flat asbestos-cement sheets. All these materials can hardly be called 100% environmentally friendly, but many people are more accustomed to working with them. All of them are moisture resistant, easy to process, so a good option. By the way, tiles fit perfectly on asbestos, better than on all other materials, including drywall.
Make the back wall in the toilet out of plastic
You can hide pipes in the toilet behind plastic panels. This way to close the pipes in the toilet is the cheapest, but also the most short-lived. The plastic is easily pressed through, so you have to be careful.
Now a little about aesthetics. If the wall decoration in the toilet is planned from the same plastic, then there are no problems at all - everything is in the same style. If the wall decoration is different, there are two ways out - find plastic panels that are similar in color or play on contrasts by adding a couple more details of the same color.

Very well chosen colors - exactly under the tile
It is easy to sheathe the pipes in the toilet with plastic panels. First, the frame is assembled, but already wooden. It is attached to the walls and floor with dowels. Since the design is small, it will hold on to nails perfectly, large loads are still not expected - plastic can only withstand very little weight.
Starting profiles for plastic panels are attached to the wooden frame, and segments of panels of the required length are inserted into them. They have a thorn/groove type connection and are installed without gaps. The plastic is attached to the frame with staples and a construction stapler. To provide free access to pipes for repair or maintenance, doors are made of plastic in the box / wall. In this case, you can install factory-made plastic hatches - they are light and fit perfectly into the style of rooms finished with plastic panels. Those who don’t like this option can make the doors themselves by making the frame also from wooden planks and sheathing them separately with plastic. There is another option - to leave a few strips loose and, if necessary, remove them.

Finishing the box and the ceiling with one plastic is a good idea
When buying, choose wall plastic panels (there are also ceiling panels) - they have thicker walls, it is more difficult to push through. If you plan to use the upper surface of the box, it is better to lay a sheet of plywood (moisture resistant) under the plastic.
Roller shutters in the toilet
The easiest way to close the pipes in the toilet is to install plumbing shutters (blinds, shutters). This option is ideal if you need to cover the entire back wall. Guides are installed on the sides, a bobbin with slats is attached on top, that's all, the installation is over, you can use it.

The disadvantage of this option is the price of roller shutters. She bites. But at any time you can raise the roller shutter that covers the pipes, and you can repair it. There is another way to reduce the price - not to put the roller shutter from floor to ceiling, but to cover only the central part with it, where all the connections are.

Even if it is not necessary to close the entire wall, but only part of it, you can build a wall of plasterboard or wall foam blocks and attach roller shutters to this wall.
How else to hide the pipes in the toilet
In small apartments, every centimeter of space counts and just closing at least some part of the room is a real luxury. Then you can close the pipes by making a utility closet. For this, narrow toilets in Khrushchev are ideal.

Planks are attached to the walls on both sides, and hinged doors are attached to them. Shelves are assembled in place. They can be made removable to provide access to pipes if necessary.
What are doors made of? The easiest option is from laminated chipboard, but you can order them from MDF. They will be made according to your size by the workshops that are engaged in the manufacture of furniture. If you also choose a color to match the main finish or make a wardrobe of the same color as the front doors, you will get a good interior.
A very budgetary way to make the back wall in the toilet attractive is to use horizontal or vertical blinds. There is no trouble with installation at all, the only thing is that you need to find the right size. Then nail the bar to the ceiling, and attach the blinds themselves to it.

Blinds in the toilet on the wall - an inexpensive way to hide pipes
When choosing, it is also important to guess the color - either match the tone, or use contrast. And by the way, plastic horizontal blinds will be more practical in this case - they do not bend if you accidentally touch them. In general, a good option in all respects.
- How to make a drain in the bath with your own hands
- Water ball valves: types, classification, device and principle of operation
- Sewerage in a private two-story house - scheme
- Piping in the bathroom: scheme and principle of installation
- How to hide pipes in the bathroom with your own hands
- Repair and replacement of drain fittings of the toilet bowl
- Plastic pipes for sewerage in a private house: reliability and quality