Wire frame. Modeling wire trees

 Live Journal
 Facebook
 Twitter
The tree is central to many myths and legends, embodying the ideal world order and symbolizing life in all its complexity and diversity.
In Slavic tales, the World Tree grows on the mysterious Alartyr-stone, on the island of Buyan, in the middle of the sea-ocean. In Scandinavian myths, we see the evergreen Igdrassil, which serves as the basis of all that exists and connects the nine worlds. In Celtic legends, you can find the Tree of Life, which is the center of the universe and the gateway to the other world. And for many other peoples, the tree plays a similar role.
Therefore, the image of a tree is considered a strong talisman that helps you find your place in the world and harmony within yourself.
I propose to make such a talisman decoration with your own hands, using copper and semi-precious stones. It will turn out not only a symbolic but also a beautiful thing.
- copper wire: a piece of about 20 centimeters thick (1.2 mm in diameter) and five pieces of wire thinner, about 50 centimeters long;
- a few beads made from natural stones (or any other material that you like);
- pliers;
- round-nose pliers;
- an anvil (or any metal bar with a flat surface, a piece from a dumbbell truly serves me);
- a hammer;
- a handy round object, the size of the rim for our tree (I have a glass vial, 4.5 cm in diameter).

Making a copper talisman tree
First you need to make a base ring. To do this, tightly wrap a piece of thick wire around something round.

Now we form the future suspension - bend the ends of the wire outside the circle with pliers.

The tips should be the same and about three centimeters long, cut them off. Something like this should happen.

We take round-nose pliers and create impressive "horns" on the tips, but not too large. Well, then we beat off our workpiece with a hammer.

Copper is very ductile and malleable, so we do not knock very hard, we hold the hammer evenly (if you hit with the edge of the hammer, a dent will remain on the workpiece). You can flatten the "horns" harder, but the ring itself is only slightly better, because then we will wrap it with a thinner wire.

We again take the round-nose pliers and bend the tips in half, so that the "horns" -curl are on the front side of the product.

The preparatory stage is over, we are starting to grow the tree. We wrap a piece of thin wire several times around the bottom of the ring, tightly and with effort. Leave the ends inside the circle.

We also wind the rest of the thin wires close to each other. It is better to make the number of turns different, so the roots of the tree will look livelier.

Now you can give free rein to your imagination. We make roots by twisting the wires together. First, in pairs, then we combine them into groups, then we twist everything together, forming a trunk. The roots and trunk can be additionally bent with round nose pliers to make them look more natural.

At the top of the trunk, we again separate the wires to grow the crown. First we twist thick branches, then more and more thin branches, bending them as we please. A tree can be slender or sinuous, rare or spreading, in short, your own, unique and inimitable.

Moving on to the leaves. Let's start with the topmost branch: string the stones on a wire, they should come close to the ring. To fix the branch on the ring, we wrap the wire tightly around it a couple of times.

We do the same with the second branch, it can be attached anywhere.

We also dress all other branches with leaves and fix them on a ring.

When all branches are secured, the final step remains. Using the protruding ends of the wire, wrap the entire ring around to close the gaps.

We move along the ring from top to bottom, making turns close to each other. When we reach the next branch, cut the wire, leaving a small tail.

We gently bend this tail with pliers to the wrong side.

The last, the lowest wire will fit in turns close to the roots.
That's all, the tree is ready. I wish you warmth, harmony and new ideas!
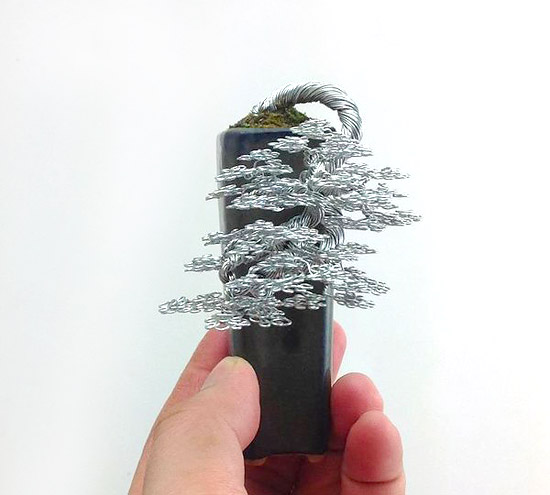
The amazing beauty of handicrafts made by American artist Ken To from wire of various colors aroused my admiration and a keen desire to try and do something like this myself.
Starting with an interest in the material and experimenting with it, Ken's passion for making wire crafts has grown into a very successful business.
Bonsai art originated in ancient China as one of the ways to emphasize and preserve the beauty of nature and the unity of man with it. The painstaking work of a gardening artist who has been shaping and pruning a tree over many years turns a bonsai into a work of art. Such a work has a deep philosophical meaning and even poetic lines are encrypted. The unity and struggle of man with nature, the inflexibility of the spirit before the elements, sublime love - everything is hidden in a small tree.

The Japanese, who are recognized as masters of bonsai, have borrowed this amazing art, developed it and gave it a more sophisticated form, filled with deep meaning.
The cultivation of bizarre miniature trees has become a real cult and gained immense popularity all over the world.

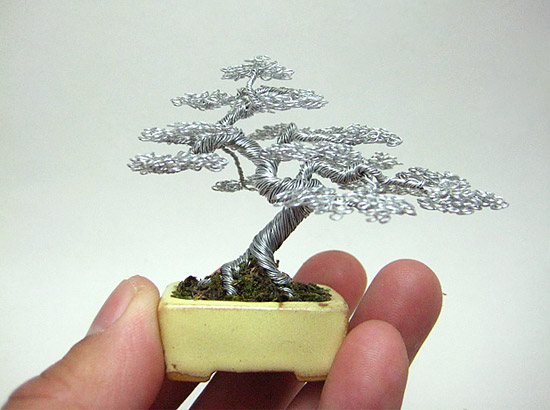
Making bonsai from wire with your own hands, of course, does not take as many years as you need to grow a real tree. This process is not long, but very creative and painstaking.

Let's figure out how you can make bonsai from wire. Wire is a very interesting material. Wide application in industry and practical in everyday life does not exclude the use of its rich decorative possibilities. There are many types of needlework, where this wonderful material is involved in one way or another. Various materials: steel, aluminum, stranded, brass, from which the wire is made and the coatings sprayed on and applied to it, make it possible to make complex and multi-colored compositions. And its flexibility is beyond competition.
To make such interesting works we need:
- brass, copper and aluminum wires 0.3 - 0.8 mm thick.
- pliers and round-nose pliers;
- side cutter;
- tweezers;
- glue gun;
- small pots. They are specially made for Ken. We can look for suitable molds or small pots for seedlings, which can then be decorated or simply painted.
- floristic artificial moss.
To make such a composition, you should roughly calculate the length of the wire segments. Depending on the complexity, one job can take up to 6 meters of wire.
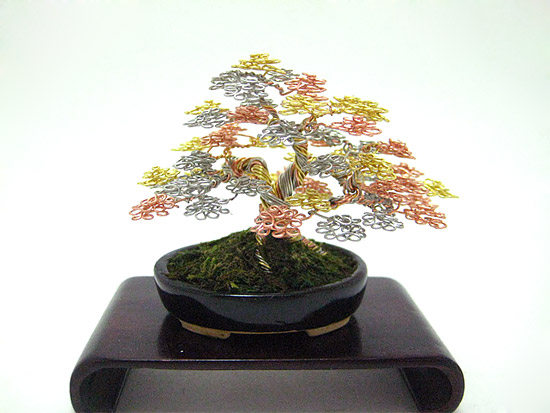
Cut the thinner wire into equal lengths. They should be 3-5 times longer than the final piece. If you plan to make a multi-color composition, then you should immediately add the desired colors. Twisting the wire just by hand, with the help of pliers, round-nose pliers, we begin to form roots, trunk, twigs, leaves and even flowers.
We wrap the roots, trunk and thick branches with thicker wire, giving the tree a more fancy look.

Compositions can be as tiny, slightly larger than a thimble, or more impressive.

Although such a wonderful bonsai thing is already quite independent and complete, if desired, this technique allows you to decorate twigs with leaves or flowers from beads and just beads made of glass or semi-precious stones.
The tree in philosophical teachings personifies life itself in all its manifestations. A flat or three-dimensional image of a tree, placed in a living room or workroom, gives the people in it confidence in the future, health and well-being. We will tell you about how to make a tree out of wire with your own hands in the article. When making wire trees, you will need cardboard, a small container of any type, paint, gel polish, a piece of foam, a material for creating a landscape cover and glue.
Workshop on making wood from wire
- This step is not required when making crafts, but if you want to make a more believable tree, you can sketch on tracing paper to correct the shape in the process.
- We take a piece of thick wire in length 2 times more than the planned height of the tree. We bend the wire in half, forming a loop at the bottom. Taking a small flower stand with two holes, we thread both ends of the wire into them.
- If there are no holes in the container, then you can use a piece of foam plastic around which the wire is wrapped. Later we glue the foam to the bottom of the container.
- Twist the ends of the wire together. We form large branches from the same thick wire, screwing them tightly to the trunk.
- For the manufacture of small branches, we use a wire of a smaller diameter. By adding branches to the tree, we place them at our discretion.
- We fasten the small branches tightly. Adjust the trunk and branches by bending them to give the tree an attractive shape.
- We wrap the tree with aluminum foil. We try to lay the foil more tightly.
- Well laid foil imitates the texture of tree bark.
- Cover the bark with brown paint. Let the paint dry. Clean the bark with a dry brush to make it look more natural.
- Draw and cut out the leaves on green paper.
- Poking through the leaves, we plant them on wire-branches. We fix it with liquid nails.
- We cover the leaves with green paint, without trying to paint over without gaps, so that a lighter green tone can be seen here and there.
- We glue the foam to the bottom of the container. We close the bottom with crumpled newspapers.
- Fill with plaster or make the top of the soil from fabric.
- We paint and glue the shavings with PVA glue.
- Our tree is ready!


Leaves can be made from other materials: beads, coins,
Hello dear craftswomen and readers. Today, making handmade trees has become very common.
The tree will perfectly decorate the interior, or be suitable as an unusual and exclusive gift. They are made from various materials: paper, beads, cardboard, etc.
But, unfortunately, not everyone has the right materials. You can make a tree from simple and affordable things that many have, or are inexpensive.
This master class is based on 2 materials: wire and nail polish to make a tree with your own hands.
For work we need:
- Nail polish.
- Thin wire.
- Thick wire.
- Side cutters (to nibble the wire).
- A round, straight thing (like a pen, pencil, etc.). In my case, this is a makeup brush.
- Dish liner or sponge.
- Plasticine.
- Vase.
- Alabaster.
In the beginning, we need a wire, side cutters, a makeup brush, nail polish and a sponge (or a backing, such as is usually used in grocery stores).

1. A wire is wound onto the opposite end of the brush. At the base of the brush, the wire is compressed with your fingers, it must be scrolled 3-4 times (depending on the diameter of the brush).
It turns out one circle (future leaflet).

2. You need to twist one more circle.

3. Twist the last circle to make 3 circles.

4. It is necessary to alternately put the circles on the brush, and gently pull the edge of the circle with your finger (or nail). As a result, you should get an elongated leaf.

5. Do the same with the rest of the circles. It turns out a shamrock. The diameter of the brush is 8 mm. You need to leave a leg 5 cm long. One shamrock takes about 14.1 cm of wire.

6. In a similar way, we make 2 more such trefoils. But in 1 out of 3 shamrocks, it is necessary to leave the leg slightly longer, about 7 cm (instead of 5 cm).

7. On a shamrock with a longer leg, wind up the rest in turn. 2. Now this element, which consists of 3 shamrocks, we will call - BASE.

8. We start with the first leaf (you can choose the color yourself). At the beginning of work, it is very important to adapt to an unusual process.
Having typed more varnish on the brush, we begin to draw it along the wire from the middle to the edge (it's easier this way than doing the opposite).

The main thing in the process: press the brush so that no voids form between the brush and the wire (otherwise the varnish will not go further and peel off); and draw from 1 edge to the other at a time. Only in this case it will be possible to make a film of varnish that will cover the wire.
We also do with the rest of the leaves.

9. When 1 coat of varnish has dried (about 2 minutes, depending on its composition), you need to apply another coat of colored varnish. The color will become richer, missing areas will not be visible (which stand out against the general background by being translucent).

10. The second layer dries longer than the first. Approximately 20 minutes. Then we apply 3 layers of varnish. Where the leaves are well painted over - transparent. And in places where there are defects, you need to paint over with another colored layer of varnish. You can do it in the reverse order: first apply a layer of clear varnish, and the other 2 - paint with color.

11. Best of all, after applying 3 coats of varnish, leave the product to dry overnight. And to paint in a room where everything is well ventilated.
It is necessary to prepare many of these base branches.

I ended up with 54 pieces of different colors. It is best to put such branches to dry in a substrate from food. Wire easily sticks into it. You can use a dish sponge. But sticking twigs into it is more difficult, and small pieces of sponge can sometimes fall out of it.
After the varnish is completely dry, you can start assembling large branches.
12. Take a wire about 60-80 cm long and fold it in half. Then fold it in half again. Tie 3 bases to it in turn. Then you need to repeat this action for 2 more large branches.

13. Similarly to the previous step, bend 80 cm of wire in half, and again in half. And wind 3 large branches on it.

14. From such branches (17 pieces) we collect the base of the tree. You should not try to make them fluffy, as this is an unnecessary action. Then, in the process of making the trunk, they will have to be pressed against each other, so that it is more convenient to work with plasticine.

15. Then take 3 pieces of thick wire and attach it to the trunk. This can be done with anything: glue, plasticine, wire, etc. We get a barrel made of wire, but as if empty - empty. It can be stuffed with paper or newspaper. And cover with plasticine on top.

16. On top of the plasticine, with a brush or hands, cover the trunk with alabaster. When working with such material, it is better to use gloves. It is sold in any hardware store and is inexpensive (about 20 rubles per 1 kg.). For all work 1 kg. alabaster will suffice.
17. We breed alabaster and fill the vase almost to the top (leaving about 4 cm). Immediately insert the barrel into the vase (alabaster hardens very quickly), and wait until it hardens (about 5-7 minutes, so it hardens, and the barrel cannot move in different directions). Paint the trunk brown.

18. The next step is very long and painstaking. All branches must be coated with plasticine so that the wire is not visible. Then paint over all the branches with brown varnish. The lighter the color of the plasticine, the easier it will be to paint over. Alabaster, which is visible from the vase, paint it green (imitating grass).

At the end of all work, let the varnish dry, it is advisable to leave it to dry overnight.
19. After the varnish has dried, you need to straighten all the twigs and leaves. It happens that the leaves are damaged and cracked, but another layer of colored varnish can be applied to this leaf.

The whole work took about 6 bubbles of nail polish (including the barrel). About 4 blocks of plasticine.
Thank you for your attention to the master class, I will be glad to receive your comments.
A wire sculpture in the form of a tree can be a wonderful decoration for your home. And it's very easy to make your own wire masterpiece to decorate your home, office, or give it to one of your friends. And in this article we will look at how to make two different wire trees with our own hands.
Making branches
You will need 7.6 m of 0.5 mm wire, which you need to cut into 10 pieces of 76 cm using wire cutters. You should also prepare 30 large beads. They are needed for decoration.
To make a tree from beads and wire with your own hands, take one piece and string a ball on it. We lower it to the center and twist the wire tightly, moving down from the bead by about 19 mm.
We string another one on one end of the wire. Bend and twist the wire around the bead. Scroll the wire 19 mm down and repeat the same steps with one more bead.
Form a chicken foot shape from the blank so that there are beads at three ends. From the remaining strips and beads, make 9 more such blanks.
Trunk formation
Twist the two branches together. To do this, cross them on top of each other and twist them together at the base of the beads. Do this with each of the branches so that you have five pairs.
Take one pair of branches and cross the other over it. Begin twisting the pairs together by adding the following details one by one. This will create a tree trunk.
At the bottom, twist the ends of the wire into a ball to help position the tree inside the pot.
How to put a tree in a pot
To place the tree in a pot or other container, add enough glue to the bottom of the container with a glue gun. Then place the wood in hot glue and press it to the bottom.
Hold in the desired position until the glue dries. Also, while the glue is hot, you need to put a layer of small stones on the bottom to give the tree more stability.
Add more glue to the first layer of stones and, holding the trunk, lay out the next row of stones. In this way, stack the stones in layers up to the very top of the pot.
Once the glue is dry, you can bend the wire branches to shape the composition as you like.

DIY wire tree for beginners: preparation
To create a beautiful wire composition, you need to prepare some materials:
- 4.5-5.5 m wire 0.3 mm;
- small wooden board (6.5x30.5x2.5);
- 2 nails (50-70 mm);
- a hammer;
- 2 clamps;
- nippers;
- table, art board, or other suitable surface.
Making the basis for the tree and preparing the workplace
Before making a wire tree with your own hands, you should form a base that will help in creating crafts. You can also use this base in the future to make other wire trees.
First, use a hammer to drive nails into a wooden board. Make the distance between them 1-1.5 cm wider than the height of your tree. We drive the nails one or two centimeters deep so that they do not stagger.
Cut off the nail caps with pliers. However, be careful! Their caps fly off very sharply, so as not to damage the eyes, it is better to wear safety glasses.
Having prepared your foundation for work, you should also take care of the workplace. To do this, use two clamps at the edge of the table to fix your board.
Wire winding
Having prepared the workspace, let's start creating the tree. With one end of the wire in your left hand, start winding it tightly clockwise around both nails.

Each circle you make will end up creating 2 branches, so consider how dense you want your tree to be. Be sure to end the wrap on a full circle. The ends of the wire left at the beginning and end of the winding should be on the same nail.
Fastening the wire
In this step, you cut one edge of the wire. This is to create a V-shape. Which will later become the trunk and branches of a do-it-yourself tree made of wire:
- Using your thumb and forefinger, pinch the part at the opposite end from the edges created in the previous step.
- Use a wire cutter to cut the piece next to the opposite nail from where you are holding the part. Be sure to cut all the wires. If you cannot cope with all the wires with your wire cutters, then cut them in parts. This should end up with a lot of little V-shaped pieces. Anything left can be thrown away.
Twisting the barrel
Using the V-shaped parts, you can start twisting the trunk for your craft - a tree made of wire - with your own hands:

Creating branches
Now that the trunk of the hand-made wire tree is ready, you need to add several branches:

Completing the craft
Once you've twisted the branches, you can shape your tree into the shape you want.
When turning and bending the branches, it is important to try to make smooth curves to give the craft the shape of a real tree. Your task is to make the most believable plant.
After you have made a beautiful frame, you can, by analogy, create a tree of a different shape or size.
There are also several ways to change appearance frame:
- You can cover the crown of your tree with aerosol glue and sprinkle with foliage made of green colored foam.
- It is also permissible to stretch steel wool between the branches.
- We recommend using spray paint to create colored wood.
With a little imagination, it is easy to come up with a unique design for your little masterpiece.

You can also repeat with your own hands a wire made of wood from the photos presented in the article. Good luck!
- Pythagoras and the Pythagoreans. The doctrine and school of Pythagoras. Philosophy of Pythagoras In the philosophy of Pythagoras, the core was
- Complementarity principle
- The problem of consciousness in the history of philosophy
- Dualism - what is it in psychology, philosophy and religion?
- Topic of lecture subject and history of development of pathopsychology lecturer
- Goddess Demeter: all about her
- Development of ideas about pathopsychology in the pre-revolutionary period