How to make a paper tank templates. Making a tank model from thick cardboard

 Live Journal
 Facebook
 Twitter
The creation of various paper crafts has long become a popular activity among parents and their children. It came from the side of Asian countries, where since ancient times people have improved their skills in origami and crafts of paper figures. This kind of activity can be an excellent workout for both the baby and the parent.
In the early 90s, psychologists and specialists working with children noted the benefits of this type of activity for children. It develops motor skills perfectly. and the spatial imagination of children. If kids like to tear and wrinkle paper more, then older kids can instill a love of folding origami, which will later develop into creating unique figures using glue, threads and other secondary materials.
Paper crafts develop imagination... In addition, observing how a simple sheet is transformed into some beautiful model, analyzing the folds of lines and developing in this direction, you can improve your spatial thinking skills, which, of course, will be needed in geometry. There have been calculations that a larger percentage of mathematicians among people have argued that they were engaged in paper crafts as a child.
A voluminous homemade cardboard tank - colorful and quite realistic - is quite simple to do. Yes, and a wedge-heeled combat vehicle is not more difficult to make - the main thing is to carefully study the pictures with the image of the desired model, so as not to get confused in colors and details, and of course - follow our instructions and recommendations step by step.
Very often different models and instructions for making a paper tank with their own hands are recommended for boys. Not surprisingly, from an early age in a boy you can see a young commander who needs an army and equipment for his military strategy. This does not mean that girls should not create tanks - speaking about this, the child himself can choose the things that interest him. Only interest and curiosity will help you create a truly beautiful and unique figurine.
You should start with the simplest model that will suit many children who begin in this area:

The first model of the tank is ready! It turns out to be small and is unlikely to be able to claim originality or uniqueness, but outwardly it looks very good and will surely please the baby. And most importantly, this model does not require special skills and is not difficult to perform.
Gallery: paper tank (25 photos)


DIY paper KV-1
Making a model of this tank in rows is more difficult and takes much longer than a regular one, but the result also guarantees much more beautiful and suitable for the original. On the Internet you can find countless different ready-made models for making this particular paper figure, but, of course, you can try to assemble and create it yourself. It should be borne in mind that this model requires a huge supply of nerves and patience, attentiveness and accuracy. KV-1 is usually started by people with some experience..

Making tanks out of paper is not such a difficult task., as it might seem at first glance. Having a sufficient amount of patience and perseverance, one can go beyond the Tiger or KV-1 models, but go for more complex types of tanks. The main thing is to get pleasure from the process and rejoice in each successfully received model.
To make an incredibly beautiful, interesting and original tank, you need to try and devote a sufficient amount of time. In this article we will look at: how to make a paper tank in the style of modular origami with your own hands.
You will need: sheets of colored paper, scissors, 6 matchboxes, glue, a round blank for the base (for example: a bottle of perfume).
Master Class
- Add the modules according to this diagram. The whole tank will need 1408 modules.
- Build a circle of 24 modules, then add 24 modules to the second row of the circle and 24 modules to the third row.
- Place 12 modules in the center.

- Make a total of 7 wheels in this way - 6 for the tracks and one for the tower.
- Make a tank a caterpillar by preparing 204 modules - the width of the caterpillar is 6 modules the length of the almost complete circumference of the caterpillar is 34 modules.
- Place the 3 wheels in the nearly complete circle of the track, then continue with 56 modules to finish it.

- Make the second caterpillar in the same way.
- Make a tower for the tank in this way: make a hole in 4 matchboxes as shown in the picture and glue them together.
- Paste the base of the tower with colored paper.

- Insert a round blank into the hole and glue 2 matchboxes as tower supports.
- Assemble the front of the tank from 42 modules - 7 modules wide, 6 modules long.
- Assemble the back of the tank from 30 modules - 6 modules wide, 5 modules long.
- Glue the front and back to the base of the tower.
- Glue the tracks.
- Take the seventh wheel and add 192 modules - 24 in length and 8 in width. Don't forget to leave a hole for the cannon.

- Assemble a cannon from 36 modules - 3 modules wide, 12 modules long.
- Glue the cannon to the tower.
- Attach the tower to the base, it can rotate.
Such a tank will undoubtedly attract everyone's attention. The main thing is to be patient in creating modules, and building a tank will only bring pleasure. Create masterpieces with your own hands!
Content
Sooner or later, if you have a child (especially a boy), you will be faced with the fact that you have to make a tank from available tools. Or you need to arrange a theatrical performance, decorate a school museum, or somehow originally pack a gift for a military man. We have already prepared, found valuable information and are ready to share with you the data and experience on creating a tank from cardboard.
How to make a military vehicle out of corrugated cardboard
A corrugated cardboard tank is a rather interesting and simple option that does not require a template. For such a do-it-yourself cardboard tank, you will need the following materials:
- corrugated material in green, blue and dark blue shades;
- scissors (sharp only);
- pVA glue;
- school line;
- simple pencil.
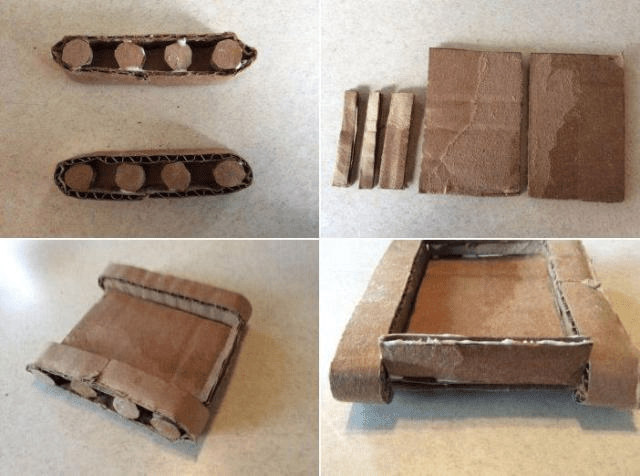
First you need to cut the dark blue material into thin strips, and the green material into wide stripes. Now you need to twist the wheels out of the blue ones, and wrap them with green ones to make a caterpillar. Use PVA glue to hold the pieces together. If the wheels are too small, then you need to use several strips. You can also use double-sided tape, which holds small pieces together well.
The future track of a combat vehicle will look something like this:

Please note that the wheels are not all the same size. In the center there are larger wheels, and on the sides with a smaller diameter. You need to make two of these tracks.
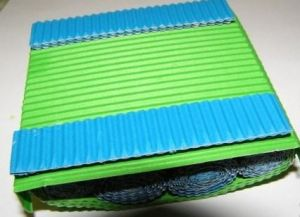
Now you need to prepare a platform from green corrugated material. You need to cut out a rectangle, bend the edges on both sides and glue the tracks, as shown in the photo:

Now you need to cut out two wide strips from blue cardboard, bend them in half and glue them to the base of the product:
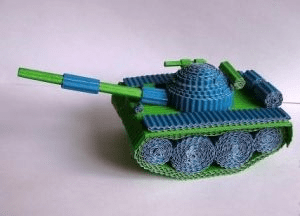
Next, you need to make the rest of the details. Make the tower on the principle of a wheel, only much larger, also twist the fuel tanks, the cannon and other necessary components at your discretion. As a result, you will get a beautiful and bright military machine that you can present to your child or make with him.
It turned out to be not so difficult to make a tank out of cardboard with your own hands without a template, but we offer another interesting option.
Tank made of colored cardboard
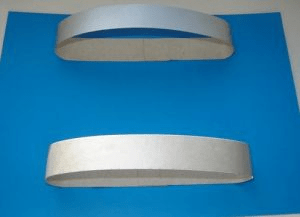
This is also a fairly easy option and you will need ordinary thin colored cardboard for it. So, first, from white or any other color of the sheet, you need to cut two strips of medium width and glue them into a ring. Now you need to take a sheet of a different color and glue the finished rings to it and press them down slightly so that they look like a caterpillar.
From a wide strip of the same color, you need to build a military vehicle cannon.

You can make it triangular, as shown in the photo, or you can simply twist the cardboard into a tube.
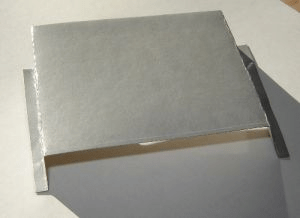
At the preliminary stage, your craft will look something like this:

The tank can be decorated with army paraphernalia or left as it is. Such a craft can be safely prepared for certain holidays at school. A cardboard tank is quickly assembled and does not require special financial costs.
War machine from an old box
And now we will tell you how to make a cardboard tank using an old box. Packaging from a TV or refrigerator is suitable. The main thing is that the material is dense, without any visible flaws. What else is required:
- scotch;
- any scissors;
- pVA glue;
- a pen.
So, a do-it-yourself tank made of cardboard with a step-by-step description:
First, you need to draw on the main material all the necessary parts of the combat vehicle: 8 medium circles, two narrow and long stripes and two short wide stripes.

Now you need to make tracks - twist the parts into an oval and glue them, on one side you need to glue wide stripes. Use tape or glue to hold the parts together.
Now on the side where the open part of the caterpillar you need to glue your round pieces. They will act as wheels in the track. Therefore, they must be located at the same distance from each other. In this case, use PVA glue.
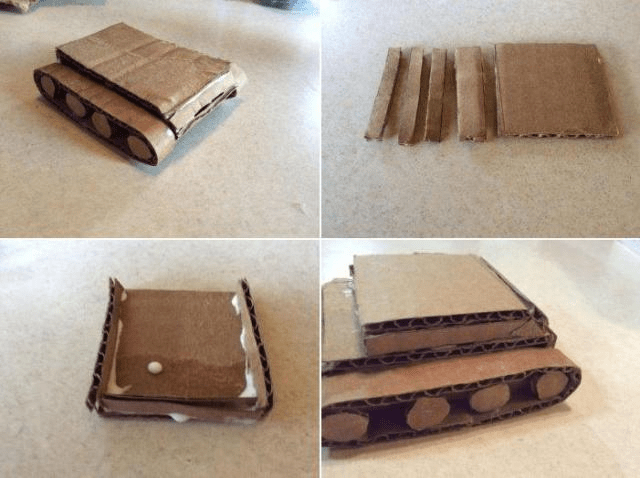


We only direct you in the right direction, and you yourself can come up with options for how to make a tower or a cannon. You can also cut additional decor from cardboard in the form of a shovel, bucket or some other component.
How to glue a tank according to a template
You can come up with a template yourself, draw and print, or you can use a ready-made pattern. Recently, paper crafts have become very fashionable. Not only children, but also adults are fond of this technique. We offer do-it-yourself cardboard tank schemes:
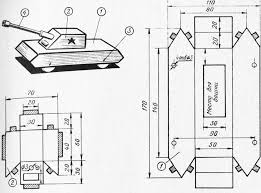
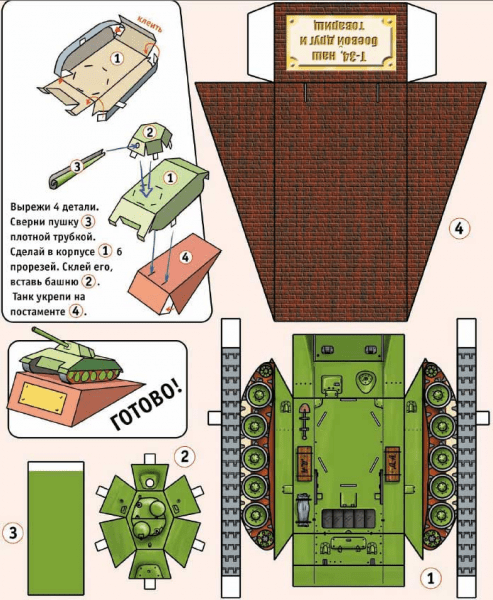
You can transfer the pattern with a pencil to the main material, or you can immediately print the pattern on a thin special cardboard.
Use an old pen or the non-sharp end of scissors to follow the dotted fold lines to keep the material folded neatly. Use a small amount of PVA glue to assemble the model.

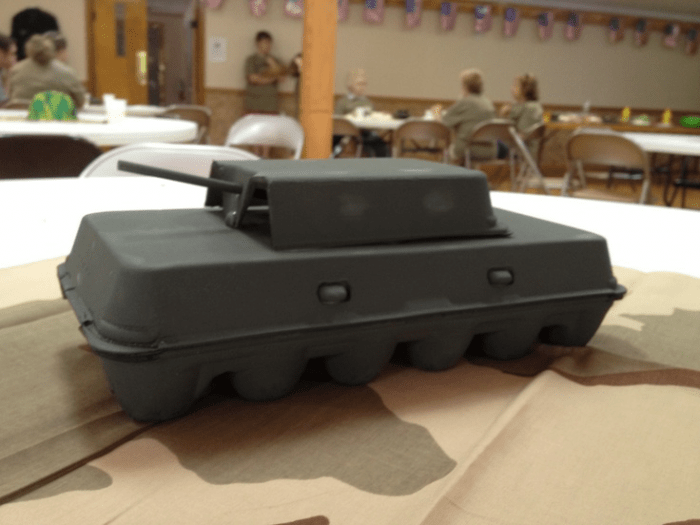
Chicken egg cage tank
We will assume that a cardboard model of a tank can be made not only from this material, but also from a cage for chicken eggs as a base. You will also need black or dark green paint, a paintbrush, a cardboard tower base, and a cannon tube. By the way, the tower itself can also be made from part of the cell. The model will look something like this:
How to make a large cardboard tank
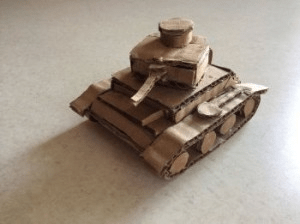
A large cardboard tank with your own hands can be made from an ordinary box from under a TV or refrigerator. The principle of its creation is almost the same as in the case of a small model. We want to offer you some photo illustrations that (we are sure) will inspire you to create something truly interesting and worthwhile.
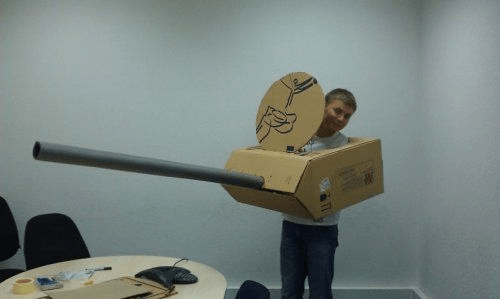
In this case, an ordinary box from under office equipment was used. A circle is not completely cut out from above, which plays the role of a hatch. And the plastic pipe acts as a gun.

Ekaterina Plotnikova
Outside february, which means that soon the most men's holiday will come - Defender of the Fatherland Day.
For the manufacture of « Tanka» us will need:
-corrugated cardboard
Color cardboard
PVA glue
Glue "Moment Universal" transparent
Pencil

1. Let's start manufacturing with the tracks of our future « Tanka»
For this we need strips corrugated cardboard, width 1, 5 centimeters.
(8 pieces).

For each track, twist 2 washers from one strip and 2 washers from two strips. It is better to coat the strips with glue.

I started to smear with PVA glue, but it dries for a long time, so it's better to use glue "Moment"... The finished washers, while the glue dries, I pulled together with rubber bands for weaving bracelets.

From the finished washers, we form the caterpillar wheels and glue the washers together. Better to glue with a glue gun. Sticks a strip on the wheels gofracatron - the caterpillar itself.

2. Go to the manufacture of the case « Tanka» .
We need a colored cardboard 9 * 11 cm... We make a fold on each side of our rectangle, retreating from the edge of 1.5 cm.

We glue the body to the tracks.
To make the head, we twist the washer of 8 strips 1.5 cm wide - the base. We glue the washer to the body, close the top with a circle of colored cardboard... Glue the tower itself to the base - twist the washer of 5 strips corrugated cardboard 1, 5 cm. Slightly squeeze the finished washer.

4. We twist the gun. For this we wind up cardboard on pencil, glue, remove the pencil. We glue the start to the head with a glue gun
5. Decorate tank fuel tank and stars.

the craft is ready!

Related publications:
Summary of the lesson on visual activity in the preparatory group "Postcard" Tank " Yulia Dmitrievna Abstract of a lesson on visual activity in the preparatory group. Topic: "Postcard - tank". 1. Integration of educational.
 Short-term educational practice "Fast Tank" (origami) Abstract: Paper construction is a powerful development tool.
Full name "Tank made of matchboxes" by A. Antipova. Age of children 5-6 years old Relevance and novelty Carrying out a CPC on this topic.
 I offer you a master class on making crafts from corrugated cardboard, as a gift for your mother or grandmother. To work for us.
 Dear Colleagues! Soon the holiday “Mother's Day!” With which I sincerely congratulate you! In every garden this is a solemn day! Working in the second.
 Even preschoolers can make small flat figures. I present to your attention a master class on making "Butterflies".
 Dear colleagues. Today I want to talk about mood, emotions. How often it changes with us. The mood changes even more often.
Parents of boys know how difficult it is sometimes to captivate the little one with some useful activity. In this case, a proven trick comes to the rescue: playing with cars or military equipment. And if you have the time and desire, then you can try to introduce the boy to an entertaining hobby: making models of cars from paper. For starters, you should try to make a tank out of corrugated cardboard.
Features of the craft
Corrugated board is much easier to work with than many other types of paper
It is hardly possible to imagine a male creature indifferent to military equipment. And it doesn't matter how old the representative of the strong half of humanity is: at both 5 and 35 he will be equally enthusiastic about modeling a modern tank or all-terrain vehicle. This homemade toy has many advantages over its factory counterparts. Since, firstly, you yourself are responsible for the quality of its manufacture. Secondly, made of corrugated cardboard, it will serve your little warrior for a long time - corrugated cardboard is a durable material, which nevertheless easily glues and takes the desired shape. In addition, tank models can be made in different sizes - this will not affect their strength in any way. In general, crafts made of corrugated cardboard can become not only a great pastime for a child, but also turn into an entertaining hobby in the future.
Materials and tools for work
To make a tank, you need a minimum of materials and tools
Before you start making a toy tank model, you should prepare necessary materialsso that nothing distracts you from modeling. And, of course, the most important thing is to purchase corrugated cardboard. This material has a significant advantage for those who like to model out of paper: for all its strength, it bends very easily and takes the desired shape without unnecessary effort. And this quality is especially important when it comes to crafts for children.
It is interesting. For the first time corrugated cardboard appeared in Great Britain in 1856. And the material was used as ... lining for hats. And only a few decades later, manufacturers appreciated the properties of such cardboard to create additional conditions for protecting a wide variety of goods from damage.
Another important preparatory stage is the choice of glue. Ordinary PVA is considered universal. But if you have the opportunity, then you can purchase silicate glue or use a special industrial one. Please note only that such formulations contain many harmful substances, so do not let your baby work without gloves and do not leave the young designer unattended.
You will also need scissors. It is best if it is a clerical knife, since its sharp edge is convenient for cutting out small parts. But such a tool is quite dangerous, so if you are not sure that the child will be extremely careful, it is better to give him regular scissors.
In order for all the details to be even and neat, they must be correctly calculated and drawn. To do this, you cannot do without a ruler and a sharpened pencil.
Instructions for making a tank from corrugated cardboard
The most durable are models of military equipment, in particular, tanks made with elements of quilling technology. That is, the parts are twisted strips of cardboard. We will need
- corrugated cardboard sheets of two colors (for example, blue and green);
- scissors;
- pVA glue;
- ruler, pencil.
The tank manufacturing technology consists of a sequence of 11 steps:
- Cut blue cardboard into strips 1.5 cm wide.
- We twist 4 strips - these are small wheels of caterpillars.
- We glue together a couple of strips and make 2 more twisted circles - these are large wheels.
- Cut out two strips 3 cm wide from green cardboard, glue each in a circle.
- We stretch out the circle a little and glue 4 wheels into it - 2 large on the sides and 2 small ones in the center. We've got tank tracks.
- Now we cut out a rectangle from green cardboard and make 3 cm folds on the wide sides.
- We glue the tracks along the long side so that the folds can be fixed on them.
- Cut out 2 strips of 4 cm wide from blue cardboard, fold them in half and glue them onto the tank platform.
- Between these parts, you need to place the tank turret, which is performed according to the wheel model.
- We glue the cannon on the tower. To do this, fold a piece of cardboard of the required length with a tube.
- We also twist 2 fuel tanks from wide strips (about 2–3 cm). The craft is ready.
Phased assembly of parts in the photo: master class
If you don't like quilling, then the tank tracks can be made simple. All parts should be well glued  Wheels can be cut out by drawing a circle of the desired diameter
  All sections must be done carefully.
Static model: how to do it yourself
Making another tank model will take you a little less time, but the car will turn out to be static, as it is glued to a sheet of paper. For such a tank, you will need the same set of materials. Only the scheme will be slightly different:
- Cut out two strips about 1.5 cm wide from cardboard.
- We fold the strips into a circle, glue and stretch slightly.
- We attach the resulting ovals to paper.
- Cut out a rectangle, bend it in по of the length and make a small outer bend on these bends. It is needed in order to glue the platform between two tracks on the paper.
- Cut out another rectangle 1.5 times smaller than the previous one and make the same folds - this is the tank cabin. We fix it on the platform.
- Now the matter is small: you need to make a gun. To do this, cut out a strip of cardboard and draw 3 vertical lines on it so that the distance between the segments is the same.
- We bend the figure along the lines, coat one of the sides with glue and bring it together with the opposite edge. It turned out to be a long volumetric triangle.
- We make small cuts in the corners of the figure, bend it outward. We glue these tails to the cockpit of the tank.
- You can draw a red star on the body of the combat vehicle. The craft is ready.
Video: Making a tank from corrugated cardboard
Corrugated cardboard offers truly incredible creative possibilities. Try to captivate your little son with such an activity, and surely soon many models of different combat units will appear in your house. And most importantly, such crafts are unique, and, therefore, the little warrior will become the owner of toys that no one else has.
- Pythagoras and the Pythagoreans. The doctrine and school of Pythagoras. Philosophy of Pythagoras In the philosophy of Pythagoras, the core was
- Complementarity principle
- The problem of consciousness in the history of philosophy
- Dualism - what is it in psychology, philosophy and religion?
- Topic of lecture subject and history of development of pathopsychology lecturer
- Goddess Demeter: all about her
- Development of ideas about pathopsychology in the pre-revolutionary period