Windows 10 deleting an account. Removing your Microsoft account from your computer: how and why to do it

 Live Journal
 Facebook
 Twitter
Windows 10 provides the ability to disable any user account. Such a feature can be useful, for example, when you transfer a computer for temporary use to another person and do not want him to climb into your profile and manage there. You just disable it, and provide a new user with a new one. Of course, in this case, you can simply set a password, but disabling the profile will be a safer method. Especially when the computer is provided for a rather long period of use. If you are wondering how to disable a user account in Windows 10 on a computer, laptop, tablet, then we suggest reading this guide.
Before you can disable your profile, you need to create a new one and give it administrator rights. If you do not do this, then in the future you will not be able to get into the system.
Disable Windows 10 user account through Computer Management
This method involves working with the section Local users and groups in snap Computer management... If you have Windows 10 Home (Core), this option will not work for you. There is no such section in it.
Disable Windows 10 user account using command line
This method is suitable for all editions of the desktop "dozen", since almost all actions are performed using.

Enabling Windows 10 user account
In order to activate disabled recording on a computer returned to the family, do the following:

To enable Windows 10 user account using command line, open Command line with administrator rights and enter the command net user username / active: yes, where username is the name of the disabled user profile. 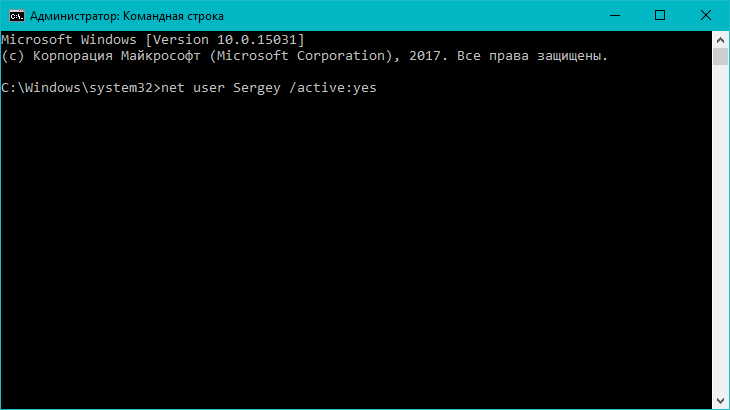
All. You have restored access to your account and now you can work in it.

Today we will tell our readers how to delete an account on Windows 10. And we will do this based on a variety of situations: when there is only one record, and you want to unlink it from the Microsoft website and make it local, or when the account is not needed at all. The second method can delete any additional account, of course, except for the administrator, both local and network-bound. At the end of the article, for your convenience, there is a video tutorial. The desire to delete your Windows account may arise, for example, when you are unable to change your email address on the Microsoft website.
Let's get started. Each of the methods will be considered in as much detail as possible, and following our recommendations, you will surely achieve the desired result.
Progress does not stand still, operating systems are becoming more convenient and functional. The leader in this field is not far behind - Windows, or rather, its latest tenth version. Microsoft links user accounts to their accounts so that data is stored in the cloud all the time and cannot be lost, which often happens when using a standard hard drive or even an SSD drive. By storing your files, passwords, and settings on OneDrive (Microsoft's cloud storage that's free for every Windows user), you can be sure they never get lost.
There is one more thing that speaks in favor of an Internet account. It's commonplace reinstall Windows... This operating system is not built like others. The registry is used here, and this is a clear disadvantage of both the "Tens" and other versions of the OS from Microsoft. The fact is that over time, this registry gets littered and the average user has nothing to do but reinstall the operating system. And here the most interesting thing awaits you - installing Windows itself is easy and short-lived, but installing and configuring software takes a lot of time. For example, the application we are using - Key Collector - requires re-configuration, which takes more than half an hour. If you install it on the cloud, you will not need to configure the configuration and the program will be ready in 2 minutes. Draw conclusions.
How to delete a user in Windows 10 and make the account local
This is the easiest way to make your account local. We will use the system toolkit and no user settings will be affected. The software or personalization will remain the same. Let's start solving the problem:
- In order to open the settings we need, you can use the combination
on keyboard. In the window that opens, click on the "Accounts" tile.


Attention! Before we continue with the process, please save all your data and exit the programs. Microsoft account link will be lost and files will become inaccessible .
- Click on the inscription highlighted in the screenshot with a red frame.


- Another window will open in which we will need to enter the current password. We do this and click "Next".


- At the next stage, we enter the data for the new account. This is a password, its confirmation and a hint for recovery.


- Almost ready. It remains for us to click on the key indicated in the screenshot and go to the new account. Once again, we remind you that you need to save all data and close programs.

After pressing the key, the current session will be ended.


We will only have to enter this password.


How to delete an account if there are several of them in the system
There are situations when there are 2 or more accounts in the windows operating system, but only one is needed. Accordingly, the extra ones need to be erased. Let's figure out how to do this. First you need to log in with an administrator account. Naturally, not the one we are going to eliminate. You cannot make any changes to the system from the guest account.
- We need to open system parameters. To do this, we will use a slightly different option than the one that was applied last time. We'll launch the settings via the notification bar. To do this, open the panel itself and click on the key indicated in the screenshot.

- Move on. Click on the "Accounts" tile.


- Now click in the left part of the window that opens on the inscription "Family and other people", and on the right, select the user whose account you want to delete.

- When we click on the selected account, two buttons will open. Click "Delete".


- A warning will appear stating that, together with the account, all data of this user will be permanently erased: documents, downloads, objects on the desktop, application settings, photos, music, etc. If we agree, then press the button marked in the screenshot.

After a few seconds, depending on the amount of account data, it will be completely deleted. Your files will not be affected. Below we will provide a method that will allow you to erase any account without affecting its data.
How to delete an account through the control panel
There is another option for deleting an account using the control panel. The method also does not require any special efforts and, following our recommendations, you can easily cope with the task. Let's get started.
- Let's go to the control panel. Recall that in order for everything to work out, you need to work from an account with superuser (administrator) privileges. Open the Tens search tool (the magnifying glass icon located on the left side of the taskbar) and enter "control panel". Next, you need to click on the result that appears.


- Go to the section highlighted in the figure.


- Next, click on the line "Delete user accounts".


- Now we select the account that we will delete (you can remove both the local one and the account associated with Microsoft).


- In the next window, just click "Delete Account".


- Here is the point we talked about. We can delete an account, but keep the files it is associated with. You can also erase everything. In our case, the data should be saved, so click on "Save files".

- Windows will ask us for the last time if we really want to delete the account and notify that the user will no longer be able to log in, but all his files will be saved on our desktop in a folder with his name. We agree and click "Delete account".


After that, the account will be deleted. If any files were associated with it, they will be saved and placed in a folder on your desktop.
There is another way to delete an account in Windows 10. In order to use it, you must, as before, have administrator rights. We do the following:
- We need the Run tool - press Win + R and launch it. In the opened window, enter the command "netplwiz" without quotes and click "OK".


- A new window will appear. Remove the switch next to "Require username and password" and select the desired account a little lower. Then press the button labeled "Delete".

- The system will once again ask us if we are sure of our actions, but we confirm them by pressing the "Yes" button.

Done. The user account has been completely erased from your computer.
Through the command line
You can achieve the same results through the command line. Use this method if none of the above worked. Moreover, this method is faster.
Attention! Novice users should not use account deletion via the command line. The system will not ask you again about your intentions and will delete all data, including your account, immediately and irrevocably. Remember this before proceeding.
Let's move on to working with the command line:
- We will launch the command line through the Windows search menu. This will allow you to work with administrator rights. Click on the magnifying glass and enter the word "cmd" into the search box. We are looking for the result we need in the SERP and right-click on it. We need the "Run as administrator" option.

- Let's ask Windows for a list of users and figure out who we will delete. To do this, enter into the command line "net user" without quotes and press Enter.


- The system will return the result: in our case, these are only two users. Remember the name of the account that will be deleted, and enter the following command: "net user" username "/ delete" (without quotes).

- Windows accepted the command and responded with its correct execution. Let's check if the user has deleted. Enter "net user" again.

As you can see, the account with the name "Seryozha" is gone. Everything works perfectly.
How to disable User Account Control
User Account Control or, as it is also called, UAC in the Top Ten exists to notify us about the activity of applications that require access to change system files. In other words, those programs that run with administrator rights. Thus, Windows 10 takes care of your safety. Out of the box, UAC tells you about any actions by applications that try to gain access to administrator rights, but you can configure this mode as you like.
Using the control panel to disable control of Windows accounts
The first method is easier than working with the Registry Editor, therefore it is recommended for beginners to use. Getting started.
- We open the control panel. Enter its name in the Windows search bar, which can be launched through the icon on the left side of the taskbar.


- Find the section indicated in the screenshot in the window that opens, and go to it.

- Click on a similar entry in the next window.

- Next, click the inscription circled in a red stripe.

- A new window opened. There is a slider that is responsible for controlling our account, the higher you raise it, the tougher this control will be.


Note: you can get to the window with the slider for setting up accounts in the "Top Ten" using the "Run" utility. Enter the command "UserAccountControlSettings" in its field without quotes and click "OK".

Explanation of the four positions in which you can set the UAC switch:
- always notify about the following cases: when programs try to install or edit PC settings and when the computer settings are changed by the user (this profile is recommended for multiple installations of different software or active work in the network);
- notifications about changes in PC parameters by users are disabled (recommended for use by those users who work with verified software and sites);
- there are no notifications about editing the computer settings by the administrator (this algorithm should be used only when dimming the desktop takes a lot of time);
- even if applications try to install software, no notifications are received (using such a profile is strongly discouraged).
If you do decide to disable UAC, remember: now any software will be able to automatically install software, and you will not even know about it. If you want to deactivate User Account Control only because of the pop-up window, we strongly discourage you from doing this!
Setting UAC in Registry Editor
You can completely disable User Account Control or select each of the four scenarios in the Registry Editor. We will describe how this is done.
- Start the registry editor using the Run utility, which can be invoked by the Win + R hotkey combination.

- Follow the path indicated in the screenshot and change the values \u200b\u200bof the parameters on it (you can change the value of the registry key after double-clicking on it with the left mouse button).


Decryption of the values \u200b\u200bof the registry keys responsible for controlling permissions in the Windows system:
- notifications are always received: 1, 1, 2;
- notifications are received when any program tries to change the settings: 1, 1, 5;
- screen dimming is disabled, notifications are received: 0, 1, 5;
- completely disable tracking of accounts: 0, 1, 0.
Attention! Once again, we warn you - by disabling UAC, you put the security of your PC at risk.
Summing up
Above, we described how to disable a Windows 10 account, both local and linked to a Microsoft account. All methods work perfectly for any edition of the "Ten". Each user has the right to choose the most convenient option for himself and use it. If you have any problems, write in the comments, we will definitely help you.
Video on How to Delete Microsoft Account in Windows 10
This guide for beginners focuses on the following questions: how to remove Microsoft account in Windows 10 and enable local account instead, as well as how to delete Microsoft account in Windows 10 or any local account.
If you are unable to reset your Microsoft account password, the instructions will come in handy. It describes how to enable the built-in Administrator profile to later delete the locked entry and create a new profile. A separate guide is devoted to this.
How to remove and turn on local Microsoft account
If you prefer to use a local account, you can switch to it from your Microsoft account. This can be done as follows:
Important: Save all your projects and documents in advance, as switching between profiles will log you out.

How to delete a Microsoft account if you have another
If you previously created multiple Microsoft accounts for computer users, but now you don't need them, you can delete. Also, this method is suitable for removing any unnecessary local account, except for the administrator account.

Removing Windows 10 account through Control Panel
Control Panel Windows 10 can also help with eliminating redundant Microsoft account.

Deleting a Microsoft Account Using User Accounts
To remove an unnecessary Microsoft profile, the utility is perfect user accounts.

These are, in principle, all the main ways to delete a Microsoft account in Windows 10. If this is not enough for you, you can read about other possible options in the instructions.
Good day. On my last project, this was the most popular topic. But it is understandable why. Microsoft enforces the use of an account to activate some additional features. But, among other things, thanks to the synchronization of the account and its settings, it is somewhat easier to reinstall the system and synchronize between several devices (for example, a PC and a tablet or laptop). It is enough to enter your username and password and you will automatically receive your language settings and even your desktop background. But there is also a small drawback, after switching to a Microsoft account, you will have to enter the password each time you turn on the computer, and after waking up from sleep. Fortunately, it can be fixed;) And now I will tell you how easy it is to do it.
The article consists of two parts: prompts when turning on the computer and.
How to turn off the Microsoft account password prompt when you turn on your computer
Fear not, it's very simple. But you need to be careful. So, press the key combination Win + R and enter in the window that opens:
control userpasswords2
If this command did not work for you, then we enter this one, they open the same window:
netplwiz
In the window that opens, select, attention, your account with the "Administrators" group... I specially noted this point, since there can be several accounts (like mine), but we need to use a working one. If you are using a guest account, then choose it. If you are an advanced user, then I think you can figure it out for yourself, but I am writing an article for the maximum number of users, and the vast majority use administrator accounts.
After highlighting, uncheck "Require username and password".
Click the "Apply" button, a small window will appear in which we must enter the login and password for the account, the launch of which we want to facilitate. And click OK.
That's it, we got rid of the password when turning on the computer. Have some coffee and move on to the second part :)
How to disable the password prompt when the computer wakes up (wake up from sleep, hibernation)
I think some people will come to this article after following the first instruction from some other resource. Because this moment is often forgotten. The bottom line is that even if you turn off the password prompt when you turn on the computer, the password prompt on wake-up will remain. And it turns off somewhat elsewhere. But let's get down to business;)
We need to get to the Power Options section in the Control Panel. You can do it manually, but I suggest just pressing Win + R,what to start the "Run" utility and copy the following command into it:
The Power Options window will open. Click on the cherished link " Password request on wakeup»On the left side of the window.
Initially, the opportunity to make changes to the item of interest to us will be closed, to open access you need to click on the message “ Changing options that are currently unavailable«.

When the computer is first started, the user is able to create a Windows 10 administrator account. OS profiles can be local and online. This is the name of a specific data package located in a specially designated folder on disk. This array contains any information about the user, his ability to interact with the system and various restrictions.
To be more specific, we can highlight information about authentication (this is the name of information about how to log into an account), all kinds of personalization (image on the desktop, interface design, a list of automatically loading programs, and so on), permissions to view various files and folders and their editing.
To log in, you need a username (usually his name) and a password, if configured. The latter is in an encrypted format and cannot be decoded. The account information also includes an avatar. This is the name of a thumbnail picture-identifier, which the user has independently selected.
A local account type is valid for only one device.
Microsoft account
The ability to log in with a Microsoft account was present in Windows 8. It has been migrated to the latest version of the operating system. The capabilities of the local user and Microsoft accounting differ at certain points, and in favor of the latter.
One of the most important features is an easy way to recover data for authorization if it has been lost. Everything is done on the official website of the developer, you do not need to enter commands into the console, use a live OS image and apply other manipulations.
Create a new user
Setting up a Win 10 account is actually pretty simple. To do this, open the Run program. The easiest way is to right-click on the "Start" icon and find it in the list. Copy "control userpasswords 2" into the text box. The Windows account management service will open. Click the Add button in the window. If it is inactive, then check the box next to "Require name entry ...".

And then there is a choice. It will be possible to create not only a Microsoft profile, but also a local profile. For the second option, click on the inscription "Login without ..." at the bottom of the window. And then just follow the prompts.

The created profile will receive guest rights. They can be expanded in the account settings, the section "Family and other users" is responsible for this parameter.

Disconnect Microsoft account
In some cases, you may need to remove your Microsoft account on Windows 10 by going to your local profile. In this case, user data will only be stored on this computer. None of the settings can be transferred to other devices. There will also be big problems with password recovery if it is lost.

Before starting, you must close all running programs and save the progress, since a PC restart will be required. The first step is to open Windows parameters (press Win + I at the same time). In the window that opens, click LMB on "Accounts", you need the category "Your data ...". Then click on the inscription "Sign in instead ...". The service will ask for a password from the Microsoft profile. In the next window, you can edit the data for user authorization, including the name.

At the end, the system will ask you to log out, and then log in with a new profile. Now the OS has a local account.

Delete user
First of all, you need to complete all the steps described in the previous paragraph to unbind the user from Microsoft services. And then you can delete the Win 10 account. But it is worth remembering that at the same time all user data will be lost. Therefore, it is advisable to save the necessary documents in advance. 
You need to open the computer settings (in the "Start" menu, click on the gear icon or simultaneously press Win + I). There, find the "Accounts" column. The “Family and other people” menu is responsible for setting this parameter.

It remains only to click on the name of the user whose deletion is planned. The corresponding button will appear, click it. A warning will appear about the consequences of your actions. It will indicate that all user data will be erased, so it is advisable to pre-save all important documents. Confirm the deletion of your account and wait for the process to finish.
- Pythagoras and the Pythagoreans. The doctrine and school of Pythagoras. Philosophy of Pythagoras In the philosophy of Pythagoras, the core was
- Complementarity principle
- The problem of consciousness in the history of philosophy
- Dualism - what is it in psychology, philosophy and religion?
- Topic of lecture subject and history of development of pathopsychology lecturer
- Goddess Demeter: all about her
- Development of ideas about pathopsychology in the pre-revolutionary period