Paper birdhouse. Do-it-yourself birdhouse made of wood and scrap materials for birds - drawings, dimensions, photos and original ideas Make a birdhouse from cardboard diagram

 Live Journal
 Facebook
 Twitter
The sounds of spring are cheerful drops, iridescent trills of birds returning home. Who doesn't love the aroma of fresh grass and first flowers?
Friends! Hi all! I started our conversation by “inviting” you to spring! And all because today we will learn how to meet birds, we will talk... The starlings have flown in from distant lands and have a family arrangement and joyful chants on schedule. So let's help them by making a house for birds, and then all their songs will be for us!
Let's clarify a few points:
- What are the requirements for garden structures?
- What can you construct a bird house from?
- What can be done by the hands of a child?
Now let's talk about all this in more detail. And at the end of the conversation I will share one design idea! So, go ahead!
Photos of birdhouses made from scrap materials are clickable:


Requirements for birdhouses
We don’t have to wait for our little ones to be given a task. to school or in kindergarten bring a birdhouse. An activity like building a birdhouse can be very interesting and worthwhile to devote your attention to without any outside encouragement. But to make the winged ones comfortable, we must take into account important factors:
- Suitable dimensions;
- Material;
- Fastening system for secure fixation.
Dimensions. First of all, you need to understand that, although this garden craft will hang on the street near the house, and therefore should also have the function of decorating the territory, we we do it is primarily for the convenience of the birds. Otherwise, all she will do is decorate the garden. No birds will live in it. This means we take into account the size of the winged aircraft for which we are building. But, if we start from the standard, then the height is 30-35cm; width - 15-17, and depth 13-15cm. Hole diameter 4-5cm.
Materials. You can use not only traditional wood, but also unusual materials. What can you build from: from willow vines, from newspaper tubes, from wine corks, from plastic bottles, plywood, cardboard, etc. The main thing is that if you use wet materials like cardboard, it is good to cover it with varnish in 2-3 layers so that it is not afraid of either snow or rain.
We secure the birdhouse. It’s worth thinking in advance about what to attach our craft to and with what. For example, you can nail a board to the back. Either nail it or tie it to a tree or pole.


Our birdhouse from a bottle - MK video
My son and I made it from an ordinary plastic bottle. Just need to paint with acrylic paints.
Video - birdhouse made of cardboard
Video - birdhouse made from jars
Master class edible feeder - cookies for birds
Master class OSB birdhouse in the shape of a rocket
The most common and most unusual birdhouses
When I look at photo birdhouses that are on the Internet or someone posted on their social networks, I’m surprised how beautiful they look and how creative they are ideas coming to people's minds. There is such a variety of shapes: round, diamonds, polygons... And what colors there are! Some people don’t paint them, while others paint them to look like Gzhel. Other options include apartment buildings. And near some it is attached feeder. This is also a very convenient option if you want birds to settle next to you for a long time and delight you every spring.
I really liked the teapot birdhouse.


What is the help of kids?
If it's all about gluing, for example if you're making a birdhouse from boxes, then the children can participate in the very process of designing, cutting and assembling. But, if the house is traditionally wooden, and the baby is too small, do not refuse his help when he gives you nails or non-sharp and not heavy tools.
Another option to make the craft unusual is original drawing. Give your little one a brush and some paint and let him create! Such a birdhouse can safely be called a joint product.
A few more photo ideas - original, but also more time- and effort-intensive birdhouses.
Blueprints
According to the drawings, you can make not only wooden, but also cardboard birdhouses. Even a birdhouse is made from twigs or newspaper tubes according to drawings. All pictures are clickable.
Next time there will be a master class on making a wooden birdhouse.
I really want to believe that now we will all look forward to spring, and the birds will not have to look for where to settle and raise their winged offspring. I hope you and your kids enjoy designing and making! I think this is not the last time you show your creativity. And in the future, other interesting articles await us all, where we will build something. Therefore, don’t forget to subscribe so you don’t miss any of our fruitful conversations! And don't forget to invite your friends. I think they will also be curious to learn and share their knowledge!
That's all for today! Bye!
Building birdhouses for birds on your own the first time is not an easy task. However, it is completely solvable. This text will describe in detail how to make a birdhouse. By following the following instructions, you will easily understand the features of the process.
You will also be able to select a tool and material and move on to the active phase.
With the right approach, you can build a birdhouse in a few hours. However, for this it is necessary to understand the material that will be used to make the birdhouse.
You can use wood, plastic, plywood, even paper. However, any material requires pre-processing. And for this you need certain devices.
Required Tools
In this regard, everything is quite simple. Before making a birdhouse, you should make sure that you have the various necessary tools. Let's list the main ones. In this case you will have to use:
- Carpenter's hammer.
- Chisels of different widths.
- A hacksaw for wood.
- Wooden hammer.
- Ruler, pencil.
- Drill, drill.
Types of birdhouses
First you need to decide on the size of this structure. The type of birdhouse will depend on this. There are several types of such houses. Namely:
1. Standard birdhouse.
In this case, its dimensions will be as follows:
- length – 16 cm;
- width – 15 cm;
- height – 40 cm;
- taphole diameter – 5 cm.
2. Titmouse. This is a small birdhouse. It will become a wonderful home for birds that are no larger than a tit. This structure is suitable for different types of birds. Perhaps these will be sparrows, redstarts, and pieds. Or the titmice themselves.
In this case, the dimensions will be as follows:
- width – 12 cm;
- length – 10 cm;
- height – 30 cm;
- entrance – 3.5 cm.
3. Wagtail. This type has a protrusion in front of the entrance. Here will be the following sizes:
- height, width – 15 cm;
- length – 30 cm.
4. Triangular birdhouse. This is a house for common pikas. Its hole is through. It has the following dimensions:
- width – 15 cm;
- height – 25 cm;
- entrance – 3x6 cm.
If you just want to make a birdhouse for the forest or have no idea what kind of birds you have in your garden, then make a standard type. You just need to remember that, for example, tits prefer small, comfortable houses. They feel uncomfortable in large ones. But the starlings will not fit in the titmouse. This is important to consider.
This construction is very simple, it can easily be done in a couple of hours. Its disadvantage is that it, of course, is not particularly reliable and will only last for one year.
This house can be made from any small box. To do this, you need to do the following:
- Glue the lid to the box itself. It must be securely attached.
- Cut a tap hole in the lid with a diameter of about five centimeters. The hole should be located no higher than 20 cm from the bottom. For complete convenience, the taphole should be round. To do this, you can glue the edges of the hole several times with wide tape. And it will serve longer.
- The back wall of the box must be very strong. After all, it is the basis. It would be nice to glue plywood onto it. Wooden planks are also suitable in this case. Instead of glue, it is generally better to use small screws or brackets for fastening.
- To protect the birdhouse from moisture, you need to paint it. It is desirable that it be odorless.
- And the very last thing. Wait until everything dries. Then the product should be secured to the base.
You can make a cardboard house in the same way. Only with him there will be more hassle. You'll have to work hard to connect all the parts and give rigidity to the cardboard itself. You can try to make a birdhouse out of paper. However, it is unlikely to be reliable.
Birdhouse from a bottle
Making such a product will not take much time. An hour maximum, maybe even less. To do this, you will need a five or three liter plastic bottle. It all depends on the size of the birdhouse you need. This house is very similar to a feeding trough. Everyone did them in childhood. But there are still small differences.
In such a birdhouse you will have to make a standard entrance. And everything else needs to be done as described above. The only, but significant, disadvantage is that the bottles are often transparent. But birds need comfort and privacy. So in this case, the birdhouse will have to be either painted or covered with paper. This product can be simply attached to a tree by the bottle handle. The care of these structures will definitely be discussed below.
Such a design will take much more time, knowledge and effort. But the result of your work will be a durable and durable birdhouse that will serve the birds for many years. The main thing in this matter is desire. Although it is much more difficult to make a wooden birdhouse, the efforts made will not be in vain. In addition to the set of tools listed above, in this case you will need certain materials:
- Aspen or birch rough-hewn dry boards.
- Odorless paint.
- Wooden planks for reinforcement.
- All kinds of consumables.
 When everything is already assembled, you can begin to construct the house. To do this you need the following:
1. Create a birdhouse design on paper. This is quite significant. You need to measure the birdhouse correctly. In this case, a drawing of the designed product is required. You should also calculate the amount of materials.
2. Then all dimensions should be transferred from paper to material. Using a tool, cut out the necessary parts. Referring to the drawing, we connect all the parts using nails or self-tapping screws. We will get a durable and cozy box. For this house to be very reliable, after connection, not a single part should wobble. 
3. Then we make a ledge for the birds in front of the “entrance” to the birdhouse. This device serves for the convenience of birds who want to get into their shelter. And it usually consists of a small plank. Birds love to rest on such a ledge. It also needs to be secured with nails.
4. Next stage. It consists of making a mount for installing or hanging a birdhouse. Most often it consists of special holes on the back wall of the house. It can also be other fastenings - a clamp or a clamp.
Making a birdhouse with your own hands is not a particularly difficult task. You just need to follow certain rules and listen to the advice of experts:
- The ideal material would be wood, as it is quite durable.
- You need to use special wood. Birch, aspen, alder, and other deciduous trees.
- Fibreboard, chipboard and OSB are not recommended for use. Firstly, they are toxic, and secondly, they are not durable.
- The smell of paint does not attract birds. So its use is not mandatory. If you still decide to take this step, then use odorless paint.
- You don’t have to make a perch inside. But it’s better to attach the ledge from the outside.
- The inside of the birdhouse should be rough so that the birds can move comfortably. If the board is smooth, you will have to put notches on it. This can be done with a chisel.
- It is better to make the entrance round so that the birds do not get injured.
- The roof of this product can be made removable to make it easier to care for the birdhouse.
- It is also advisable to make the roof sloping so that moisture does not accumulate. It won't last long if it's even.
Birdhouse installation

This is an important process. Making a birdhouse, the photo of which is provided in this text, is half the battle. You don't need any special experience for this. But then it needs to be placed correctly. After all, if you attach this house poorly, and even in the wrong place, then it can turn over or, even worse, fall.
There are a few tips to follow in this regard:
- It is necessary to take the choice of location seriously. For example, it could be the end of a house, a strong pole, a tree, a pillar and much more.
- It is better to install the birdhouse no lower than three meters from the ground. And always in a place where a small predator like a cat, marten or weasel cannot reach.
- The birdhouse should be strengthened at a slight slope. That is, it must be placed so that raindrops do not fall into the entrance.
- You can fasten the birdhouse with the same nails and screws. But if you decide to hang the house on a tree, then it is better to use clamps, do not injure the tree itself.
In principle, it is possible to install bird houses during the entire warm season. The birds will settle there in any case. However, the ideal time is early spring. After all, the bird family needs time to settle down and have offspring.
There is nothing complicated in this regard. After you have made and installed the birdhouse yourself, you, of course, want it to serve the birds for as long as possible. And for this you need to constantly look after the house.

How to do this? The answer to this question is quite simple. This does not require any extra costs or additional time. Everything is done simply and quickly. You just need to clean the bird house of dirt and feathers at the end of the season.
Making something with your own hands (a feeder, a birdhouse, various garden structures and much more) is a very exciting activity.
It is not a pity to allocate several hours a week, or even a month, for this work. After all, you are going to do very useful things.
After you make a beautiful decorative birdhouse yourself, the desire to create further will certainly awaken in you. Such crafts will not only create comfort for your garden animals, but will also significantly decorate the interior of your summer cottage.
Having read the above, everyone will be able to figure out how to make a birdhouse. But exactly how it will look depends on individual desire. The main thing in this case is hard work, scrupulousness and patience. All in your hands!
Tell me how to make a birdhouse out of wood? At school, my son was given the task of bringing a house for birds, and our dad is at work all the time, so the child and I decided to do this ourselves and make two birdhouses: one we will take to school, and the second we will hang in our garden. Which boards are best to use and should we then paint our structure?
Birds are nurses not only of the forest, but also of the garden. Every summer resident who has fruit trees and shrubs growing on his property knows this. All year round, birds not only delight the ear with their singing, but also help gardeners in their difficult work of protecting trees from pests, destroying small insects and feasting on their larvae. To attract birds, feeders are hung on trees and volunteer helpers are fed during the cold winter season, when it is not so easy to find “prey,” and they also arrange a home for them. Any bird will like a good-quality wooden house; it can not only live in it and hide from bad weather, but also breed in it.
Nuances that are important to know before starting work

As is already clear, the best birdhouse is made from natural materials, in the sense of wood. Some craftsmen make houses from cardboard boxes or plastic bottles, however, this is not at all the same. In the first case, the dwelling will be temporary and will last one season, if it does not get wet first in the rain. Plastic containers are more suitable for manufacturing, and besides, there is no question of their naturalness. The smell of chipboard or plywood will also scare away birds; the latter is also too thin and the house will be cold.
For a bird house, you should use hardwood boards, but in no case coniferous ones - they contain resin that will stick to the plumage, which is fraught with health problems for the birds. The thickness of the boards must be at least 20 mm so that they retain the heat necessary for the chicks.
There is no need to plan the boards to achieve their ideal smoothness. A rough surface, especially inside the birdhouse and under the entrance, will help birds get inside and move around easily.
Making a birdhouse step by step

First of all, you should draw up drawings of your future home. This will make the process of making blanks easier and will make them even, so that in the future there will be no gaps between the walls.
Birdhouses can be of different sizes and shapes - it all depends on what kind of birds will live in it. There is no need to make “apartments” that are too spacious, because the bird family is small and the young can freeze or grow weak. The standard dimensions of the house are approximately as follows:
- bottom width – 15 cm;
- birdhouse height – up to 30 cm;
- roof – approximately 20x24 cm;
- The diameter of the protrusion (taphole) is no more than 5 cm.
It is better that the back wall is a couple of centimeters lower than the front panel - such a slope is necessary for water to drain. Accordingly, then on the side walls the upper cut will be oblique. The roof should protrude slightly, so its dimensions are slightly larger than the bottom.
 Now you can get started:
- Transfer the drawing with a pencil to the boards.
- Cut out all the details.
- Plan the outer surface of the workpieces.
- In the front panel, cut out the “entrance” in the form of a circle.
- Assemble the birdhouse in the following order: front, side walls, bottom, back wall, roof, entrance. All parts must fit snugly together. It is better to fasten them with screws or nails.
All that remains is to attach a mount to the birdhouse in the form of a strip on the back wall and install it on a tree, wrapping it well with wire. There is no need to paint - the smell of the paint will scare away the birds.
Our interest in birdhouses awakens in the spring along with raindrops, bright rays of the sun and the ringing voices of birds. I really want nimble and cheerful birds to settle in our yard. It's nice to watch the family activities of birds and listen to their trills. It’s equally nice to know that birds will help protect your garden from pests.
Birdhouses for birds: what are they?
We have all observed a considerable number of different birdhouses. You may get the impression that these are just small houses with a hole of different shapes and colors. In fact, bird houses can be made from various materials and must have certain parameters for different types of birds. There are certain requirements for their design and placement.
Especially for you, we have grouped the existing options into an easy-to-read form. Of course, before you start assembling a bird house, you need to see what they are like.
Birdhouses made of wood - classics of the genre
There is no doubt that wood is best suited for making a classic birdhouse. The reason is in the whole complex of its characteristics:
- good thermal insulation;
- acceptable sound insulation;
- sufficient strength;
- environmentally friendly;
- well processed;
- affordable.
We have prepared for you photos of 40 types of wooden birdhouses, arranging them in order of increasing complexity and quality of design.
 Here are images of the simplest designs. As you can see, they suit the starlings themselves. Unless they suspect that the lifespan of an untreated house is limited. If appearance doesn't matter, choose one of these options.
 If you spend a little more time, you can make a much nicer house for the birds. Perhaps you use another type of lumber for this purpose. Definitely, it will take a little more skill and effort.
 In these designs, fantasy played the main role. Moisture-proof impregnation and a tin roof will definitely increase the service life of the crafts. The products are somewhat more complex than ordinary bird houses.
 As you can see in the photo, the birdhouse can be decorated by cutting a hole in the shape of a bird’s silhouette. At least the roof can be painted. To assemble a bird house, you can use clapboard treated with a blowtorch.
 The photographs above show the application of paints. In principle, one color is enough to decorate a craft. Several bird houses painted in different colors look great.
 If you try, paints will help turn a bird's home into a fairy-tale house. The design itself is not complicated. Imagination and diligence are the main tools of the presented success.
 A few more options for successful and simple solutions. Small cross-section sticks allow you to complement the craft with a fence, trellis, and so on. Using a jigsaw helped a lot in the bottom two photos. The use of wood of different colors and unusual shapes of the bird house ensured the exclusivity of the work.
 The photos presented above say: don’t limit your imagination! Of course, to assemble an airplane and helicopter you will need parts made on a lathe. However, the locomotive and the tiger are made from ordinary planks using a simple tool. Can be repeated!
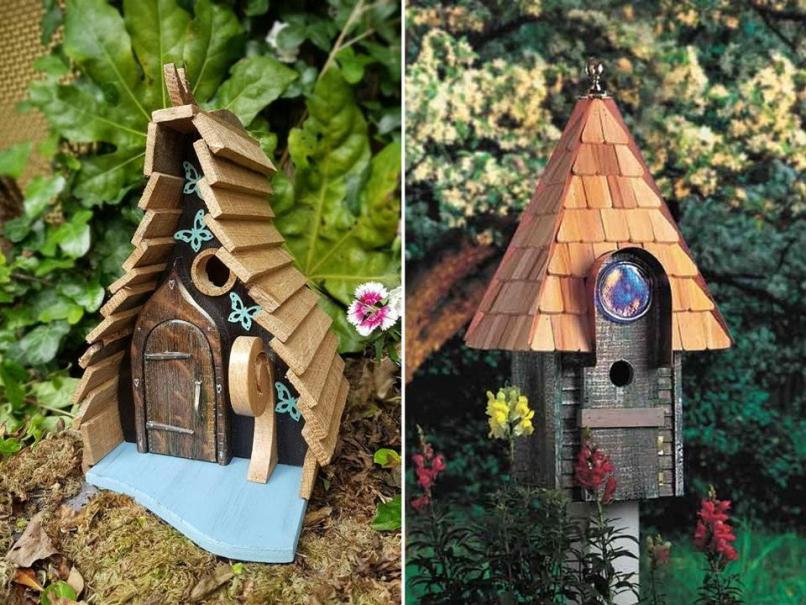 The two elegant bird houses pictured above were crafted with great taste and care. It's not easy to repeat this. To create something similar and your own is even more difficult.
 We present four more examples that will decorate a site of any level. Of course, wood carving is not for everyone. Note that the two lower options are quite realistic for copying. It will take a lot of time and effort.
A birdhouse made of logs is a separate topic
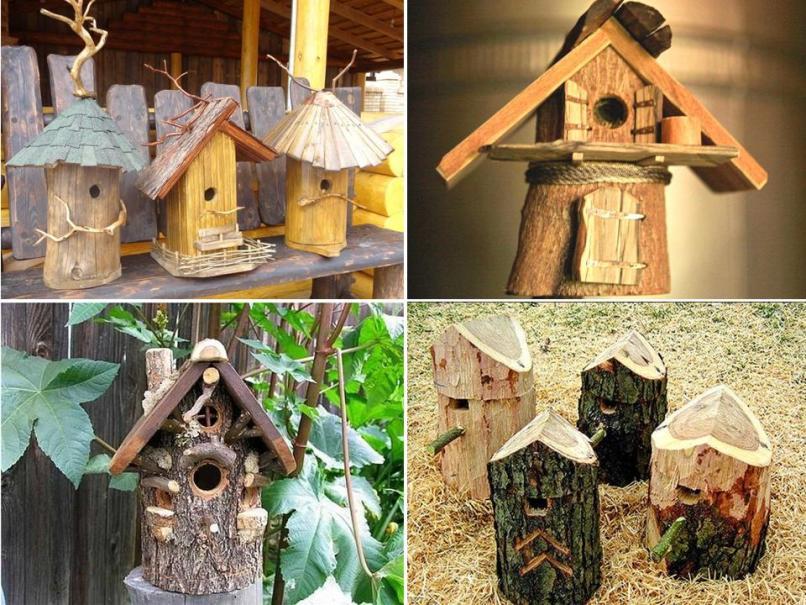 A great idea is to use an ordinary log for a birdhouse at the dacha. This is also wood, but untreated. Please note that an old tree trunk with a rotten core is the best option. Such housing for birds resembles a hollow and is called a nest box. As you can see, the design of the product can be very different.
 For many, an old log is more affordable than an edged board. Birds don't care what their home looks like. A simple deck or palace made of birch will do. You make the choice.
 The nest can be decorated with branches, boards, and mushrooms. Again we are talking about the manifestation of imagination.
In any case, those who decide to make the house more complex and interesting must definitely link its design with the place and environment where the birdhouse will be located.
They also make plywood bird houses.
 It is believed that plywood is not the best choice for a bird house, as it has an unpleasant and harmful smell of glue. However, the starling in the picture likes the plywood housing. You probably shouldn't use products with a noticeable glue smell. It can be assumed that the slight odor will subside over time. Plywood is more expensive than edged boards, but it is stronger and will last longer.
 Here is a factory kit for assembling a bird house. Its main advantages are its interesting design and high assembly speed. Thin plywood has reduced heat and sound insulation. This type of bird house is best used in warm regions and will not last long.
 Several more design options for birdhouses made of plywood demonstrate the wide decorative capabilities of the material. The use of paints will ensure a flawless appearance. It is probably better to use such crafts for decorative purposes.
 Here are the simplest plywood bird houses. They are best used in relatively warm regions. They won't last long in this condition.
 The use of 20mm thick plywood and paints greatly improves the position of plywood houses. Experiments with the shape of the craft are encouraged.
Birdhouses made of cardboard - it's possible
 Cardboard birdhouses are difficult to take seriously. As follows from the pictures, such products exist. At the same time, they are made at enterprises producing corrugated packaging.
 Of course, such a bird house is inexpensive, can be assembled quickly and even looks decent. Obviously, they will last one season, and in those areas where it will not be soaked by rain. However, we decided to overcome the identified shortcomings of the material and further in the text we offer a diagram for assembling a fairly reliable bird house made of corrugated cardboard.
Birdhouses made from plastic bottles - a backup option
 At first glance, plastic containers are very suitable for a bird’s nest: they cost nothing, are durable, and are not afraid of rain. Note that birds do not like to sit in a transparent room with poor heat and sound insulation. In addition, the slippery surfaces of the bottle make it difficult for the bird to move around in the house.
However, these shortcomings can be combated. Note that the assembly of such a product does not require a hacksaw or drill and can be done by a woman or child. A plastic bottle can be painted, covered with an opaque material and lined with fabric on the inside. It is better to use five-liter eggplants.
To prevent the lightweight structure from being swayed by the wind, it must be securely attached to the tree, for example with tape. Obviously, in this situation there is a wide scope for decor and decorations. Below we offer a practical way to use plastic bottles for a bird house.
Bird houses made from scrap materials
 A very interesting house for birds is made from a pumpkin. The internal contents of the plant are cleaned with a spoon through the future entrance. The craft is dried, decorated and hung on a tree.
 Options for “decorating the room” outside can be very different. Note that even in its simplest form, the product has a certain decorative value. Often it is for this purpose that such crafts are made.
 A wooden barrel or pebbles and cedar cones, as well as beer cans, are suitable for building a bird house. Almost any material will do, from beer cans to shoes.
At the same time, it is important to comply with the conditions for comfortable living of birds, which we discuss further in the text.
 An old boot is an excellent home for birds. By the way, the leather version will last quite a long time. The convenience of living in an old snag with a hollow for birds definitely doesn’t need to be explained. Nothing prevents us from adding our human decorations.
 An old bucket is perfect for birds. It is especially convenient to use a piece of plastic pipe to set up a bird house. Very simple and durable. The possibilities for decoration are, as always, unlimited.
Multi-family houses or townhouses for birds
 Probably, apartment buildings were first developed by birds, and then by people. There are a great many options for execution. Just like people, an apartment building can be beautiful.
 These examples look more like townhouses. Probably, next to a “high-rise building” for a large number of birds it will always be possible to observe at least one of them.
At the same time, we must not forget that a cheerful company of birds can harvest your entire garden in one sitting.
Decorative birdhouses
 Decorative birdhouses also have a place. They are designed to decorate rooms. Often decorative crafts are placed in the garden.
 Bird houses can be made by children from paper, cardboard boxes, plastic bottles and beer cans. Of course, in this case no dimensions need to be observed. We have selected for you images of the most typical products that are suitable for a child.
Dimensions of birdhouses and other requirements
There are general requirements for bird housing, regardless of what specific birds they are intended for:
- The bird house must have sufficient thermal insulation and be protected from noise, moisture and drafts. To do this, a wooden birdhouse is made from boards at least 20mm thick. The seams and cracks of the house are sealed with clay, plasticine or tow.
- The structure should not have sharp protrusions that could injure feathered inhabitants. The protruding parts are treated with emery cloth.
- The configuration of the birdhouse should allow birds to easily get in and out. In a birdhouse made of planed boards, the front wall from the inside is roughened using a hacksaw and a drill. A birdhouse made from a plastic bottle is trimmed from the inside with a coarse cloth.
- The material of the bird housing should not emit unpleasant odors. Laminated chipboard and OSB board contain formaldehyde and are not suitable for birds. For the same reasons, the use of plywood is also discouraged. Inorganic adhesives should not be used to assemble the birdhouse. It is better to paint the product with acrylic paints.
- You should not use too bright colors to decorate the house. Birds distinguish colors much better than people, and in nature they are not used to showing off their nest to everyone. It is better not to create a tip for birds of prey and cats. Good paint will significantly extend the life of your product.
- The design and placement of the birdhouse should provide sufficient protection from cats and woodpeckers.
- The birdhouse should not be too large so as not to provoke the female to lay too many eggs. It is difficult to provide food for a large number of chicks, and they will not survive.
 Let us add in more detail a few more significant comments on the “architecture” of bird houses. To protect against feline organized crime groups (organized criminal groups), the birdhouse should be positioned so that it is impossible to climb into it from nearby branches.
It is better not to make a support under the entrance, as the entrance to the bird’s house is called: branches are enough for the bird if the birdhouse is on a tree, and the cats will definitely take advantage of the additional opportunity for criminal purposes. To protect the chicks from attack from above, the overhang of the birdhouse canopy is increased to 70-80mm. The greater the angle of inclination of the roof, the more difficult it is for cats to commit a dirty deed.
 To prevent cat gangs from reaching the birdhouse along the support from below or above, it is wrapped in tin in accordance with the image. The cat slides on the metal and will not reach the chicks. To protect against the claims of a woodpecker, the bird entrance is reinforced with a metal or thick wooden overlay, as in the photo. Then he will not be able to expand the entrance and get to the eggs.
Quite often, birdhouses are made from coniferous wood. Resin released from wood can ruin the plumage of birds. It is better to use birch or alder for a bird's nest. As a last resort, you should choose pine boards without knots.
Different birds have their own characteristics and choose their “apartments” according to their needs. When planning to make a house for certain birds, use its standard GOST dimensions from the table below.
 The bird house mentioned in the table, called a “half nest,” is intended for birds that are accustomed to nesting not in the hollows of trees, but in the recess between the branches. These birds prefer a certain amount of light, and a slit-shaped entrance is suitable for them.
Please note that it is difficult for a wagtail to move on vertical surfaces, and it is better for it to arrange a comfortable area in front of the entrance 8-12 cm wide. For small birds, like pikas, two entrances located opposite each other are organized. It is believed that starlings do not live in green houses.
Choosing a location and methods of attaching bird houses
 Ornithologists recommend placing one birdhouse on an area of 20 m2. In practice, one birdhouse in the garden is enough, since a larger number endangers your cherries and even tomato seedlings. If you install several bird houses, ensure a distance of more than 15 meters between them.
Usually the birdhouse is installed at a height of 2.5-3.5 m from the ground. If there are objects nearby where people often appear and will disturb the birds, increase the height to 4.5-5.5 m.
It is necessary to think about the optimal orientation of the bird's house relative to the cardinal directions. If the entrance to the open space faces south, the house may overheat. It is better to place it in the shade. It is also incorrect to point the entrance towards the most frequently blowing winds, since rain will enter through the entrance to the birdhouse. Also, to protect from rain, you should use the wall or roof of a building, tree foliage, etc.
Often the birdhouse has a special bar for attaching to the support. It can be fixed to inanimate objects with nails and screws. Flexible clamps are used for fastening to trees. Reliable and durable cords and ropes are suitable. In this case, the fasteners should not pinch the tree as the trunk thickens. If the birdhouse you installed is not occupied by residents, try moving it to another location. This circumstance will probably influence the birds' decision.
Workshops on making bird houses
Drawings, dimensions and photos of assembling a wooden birdhouse with decorations
We invite you to familiarize yourself with the drawings of three options for the most common birdhouses made of wood. Let us repeat that it is better to make them from deciduous wood or use pine boards without knots with resin. If you check the size table, you will find that for starlings and other birds the house may have different dimensions than in the drawings. Next, we describe a diagram for assembling a bird house with a pitched roof, following which you can carry out any of the three projects yourself.
 Here is a drawing of a birdhouse made of boards, which is the simplest. A special feature of this design is the removable lid. In order for it to be securely fixed, a 120x120mm insert is provided, attached to the lid from the inside. If you do not plan to remove the cover, the liner is not needed.
 The gable lid looks more interesting, but the design is a little more complicated. Pay attention to the accuracy of the connection of the roof parts with the side walls. Additional compaction with plasticine, clay or hemp may be required in these places. The design does not provide for a removable cover.
 This drawing shows a design with an inclined removable cover. You should pay attention to the careful execution of inclined cuts of the side walls. We present a master class on assembling a birdhouse in two stages: first we make a birdhouse according to the description, and then we decorate it at our own discretion.
 This is what the finished birdhouse will look like
 Let's consider the sequence of actions step by step:
- To make the birdhouse, I used a pine board with a section of 160x20mm. The knots are very small, so the resin will not interfere with the birds.
- For parts 120mm wide, I cut the board lengthwise to this width. I used a 40mm wide scrap as a pole to attach the birdhouse.
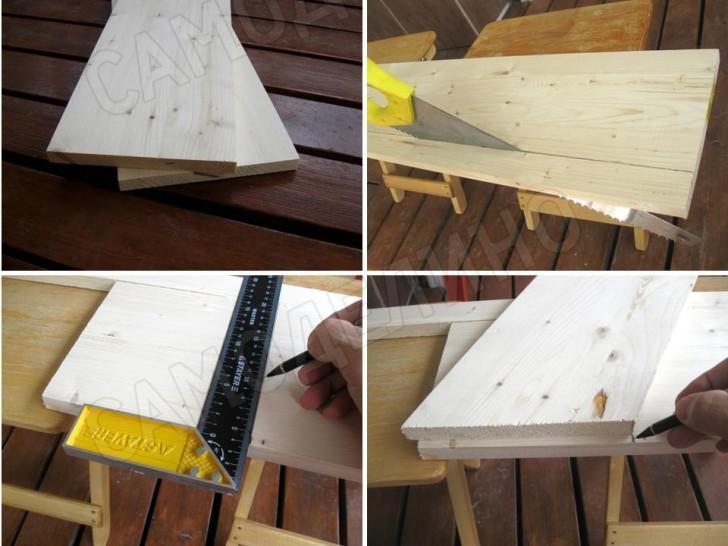
- I used a square to mark the parts. Otherwise, cracks in the craft cannot be avoided.
- I marked the length of the insert under the lid “in place”, it’s more convenient.
- I carefully marked and made a bevel cut on the front and back walls of the product.
- First, I drilled the tap hole with a feather drill.

- However, I didn’t have a feather drill of the required diameter, so I finished the job with a jigsaw.
- I scratched the inside of the front wall with a hacksaw to make it easier for the birds to get out of the house.

- The result was a set of parts shown in the picture.
- The entrance was cleaned with sandpaper for the convenience of the birds.
- To assemble the house, I drilled holes with a diameter of 2 mm for screws. On long walls, three screws are enough, on short walls, two.
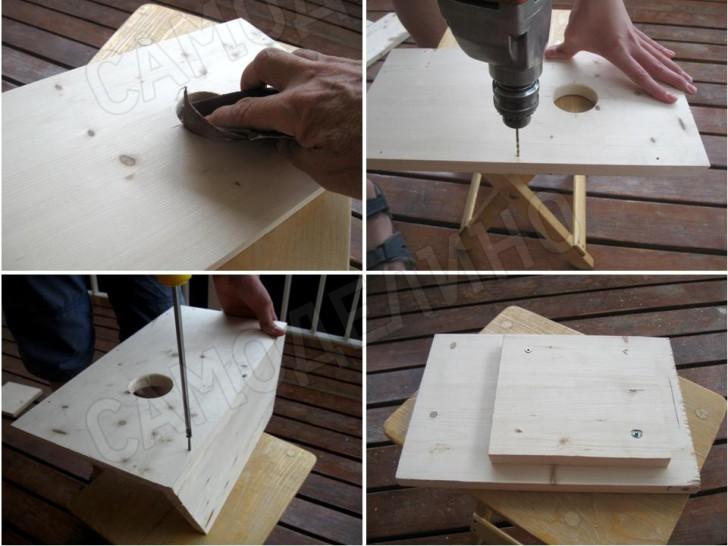
- I fastened the side walls with 3.5x40mm screws; 3.5x35mm screws were used to assemble the lid.

- The result is a birdhouse without cracks or gaps. For those who want to extend the life of the craft with the help of paints and at the same time make a funny birdhouse, follow below.
- First, let's turn the canopy over the entrance into the visor of an improvised cap. We carry out the markings using a compass.

- The cut along an arc was made with a jigsaw and the sharp edges were treated with emery cloth.

- I also used sandpaper to smooth out all the sharp edges of the craft. When doing this type of work, it is convenient to wrap the sandpaper around a wooden block.
- Next, I cut out templates for the eyebrows, eyes, lips and ear of the “Cyclops” from paper. I tried them on for a craft project and remade those that didn’t fit the proportions.
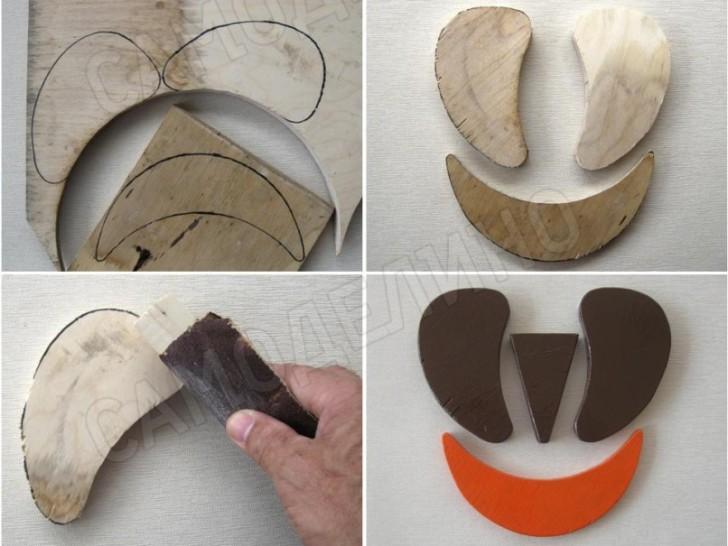
- For false ears I used 16mm plywood, for the mouth – 10mm. I pressed the corresponding templates onto the plywood and outlined the outlines with a marker.
- I cut out all the complex shaped parts with a jigsaw.

- The nose has a geometric shape, so I marked it out using a ruler. I cleaned the cut parts with sandpaper.
- I painted the ears, nose and lid of the birdhouse with brown paint in two layers. For the lips I used red color.
- The body of the “Cyclops head” was painted with yellow acrylic paint. To mark the whites of the eyes and eyebrows, I attached the corresponding templates to the front wall and outlined them with a marker. I did the eyebrows and eyelashes with a black marker. The white of the eye was painted over with white paint.
- The ears, nose and mouth were secured with screws. I invited a cheerful bird – a fashion model – especially for photography.
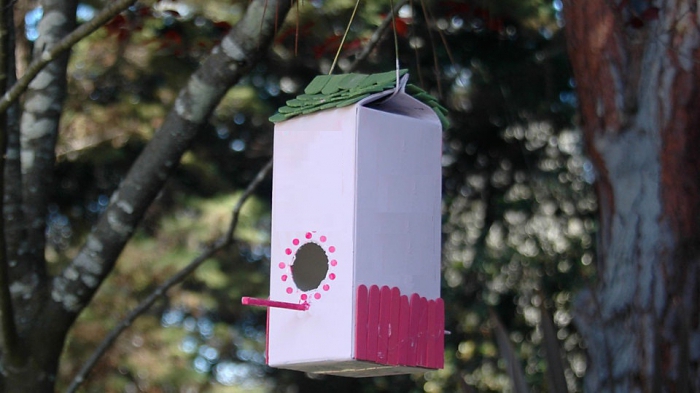
New technologies for assembling a birdhouse from cardboard and bottles for women's and children's hands
Not everyone who wants to build a birdhouse with their own hands has the ability to saw boards, drill and drive screws. On the other hand, plastic bottles and cardboard boxes are available to everyone. Both materials are not suitable for creating a bird house.
 We came up with the idea that a wonderful result would be obtained if these available materials were used together: plastic protects from moisture, and corrugated cardboard provides thermal insulation. We bring to your attention an original project of a bird house made from improvised materials, which can be implemented by anyone at home. Look how we did it in the picture.
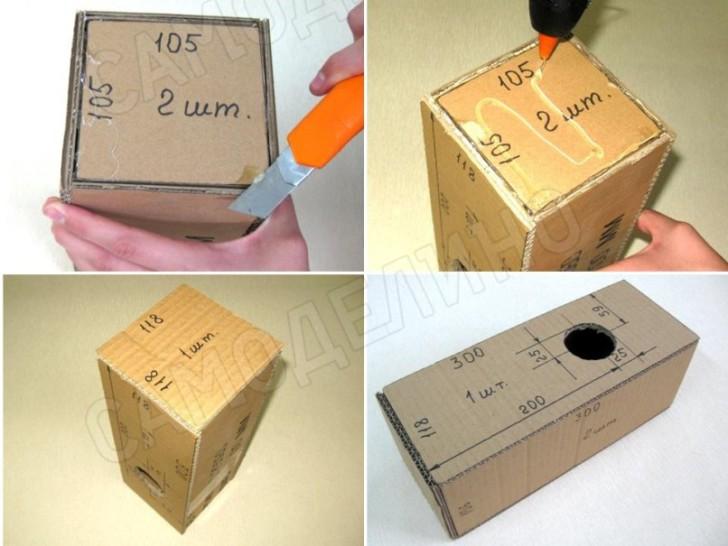
 Here is a presentation of a master class on making an apartment for birds from plastic bottles and corrugated cardboard. In this case, a drawing is not required, since the dimensions are marked on the parts:
- To start, you will need two identical five-liter bottles. We cut one of them from the bottom along the line marked with a marker. The cut is below the protruding part so that the second container can be inserted into the first.

- Corrugated cardboard is best suited two-layer 6mm thick. The marking should be done in a rectangle. We cut the cardboard with a stationery knife using a metal ruler.
- First, we cut out one piece 118x118mm and check how it fits inside the cut container. It is ideal if it clings a little to the walls of the jar. If it passes with a large gap or passes into the container with difficulty, you will have to choose other square sizes. In the case when the size of the bottom and roof is changed or cardboard with a thickness other than 6mm is used, the drawings of the parts will be different. The height of 300mm will not change, the width of the front and rear walls is equal to the size of the bottom and roof, the width of the side wall is equal to the width of the front, minus double the thickness of the cardboard.
- We mark the entrance with a marker in accordance with the image. To obtain a circle, it is convenient to trace the lid of the container with a marker. Cut the hole with a narrow knife.

- We cut out all the details from corrugated cardboard in accordance with the image.

- Using a glue gun, apply glue to the bottom of the back wall.
- We install the bottom liner on the glue. To ensure proper assembly, temporarily install and hold the side wall with your hand. You need to hold the parts until they are fixed with glue.
- The result will be an assembly in the shape of the letter “G”.
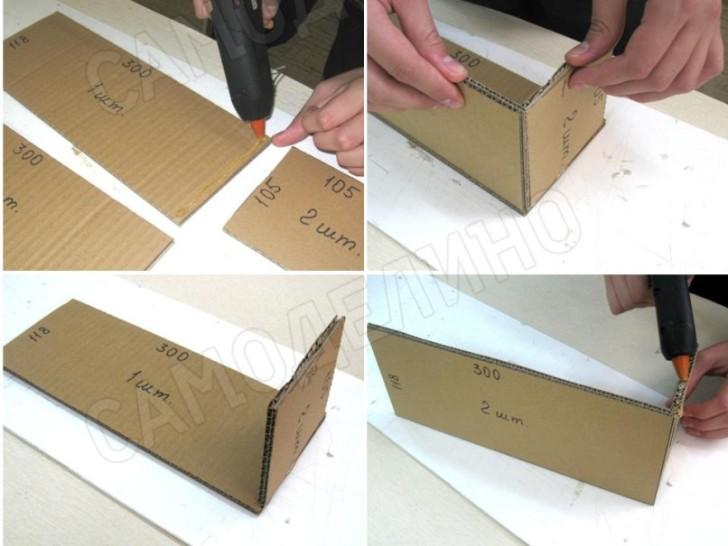
- Apply glue to the end of the bottom.
- Apply glue to the edge of the side wall.
- After installing the side wall and the glue has cured, you will have an assembly of three parts.
- Apply glue to the upper parts of the side and back walls.

- Once the roof liner is installed and the glue has cured, you will have a four-piece assembly.
- Apply glue for the second side wall.
- We install the second side wall and get a box without a lid.
- Apply glue to the ends of the four parts and install the front wall.
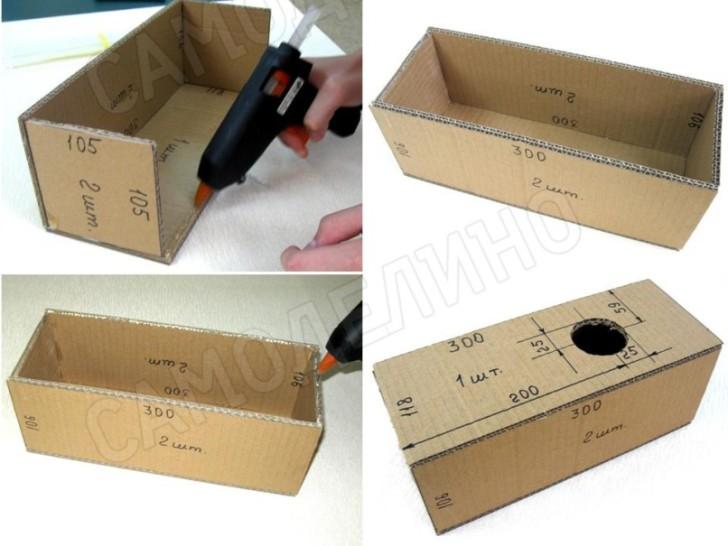
- The base of the craft is ready.
- At the ends of the craft, remove the exposed glue to glue the bottom and roof.
- Apply glue to the four ends of the walls and the bottom liner.
- Install the bottom of the birdhouse.
- Now we have a bird house with an insulated and reinforced bottom.
- This is what the finished cardboard capsule looks like after gluing the roof.

- Carefully insert the cardboard insert into the bottle and mark the tap hole on the bottle with a marker.
- We cut out the tap hole in accordance with the markings.
- We prepare corrugated cardboard parts for insulating the bird house in accordance with the image.

- Everything worked out for us, and the “insulation” is in place.
- We push the parts into place. If they do not fit well, the parts can be trimmed or the cardboard can be crushed at the edges of the long sides.
- After adjusting the size of the second bottle and assembling, mark holes for wire staples on the sides of the birdhouse with a marker. We punch holes at a distance of 20mm so as not to perforate the walls of the product.

- We make two brackets from copper wire with a diameter of 0.5-1 mm in accordance with the holes.
- We move the bottom eggplant down and insert staples into it on both sides. We bend the ends of the staples so that they easily fit into the upper bottle.
- We move the lower bottle into place and insert the staples into the holes on the upper bottle.
- We push the bottom part of the plastic container into place.

- We twist the wire and bend the twist.

- This is what an almost finished birdhouse looks like. We received impeccable thermal insulation and protection from moisture of the bird house.
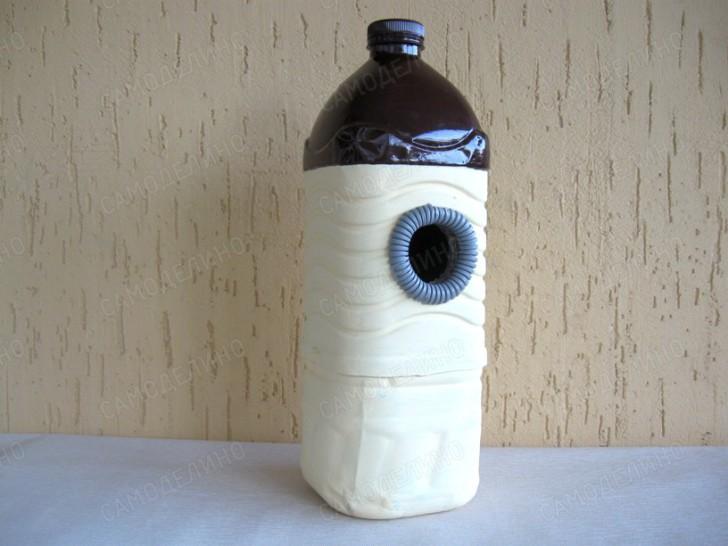
- We painted the top of the house with brown paint, and the bottom with yellow paint. The sharp edge of the plastic can injure the bird. We took a piece of corrugation, cut it lengthwise and put it on the edge of the taphole. You can color the product at your own discretion. The craft resembles a castle tower, so you can create a pattern of battlements from below.
How to make a birdhouse from a log easier
We have already given examples of arranging an original birdhouse made of logs. Birds will definitely like this project, as it resembles a hollow bird familiar to them: it has no cracks and blends in with the surrounding environment. Now let’s look at a master class on assembling such a bird house yourself.
- Do-it-yourself birdhouse made of wood and scrap materials for birds - drawings, dimensions, photos and original ideas Make a birdhouse from cardboard diagram
- Crochet blue rose. Crochet yellow roses. Master Class. Volumetric technique for making a beautiful and lush flower
- How to make a clock out of cardboard?
- Power supply power calculation
- How to set wallpaper on your desktop Put wallpaper on your screen
- How to make sides for a bathroom
- How to cover the outside of a house - a smart choice of material