How to hide the pipes in the bathroom under the tiles
 Live Journal
 Facebook
 Twitter
Sewer and water pipes with shutoff valves located in the bathroom or kitchen in the visibility zone do not add aesthetics to the decoration of the room. At the same time, the pipes of cold water supply and sewage systems are also an undesirable source of cold, lowering the temperature in the bathroom. In addition, condensation forms on the surface of these pipes, flowing down to the floor and requiring constant cleaning.
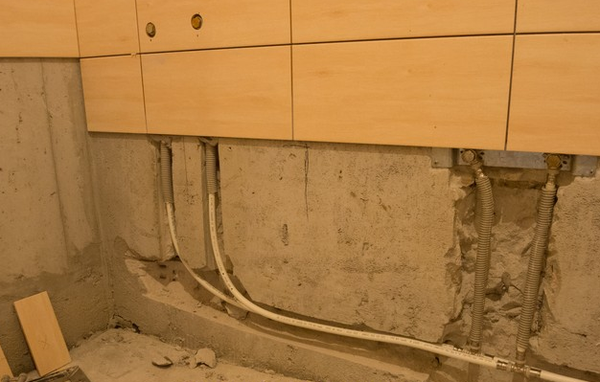
Before you hide the pipes in the bathroom, it is necessary to conduct a thorough inspection
Consider ways to solve these problems, depending on the location of the pipeline and its purpose.
Installation of new systems during construction or overhaul
This situation simplifies the solution of the issue, since installation "from scratch" with a properly thought out sequence of repair work allows you to repair the bathroom with less effort and time.
Installation of plumbing for tiling
The layout of water pipes to hide the plumbing system is carried out along the walls before the production of leveling plastering. So that the plaster layer for covering the pipes does not have to be made unnecessarily thick, channels for plumbing are ditched in the walls of the bathroom. Using a grinder with a “dry cutter”, according to the markings previously made on the walls, parallel cuts are made at a distance of the diameter of the pipes used, after which the material is cut down between the cuts with a perforator or a chisel with a hammer.
Hidden pipes under the tiles must be of excellent quality, then their service life will be as long as possible
Before plastering, the pipes in the channels are fixed with temporary clamps, which can be removed after the first grout has cured. Modern nylon and metal-plastic pipes, which have replaced steel material due to their undeniable advantages, do not need thermal insulation. After leveling plastering, ceramics are laid on top of the wiring.
Sewer pipes, due to their significant diameter, are not recessed into the walls, since chasing the wall to such a depth is fraught with a weakening of the bearing capacity.
The sewerage system can be closed with decorative shells made in various ways.
If the sewerage system is installed "from scratch", then when choosing plastic pipes, preference should be given to a thick-walled variety that is resistant to hot water, since the lining of sewer pipes will make it difficult to repair if a thin-walled material fails.

Sewer and water pipes, being in plain sight, can ruin even the most original design, so you need to hide them
When performing a major overhaul or performing work in an operated room, the technology for finishing sewer pipes in a bathroom is the same. To hide the sewer system under an aesthetic shell, you need to make a box from the frame and cover. For horizontal sections of the sewer, a rectangular section of the box is selected, which makes it easier to maintain cleanliness on the floor. Facing the riser in the bathroom can be made on a frame not only rectangular, but also round, semicircular or oval in section.
Frame manufacturing
The frame for the subsequent finishing of the pipeline is best made from materials that are not afraid of water - steel, aluminum, plastic. The use of galvanized cd-profiles for this purpose with appropriate fasteners used in the installation of drywall will save time and effort. The frame is attached to the wall and floor of the bathroom with self-tapping screws, preferably in places that should subsequently be closed with a box. To firmly seal the frame pins in the wall and floor, you can cement them there in the holes carefully drilled with “crowns”.

Metal gratings are mounted on the installed frame or directly to the pipes
Between themselves, the frame parts are fastened with exhaust-type rivets or also with self-tapping screws. If the frame is made of steel without a protective coating, then after installation in place it is covered with two layers of anti-corrosion paint (you can use lead or iron minium diluted in drying oil).
Thermal insulation of lined pipes
Thermal insulation is carried out to exclude the formation and accumulation of condensate under the box, since slight condensation of moisture will occur on the surface of even plastic pipes, the thermal conductivity of the material of manufacture of which is close to zero. Pipes are insulated with flexible foamed synthetic rubber ("K-Flex"), which is produced both in sheets and in the form of shell pipes with an internal diameter of 6 to 160 mm.
Sheet material is cut into strips, wrapped around the pipes in a spiral or strip and fastened with nylon tie-ties. A longitudinal incision is made on the tubular sheath (sometimes it already exists), and the insulation is put on the pipe, also fastened with nylon clamps.
If there are remnants of sheet glass wool at hand, then it can also be used for thermal insulation, only you need to work with this material in overalls, gloves, goggles and a respirator.
Frame finish
To hide the pipes, the frame must be closed with a waterproof finishing material. The use of drywall for the manufacture of the box is not excluded, but it requires careful waterproofing of such a coating, since even moisture-resistant drywall (GKLV) is not designed for prolonged contact with water. And if on top of the drywall, in order to hide it, lay a layer of moisture-resistant material, then the use of GKLV generally loses its meaning. Therefore, it is advisable to close the pipes in the box with tiles, plastic, textolite or extruded polystyrene foam tiles 1-2 cm thick with a decorative front layer.

Closing the pipes in the toilet with drywall will provide free access to hidden communications in case of repair or elimination of an accident
The listed material, except for ceramic tiles, is attached to the frame with self-tapping screws. It is better to hide the corner joints and junctions of the box with the walls under decorative plastic or metal plates that can be glued with silicone sealant.
Laying tiles on the frame
To soundly close the frame with tiles, you need to build a solid base. The possibility of using drywall for this purpose should be considered only as a last resort, in the absence of other materials.
A fine-mesh (2x2 mm) steel or nylon mesh is fastened on top of the frame with self-tapping screws, rivets in tension, on which a layer of tile adhesive 2-3 mm thick is applied with a flat spatula. After a day, the surface is ready for tiling, which is laid in the same way as on a conventional base. After another 24 hours, the tile joints are rubbed with a moisture-resistant grout mixture. Ceramic joints at the corners are trimmed with decorative plastic or metal trims for tiles.
![]()
In the bathroom, you can use moisture-resistant drywall - GKLV
If there is an inspection window on the section of the sewer to be trimmed, then access to it must be provided. This can be done if you mount a ready-made hatch of the right size assembled with a box, which are commercially available, opposite the window vent. But you can do it easier - do not put the tile opposite the hatch on the glue, but only wipe its joints with colored silicone. This will allow, if necessary, to pull out the tile without damage, and then also put it in place and hide the window.
Risers finishing
The bathroom can have two risers - plumbing and sewer. You can also hide them in a rectangular frame box. Depending on the location of the risers, they can be closed with one box, or each riser is lined separately.
Riser waterproofing
To hide a vertical riser pipe, there is a technology that allows you to simulate a column. A heat-insulating tubular shell "K-Flex" of the corresponding inner diameter and with a wall thickness of 1.5-2.0 cm is put on the riser. The shell is put on the pipe in pieces 0.3-0.5 m long, and gaps of 3 cm.
Installation of the outer shell
A thin-walled plastic pipe with an inner diameter equal to the outer diameter of the K-Flex is selected, and a cut is made along its entire length with a grinder. The gaps between the pieces of the "K-Flex"-shell around the circumference of the riser are filled with mounting foam and, without waiting for its expansion, they put a thin-walled plastic pipe cut along the riser, expanding the slot.
The pipe is pulled together with nylon clamps so that the expanding foam does not open it, and is deployed with a slot to the wall. A day later, the clamps are cut off and a heat-insulated riser is obtained in a shell made of a plastic pipe, attached with its inner surface to the riser with foam rings between the K-Flex insulation sections.
Facing the riser with mosaics
The surface of the plastic shell is primed with a primer that increases adhesion and finished with a mosaic, laying it on a white cementitious adhesive mixture or a polyurethane-based composition.
If the mosaic is laid on a reactive composition, then the base does not need to be primed, but it must be degreased.
When the glue hardens, the mosaic is grouted and the sewer or water riser in the bathroom turns into a column.
Conclusion
Having finished the water and sewer pipes in the bathroom with ceramic tiles and comparing the condition of the room with the situation before the repair, it is impossible not to come to the conclusion that it is not only desirable to equip and close the pipelines in the premises with beautiful cladding for aesthetic reasons, but also necessary to comply with sanitary and hygienic norms.
- How to make a drain in the bath with your own hands
- Water ball valves: types, classification, device and principle of operation
- Sewerage in a private two-story house - scheme
- Piping in the bathroom: diagram and installation principle
- How to hide pipes in the bathroom with your own hands
- Repair and replacement of drain fittings of the toilet bowl
- Plastic pipes for sewerage in a private house: reliability and quality