How to make sandpaper from a washing machine motor. How to make emery with your own hands from a washing machine How to make emery from a 380 V engine

 Live Journal
 Facebook
 Twitter
Reading time ≈ 4 minutes
Many business people wouldn't mind having a functional sharpening machine on hand. Equipment of this type from a good manufacturer is not cheap. It is not at all necessary to spend money on buying a new machine, since it is quite possible to make emery with your own hands, spending a minimum of money and effort.
Among the many power tools needed in the household, emery takes pride of place in demand. It will come in handy in the garage, at the dacha; will be indispensable for any craftsman.
Guided by the photo and video materials in the article, possessing the necessary set of materials and tools, and with minimal skills, you can easily make homemade emery. The design of the future machine will include: an emery stone (sharpener), a support frame, an auxiliary table, and electrical equipment.
Homemade emery from a washing machine engine


The task: how to make emery with your own hands will be greatly simplified by having an old washing machine with a working electric motor on the household. The operating characteristics of the electric motor should be as follows: voltage - 220 Volts, power - 370 Watts, speed - 2800 rpm. By removing the engine from a washing machine that has become unnecessary, you can solve the problem of providing the future emery with an electric drive.
Necessary materials
To make a sharpener, you need to have the following list of materials and structural elements available.
1. Electrical equipment set:
- a capacitor for starting the engine (you can use the one that was in the washing machine);
- switch;
- wires;
- plug with cable.
2. Engine elements:
- flange for attaching an emery wheel;
- grinding wheel for the sharpener (as an option, you can purchase several wheels with different degrees of grain);
- a piece of galvanized sheet.
3.Materials for support frame:
- 2 corners;
- a piece of pipe with a large rectangular cross-section;
- 2 pieces of pipe with a smaller rectangular cross-section;
- rubber shock absorbers.
4. Materials for the auxiliary table:
- 2 metal plates;
- a piece of square pipe;
- set of bolts and nuts.
5. Auxiliary materials:
- primer paint for metal.
Required Tools
Among the tools and devices for making emery, it is advisable to acquire:
- an angle grinder with a cutting wheel for metal and a brush for cleaning metal;
- welding machine;
- drill with a set of drills;
- a set of files;
- vice;
- screwdriver;
- a set of keys;
- tape measure;
- hammer;
- ruler;
- pencil;
- with brushes.
Stages of work on making emery


1. Initially, it is necessary to decide on the dimensions of the future emery machine, develop its diagram, drawings of structural elements. If you wish, you can use the drawings published in the article. The dimensions of the future emery must be brought into line with the dimensions of the available electric motor.


2. It is advisable to order a special flange from a turning workshop for attaching an emery wheel to the electric motor shaft with a set of fastening nuts, since independent production of this element requires special machines, as well as appropriate professional experience.
3. Manufacturing of the support frame.


3.1. Using an angle grinder, on the wide edge of a large rectangular pipe, according to the drawing, a groove should be cut into which the capacitor will subsequently be placed. Also, you will need to cut appropriate recesses in the corners for future installation of the electric motor.


3.2. From the available pipe blanks and corners, it is necessary to weld the frame using a welding machine.


3.3. Using a drill, you need to drill a specified number of holes for mounting the washing machine motor.

4. Making an auxiliary table.


4.1. On the horizontal surface of one of the metal plates, it is necessary to drill longitudinal grooves with a drill, which will serve as guides for moving the table to a certain working position. The surface of the second (top) plate is left smooth.


4.2. Using a welding machine, the elements of the table are welded: 2 metal plates, a square pipe.


5. Due to the bolted connection, the table is fastened to the frame.


6. Using a metal brush attached to a grinder, all roughness and irregularities in the resulting structure are cleaned.


7. All metal parts of the structure are coated with metal paint.


8. Rubber shock absorbers are attached to the lower part of the frame using self-tapping screws.


9. The electrical circuit is assembled and the switch is attached to the frame.


10. A protective apron is made and installed on the engine from a piece of galvanized sheet.
Quite often, home craftsmen feel the need to use sandpaper. It may be required when knives or scissors, as well as other cutting tools that require sharpening from time to time, become dull. Many specialists are in no hurry to purchase such equipment because it is very expensive. There is no need to talk about private consumers, who do not use such equipment as often as professional craftsmen.
Making your own emery
You can make emery with your own hands; if you have an engine from an old household appliance, you can use it. First you need to choose an electric motor that would be suitable for the manufacture of the described equipment. Quite often, motors from old washing machines of the “Vyatka”, “Volga” type are used for design. or “Siberia9raquo;. This technique has a fairly powerful motor.
Among other things, you can borrow a switch from the washing machine that has a starter. Despite the fact that carrying out this work may seem quite simple, it is very difficult to make emery with your own hands. For example, one of the main questions is how a sharpening stone can be mounted on the motor shaft. This is due to the fact that there is not always a thread there. In addition, the diameter of the stone hole may not coincide with the diameter of the shaft. For this reason, you need to prepare a special turned part.
Defining parameters
In order to make emery with your own hands, you need to first determine its parameters. Quite often, asynchronous motors are used to make such an installation at home. For emery, you can use the maximum speed, which is equal to 3000 rpm. If you use a more impressive rotation speed, you may encounter the problem of the grindstone breaking. It is preferable to use a motor at home that has a speed of 1000-1500. If you use an electric motor at 3000 rpm, you need to prepare a fairly strong stone. Among other things, a high-quality flange will be needed. Most often, high engine speeds are used not for sharpening, but for polishing parts. 
In order to make emery with your own hands, it is not necessary to use a powerful electric motor. For a homemade sharpening machine, a more acceptable power limit is 100-200 W. Three-phase and single-phase electric motors can be used.
Flange preparation
Before that, you need to think about how to ensure the connection between the engine and the stone. For this, a flange is prepared. When carrying out this type of work, it is preferable to use the services of a turner. But the rest is a matter of technology and the availability of available materials. It is necessary to prepare a flange, which is mounted on the shaft and also strengthened with a washer. It is necessary to take into account that the thread must be prepared on the nut and flange depending on the direction of rotation of the electric motor shaft. 
If, when making emery with your own hands, the drawings of which will have to be reviewed before starting work, you will use a system in which the rotation occurs clockwise, then a left-handed thread must be prepared and vice versa. If this factor is not taken into account, then the nut will work to unscrew. This will certainly lead to the stone falling off. If there is no suitable equipment for making bushings of a certain diameter, you can use pieces of pipes, and the resulting gap between the shaft and the motor bushings must be compensated by tightening it with electrical tape. You should choose one that has a fabric base. It is necessary to put the bushings one on top of the other. At the same time, when winding the electrical tape, you need to maintain uniformity.
When making emery with your own hands from a washing machine, the sleeve must be made using a pipe whose diameter is 32 millimeters. You should put an emery wheel on it. Such a system of bushings will be mounted on the shaft quite firmly.
If the work is done at home, then you can prepare the thread using a tap, and you will need to clamp the motor shaft in a vice. Before making emery, you need to determine the direction of its work. It is very important. 
With self-made emery, you can adjust the direction of rotation of the rotor. You will need to find the starting and operating windings using a tester. The resistance level of the winding is quite often 12 Ohms, but the starting winding is close to 30. The working winding must be connected to a 220 volt network, but the starting winding must be connected at one end to the coil terminal, while the other must be touched to the second terminal of the winding, and then discarded his.
Features of tool manufacturing
Do-it-yourself electric emery is quite often made at home without using a trigger coil. In this case, after connecting the winding to the network, it is necessary to launch the abrasive stone in a certain direction using your hands, after which the machine will start working on its own.
Carrying out the installation of emery
Let's look at how to make emery from a washing machine with your own hands. First you will need to determine how to properly install it on the workbench. This can be done using a bracket that is removed from the washing machine. Fastening can be done using bolts. The motor, on the other hand, rests on an angle that holds it in a horizontal position. Among other things, it has a cutout that completely follows the outline of the motor housing. 
In order to reduce the force of vibration, you need to put an edging made of a rubber piece of hose on the corner. You can avoid injury from a working saw and flying debris from the abrasive wheel when using the machine by making a casing. It is preferable to make it from steel. For this you need to choose a canvas whose thickness is 2.5 millimeters. This could be a strip of metal that needs to be rolled into a half ring shape. Under the working surface of the emery wheel, it will be necessary to mount a galvanized sheet element, which will protect the workbench from the effects of flying sparks formed during work. All actions for your own safety should be performed using special glasses.
Finally
As accessories for equipment, you can use plexiglass, the thickness of which should be 5 millimeters. It is mounted on the engine casing, and it is necessary to use an attachment. The fastenings should be made in such a way that the element can be tilted 180 degrees. 
You also need to make a tool rest, which is necessary for a strong and reliable support of the workpiece. All work can be done independently, without the help of a specialist. To do this, you will need to stock up on the appropriate tools and materials. In addition, there is no way to do without the recommendations that were presented in the article.

Never do this in church! If you are not sure whether you are behaving correctly in church or not, then you are probably not acting as you should. Here's a list of terrible ones.

How to look younger: the best haircuts for those over 30, 40, 50, 60 Girls in their 20s don’t worry about the shape and length of their hair. It seems that youth is created for experiments with appearance and daring curls. However, already last.

What does your nose shape say about your personality? Many experts believe that you can tell a lot about a person's personality by looking at their nose. Therefore, when you first meet, pay attention to the stranger’s nose.

What is it like to be a virgin at 30? I wonder what it’s like for women who didn’t have sex until almost middle age.

9 Famous Women Who Have Fallen in Love with Women Showing interest in someone other than the opposite sex is not unusual. You are unlikely to be able to surprise or shock anyone if you admit it.

15 Cancer Symptoms Women Most Often Ignore Many signs of cancer are similar to symptoms of other diseases or conditions, which is why they are often ignored. Pay attention to your body. If you notice.
How to assemble emery with your own hands
Every owner, one way or another, is faced with a situation where she needs to sharpen knives, scissors and other sharp objects that become dull over time. You can turn to a master every time and pay a lot of money for his services or buy ready-made emery, or you can be smart and please your wallet by making emery yourself.

Basic materials and tools
The principle of operation of a homemade device
In order to construct a homemade emery, you need an electric motor left over from using old household appliances.
It is the electric motor that puts the product into operation, as a result of which the attachments, pre-sharpened on lathe equipment and installed on the motor shaft, sufficiently clamp the emery wheel.
How to choose an electric motor
Most often, craftsmen choose as a motor an electrical device left over from an old-made washing machine, for example, “Volga”, “Sibir” or “Vyatka”. As you know, the equipment made during the Soviet era was of high quality, so the engines were also quite powerful, with high reverse performance. From such a washing machine, you will also need a switch with a manual starter mechanism.
The main difficulty encountered is the precise placement of the whetstone directly on the engine shaft. The shaft does not always have a thread; the size of the hole in the stone may also not correspond to the size of the shaft. A specially machined part that will smooth out the dimensional discrepancy will allow you to cope with this task.

The maximum speed limit used in emery is 3000 revolutions per minute. This nuance cannot be ignored, because a high rotation frequency can cause the sharpening stone to rupture. It is preferable to use a product at home with an engine speed of 1000 to 1500 rpm.
However, if you wish, you can make a more durable emery with your own hands; to do this, it is enough to fix a high-quality flange. A powerful device may be needed not for sharpening, but for polishing various surfaces.

So, the power of a wear-resistant machine should be 400 W; at home, a device with a power of 100–200 W is sufficient.
Manufacturing process
Flange undercut
As you know, the flange connects the engine and the stone. If you do not have experience working on a lathe, seek help from a specialist by providing a detailed drawing of the future device, with measurements of the diameter of the stone on the inner surface and the size of the shaft.
The made flange must be correctly placed on the shaft, the result must be secured with fasteners, for example, a bolt and a nut; it is preferable to use an additional threaded washer located on the left side.

Depending on the vector of rotation of the shaft, a thread is formed on the fasteners. Clockwise rotation requires left-hand threading, counterclockwise rotation requires right-hand threading. This is the principle of tightening the nut; if you neglect it, the part will unwind, and the stone will most likely fly off from its installed place, which is dangerous for the person who works with the emery.
However, not everyone has the opportunity to make emery with their own hands with point bushings of a certain size, as required by technology. Pieces of pipes will help to cope with this situation at home; cracks and voids formed between the bushings and the shaft can be hidden by wrapping them with textile tape. Another option is to sequentially place a smaller bushing in a larger one.
When winding the electrical tape, follow the uniformity. The sleeve is made from a pipe whose diameter is 32 mm, coinciding with the inner diameter of the emery circle. After which the circle must be placed on top of the sleeve.
Taking into account the direction of the emery work
Before you make emery with your own hands, decide on the vector of its work. For convenience, you can independently change the direction of the rotations the rotor makes. If the engine is taken from a washing machine, it can be considered asynchronous, which means there are no obstacles to changing the direction of rotation.

Find the windings intended for starting and operating, use a tester. How to distinguish the starting and working windings? The resistance indicator of the first reaches 30 Ohms, the working one - 12 Ohms. The working element is connected to a 220 W power supply, the trigger works when one end is connected to one of the terminals located on the coil, with the other end it is enough to touch the next terminal for a short time and immediately put it aside.
Self-installation of emery
After the homemade emery is designed, proceed to fixing it on the workbench. Remove the bracket from the equipment and secure the product to the workbench using bolts. Position the motor horizontally. To reduce the amount of vibration that occurs during installation, place a edging made from a rubber piece of elastic hose on the corner.
Safety precautions include the creation of a special casing that will protect against breaking off fragments of the abrasive wheel. Use a thick metal ring (strip), 2–2.5 mm in size.
 Position the sandpaper so that it is convenient for you to work with it
A small piece of galvanized sheet should be fixed under the workpiece, which will serve as good protection for the workbench from flying flammable sparks. Don't forget to wear special glasses.
The sanding machine will be more complete and professional if you use plexiglass, the thickness of which is 5 mm, it is fixed to the engine casing. If desired, you can design a homemade emery with glass that tilts at an angle of 180 degrees. A hand rest you can lean on will add convenience.
Conclusion
You have already seen that you can assemble emery with your own hands at home. A little diligence and patience, and a useful device will be constructed.
Follow the step-by-step technology. described above, do not neglect the basic safety rules, treat the process responsibly, everything is in your hands.
How to make homemade emery
Making emery with your own hands is not at all difficult, especially considering that the components for it are available and inexpensive. Such a device will become indispensable in the household, as it allows you to quickly and efficiently sharpen tools, kitchen knives, and grind surfaces made of various materials. The cost of finished emery is quite high, especially for professional equipment. In most cases, parts of a homemade device can be obtained for free or for a purely symbolic price. Creating such a device from scratch will allow you not only to save money, but also to prove yourself as a true master!

Emery can be used for roughing metal, as well as grinding and sharpening tools.
What kind of work can be done with sandpaper?
This question is asked by home craftsmen who are not yet completely sure of the advisability of creating emery. Depending on the rotation speed and grain size of the abrasive, sandpaper can be used to perform both rough processing of metals and their grinding and finishing. If there is a stop with adjustable angle of installation, it is easy to accurately sharpen cutters, chisels and drills. You can sharpen an ordinary kitchen knife on this machine in just a few seconds, without much effort.
If your hobby is working with metal, grinding it or forging knives, then using sandpaper and a set of circles of different grain sizes, you can polish the surface of the material to a mirror shine.
Rest assured, having emery in your home will greatly expand your capabilities.
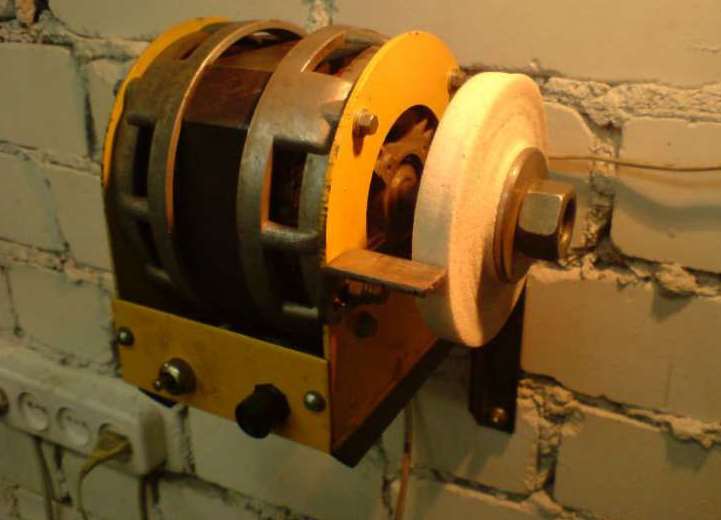
The engine is the main part of the emery

Homemade emery device.
The main working tool of an emery machine is a whetstone, but without a powerful electric motor you can’t get much use out of it. An engine of optimal size and power can be obtained from an old Soviet-made washing machine; fortunately, they can easily be found at the nearest market or in newspaper advertisements under the “I’ll give it away for free” section. Most washing machines of this type, despite their rather advanced age, have a fully working engine. Its power is about 100-200 W depending on the model. This is quite enough for home emery. The rotor rotation speed should be no more than 1500, and preferably 1000 revolutions per minute, otherwise the risk of destruction of the grindstone during operation increases, which leads to tragic consequences.
Motors of old-style washing machines are represented mainly by asynchronous models. This means that a simple modification of the device will allow you to change the direction of rotation of the rotor. To do this, swap the connection points of the starting or operating winding.
A standard washing machine motor has 4 outputs: two of them are for connecting to the network, two more are for connecting the starter. They can be distinguished from each other by their resistance. Arm yourself with a regular tester and take resistance measurements. For the working winding, which is connected to the network, it will be 12 Ohms, while for the starting winding this parameter is 30 Ohms. By swapping the connection points of one of the windings, we will result in the rotor rotating in the opposite direction.
How to assemble emery

Diagram of sandpaper from a washing machine motor.
Homemade emery may have a different appearance from the standard one, but the main components are always the same. These include:
- Electrical engine;
- sharpening stone with lock;
- bed;
- protective casing;
- handyman
Assembling all the parts together begins with choosing the material for the base - the bed. It can be made of sheet metal, wood or durable thick plastic. Preference should be given to metal, as it has high reliability, fire safety and, due to its weight, ensures the stability of the device on any surface. If the device is mounted with bolts, rubber gaskets can be used at the fastening points. They reduce the vibration that occurs when sanding. Also, the collapsible design allows you to transport the tool to another place of work at any time.
If you choose not a metal base, but a plastic or wooden base, its surface in the working area should be covered with a layer of galvanized iron 0.5-1 mm thick. This will protect the workplace from fire due to hot sparks hitting a flammable surface.

Figure 1. Shaft adapter diagram.
The electric motor has 4 long mounting pins in its housing, the presence of which greatly facilitates the installation of the motor on the frame. To do this, two iron corners are welded or bolted to the metal surface, placing them parallel. Two holes are made in them, to which the pins will be attached. The installation of the motor can be done by slightly re-equipping it or leaving the original motor bracket, which attaches it to the body of the washing machine, in its original form.
The most difficult stage of assembling a homemade device is finding or making a clamp for the grinding wheel. Due to the fact that the rotor shaft is smaller than the diameter of the hole in the grindstone, a special adapter may be needed (Fig. 1). It allows you to securely fix the stone, preventing it from slipping. On the reverse side, the sharpening stone is attached to the adapter with a nut, under which a cardboard spacer is installed. The thread of the nut is selected right or left, depending on the direction of movement of the grinding wheel: when moving clockwise, the nut is installed with a left-hand thread, otherwise - with a right-hand thread. The cardboard spacer is used to prevent excessive clamping force from breaking the abrasive stone.
The most important indicator that a homemade emery should have is safety.

Figure 2. For sharpening corners, it is better to make an adjustable tool rest.
Therefore, such a device must be equipped with a protective casing, which can save not only from small metal particles and sparks, but also minimize the risk of injury in the event of an unexpected split of the sharpening stone. For ease of use, the casing can be made of transparent impact-resistant plastic. In addition to plastic, you can use sheet iron with a thickness of 2-2.5 mm. Do not forget about the constant use of personal protective equipment for eyes and hands.
A small metal plate called a handrail allows you to correctly distribute the load on the material. It is designed to rest tools or materials on it during processing. The tool rest can be made adjustable (Fig. 2), so the sharpener can be optimally used for sharpening cutters and other tools for which the angle of the working surface is important.
Safety when working with sharpening tools
Although the described sharpener has low power and is intended for home use, in terms of safety it requires no less care than professional equipment. By adhering to the following rules, you will protect yourself and others from the risk of injury while working:
- Even for short and simple work, use safety glasses. They will reliably protect your eyes from hot scale and abrasive fragments.
- Before starting work, check the stone for tight fit on the shaft, absence of cracks and chips. If necessary, replace the stone.
- Do not touch work surfaces or moving parts with your hands.
- The device you will be working with is an electrical device and therefore there is a constant risk of electric shock. Therefore, check the integrity of the wire braid; if any malfunctions are detected, you should immediately stop working.
- Be sure to use a protective cover when working. Yes, it reduces visibility and is not so convenient to work with, but the level of safety with its use increases significantly.
Conclusion on the topic
Self-assembling emery from scrap materials is a fairly simple task, which will allow you to get a universal tool for grinding, cutting and sharpening metal materials.
You can now make any knife, chisel or drill sharp in just a couple of seconds, without much effort.
When working with emery, it is very important to follow all safety rules.
How to make emery with your own hands
There is a constant need on the farm to sharpen knives and other household items. Some turn to paid services for help, while others find an original solution by making their own sandpaper. How to make emery with your own hands at home? You can learn about this from this article, which contains the experience of a large number of homemade products.
Why is it needed?

Emery is needed to perform a variety of jobs. For example, this could be sharpening drills. During operation, the drills heat up and, as a result, become dull. Throwing them away and buying new ones is a completely illogical solution. Moreover, with the presence of emery, you can sharpen the drills yourself. This also applies to a kitchen knife. Perhaps more than one housewife asks her husband to sharpen a knife. The usual friction of knife against knife is a difficult task, especially since such sharpening will not last long. For this reason, having your own emery at home is always a plus.
Although, of course, you don’t have to waste time making a homemade device, since you can buy ready-made emery, still, if you have all the necessary parts, why not make the emery yourself?

One of the important components of a homemade emery is an adapter with a flange. It can be made on a lathe. What does that require?
- Make a sketch.
- Indicate the dimensions of the motor shaft diameter.
- The diameter of the internal hole of the grinding stone.
As for making the flange, it can be made separately or directly on the adapter. Depending on the direction of the shaft, the thread cutting direction must be selected. If the shaft moves clockwise, then the thread is left-handed, and exactly the opposite. In this case, the nut will tighten randomly during the sanding process. And this, in turn, will make the use of emery safe.
What if there is no suitable cylindrical material for the adapter bushings? In this case, take a thick-walled pipe. The resulting gap between the bushing and the engine can be filled with woven electrical tape. However, this option is not the most reliable.
To avoid having to reel it in, you can use a metal pipe with an outer diameter of 32 mm. She will dress quite simply and reliably.
Electric motor

Very often, emery is made from a washing machine motor. It is necessary to put sandpaper on the motor shaft and fix it on it. So, you can use a motor from a washing machine “Vyatka”, “Riga”, etc. These and similar engines have sufficient power. You will also need to take a starter from such devices.
The recommended speed for sanding is 1000–1500 per minute. If the revolutions exceed 3 thousand, this can lead to a rupture of the circle. The higher the engine power, the stronger the sanding wheel will be required, as well as the mount for it.
As for power, 100 or 200W will be enough. If it is necessary to sharpen large parts, the motor can reach a power of up to 400 W.
Assembly and installation

You should be careful when attaching the emery. The safety of its operation directly depends on the quality of fastening. It is recommended to use brackets for mounting to a workbench. You should also use an angle with a rubber gasket to reduce vibration. Be sure to make a protective casing that will protect your eyes and other exposed areas of the body from debris. The casing is made from a strip of metal up to 3 mm thick. Cut out a strip and secure it in the shape of a half ring on sandpaper.
Also keep in mind that sparks may form when sharpening metal objects. To protect the workbench (especially if it is wooden) from fire, it is recommended to install a metal sheet underneath.
To increase the quality of protection, plexiglass up to 5 mm thick can be attached to the engine casing. Having secured it to the hinges, it can be folded back.
It is equally important to pay attention to safety precautions. You cannot work on a workbench wearing clothes whose sleeves are hanging down.
So, we examined with you the features of making homemade emery. If you have your own experience in this work, then write your comments at the end of this article. For beginners, we recommend additionally viewing the prepared video material.
How to make emery with your own hands
Of course, you have heard more than once about the benefits of emery in the household, even if you are not a fan of making crafts with your own hands. After all, in every home there are knives, scissors and other piercing and cutting instruments that require sharpening from time to time. But the price of sandpaper in most retail outlets will not please you! And so why not think about making this incredibly useful tool yourself?
Purpose of emery
Many people use drill bits to make holes in metal using a drill press or drill. After a certain time, the drill begins to get very hot and drills worse, due to the fact that it has become dull. And all this happens quite quickly if you drill with a drill at high speeds. There are cases when the drill breaks off in the middle if it is “bitten”; when leaving the metal, and the part was not secured.
Accordingly, working with a blunt instrument is a pain. Nowadays, few people remember how tool sharpeners used to go from house to house with small portable sharpeners and sharpen all kinds of tools, including knives. Nowadays, you can, of course, go to the store and buy a completely new tool with factory sharpening, and you can also sharpen a drill at home.
To sharpen drills, you should use a commercial sharpening machine, or you can also sharpen them using homemade sandpaper. A sharpening machine is a necessary and irreplaceable thing in the household. It can be used to sharpen almost any tool and can also be used for sanding wood.

Every tool store sells electric sanders. Quite a large selection of them. You can purchase either a very small sandpaper in order to correct dull cutting tools, or a fairly powerful sharpening machine, with which you can grind off a large layer of metal from any part.
The best purchase would be a double-sided electric sandpaper, with finishing wheels on one side and rough grinding wheels on the other. To prevent injury, these circles must have protective covers in case of destruction or damage to the circle while the engine is running. It is also desirable that the electric sharpener have adjustable working stops for the tools being sharpened and spark-proof shields with protective glass.
Electric sanders with adjustable rotation speed are quite convenient. When removing a large layer, you need to use increased speed, and the “finishing” itself must be used. It is better to make the cutting edge at low speeds. This will, of course, prevent the metal from burning. From time to time, when sharpening a tool, it is necessary to cool it in a bath of water.
DIY emery
Every man may have an engine from a household appliance in his hands, and the question of how to make emery with your own hands from scrap materials immediately begins to loom in your head. For this, all kinds of electric motors are used, on the shaft of which attachments specially turned on a lathe are installed, which are designed to clamp the emery wheel.
Motor selection
For this purpose, they usually use motors from old-made washing machines, such as Volga, Riga, Siberia, Vyatka. and so on. The engines on such machines are quite powerful and reversible. Switches with a starter are also used from such washing machines.
Despite the fact that it seems quite simple, it is not at all easy to assemble homemade emery from the engine of a Soviet washing machine. For example, one of the main questions is how to attach a whetstone to the motor shaft. After all, there is not always a thread, and the diameter of the hole in the stone may not coincide with the diameter of the shaft.
Therefore, a special turned part is needed that would compensate for this disproportion. To make homemade emery with your own hands, you need to know its future parameters. In most cases, asynchronous electric motors are usually used to make emery at home.

For emery, the maximum speed is considered to be about 3000 rpm. A sharpening stone can simply burst at a very high rotation speed. It is best to use an engine at home with 1000 - 1500 rpm. If a 3000 rpm electric motor is to be used, a fairly strong stone must be present and a quality flange made. Most often, high engine speeds are used not for sharpening, but for polishing products.
In order to make emery with your own hands, it is not necessary to use powerful electric motors for such purposes. Although experienced craftsmen say that for a homemade sharpening machine, an acceptable power is 400 W, and for home use, an engine with a power of about 100 - 200 W from a Soviet washing machine is enough. Of course, it is low-revving, but this is very good.
You can use three-phase and single-phase electric motors to make emery with your own hands. Both are included in a single-phase network. The device is connected to a single-phase network via a capacitor.
Flange undercut
To connect the engine and the stone, you need to machine a flange. For such purposes, it is best to contact a turner with a drawing of the emery, the dimensions of the internal diameter of the stone and the diameter of the motor shaft. And the rest is a matter of technology and the availability of available materials.
You will have to grind out the flange itself, which is mounted on the shaft and is also fixed with a bolt, and a nut, and a washer with a left-hand thread. You also need to take into account that threads are cut on the nut and flange, depending on the direction of rotation of our electric motor shaft. If the rotation occurs clockwise, then the thread should be left-handed, if suddenly it’s the other way around, the thread should be right-handed. During operation of the table emery machine, the emery nut will spontaneously tighten. If you neglect this factor, the nut will work to unwind, and therefore the stone may fly off. And, of course, this is extremely dangerous.

What should you do if it is not possible to manufacture point bushings of a certain diameter? In this case, pieces of pipes of suitable diameter may be useful, and the gaps between the bushings and the engine shaft can be compensated by winding fabric-type electrical tape between the bushings. In addition, you can put the bushings on top of each other.
In this case, the most important thing when winding electrical tape is to maintain uniformity in order to avoid the formation of large beats during rotation. The sleeve is made from a pipe with a diameter of 32 millimeters, equal to the internal diameter of the emery wheel. An emery wheel is placed directly on it so that it can fit tightly without winding.
This bushing system sits quite tightly on the shaft. But fixation with a bolt and washers is required. At home, you can cut a thread in a shaft using a tap, while holding the electric motor shaft in a vice. In this case, it is necessary to determine the correct hole diameter for the thread.
Direction of work
Before you make emery at home, you need to find out the direction of its work. With homemade emery, you can change the direction of rotation of the rotor. If, for example, the motor is from a washing machine, then it is asynchronous, that is, when switching the corresponding windings, you can change the direction of rotation. Also, in motors from old household appliances there are 3 - 4 outputs. For example, with 4 pins, changing the direction of rotation is not difficult.

For these purposes, we find the starting and operating windings using a tester. The resistance level of the working winding is usually 12 ohms, and the starting winding is close to 30 ohms. The working winding is connected to a 220 W network, and the starting winding is connected securely with one end to one terminal of the coil, and with the other end you need to briefly touch the second terminal of the winding and then immediately discard it (special relays are usually used for this). If you use a capacitor motor, the connection circuit will be different.
This means that your emery will spin in one direction, and if, for example, you swap the leads of the starting winding, then the motor will correspondingly rotate in the opposite direction. You can, in principle, do without a starting coil; in this case, after connecting the working winding to the network, you need to turn the abrasive stone in a certain direction, and then the machine will work.
Installation of emery
After you have made your homemade emery, you need to figure out how to properly install it on your workbench. This is done using a bracket, which is also removed from the washing machine and bolted to the workbench. The engine, on the other hand, rests on an angle that supports it in a horizontal position, and also has a cutout that completely follows the shape of the engine housing. To reduce vibration, a edging made from a rubber piece of hose is put on the corner.
To avoid injury from the saw and flying debris from the abrasive wheel when working on a homemade sharpening machine, it is necessary to make a casing. It is best to make it from thicker metal - 2 - 2.5 millimeters. This can be a strip of metal rolled into a half ring.
Under the working body of the emery, you directly need to screw a small piece of galvanized iron sheet, which will protect the workbench from sparks during work. For your own safety, all work must be carried out in special glasses or other protection.
As devices for emery, you can use plexiglass, 5 millimeters thick. This glass is attached to the engine casing using hinges; it can be tilted 180 degrees. Also, for the usefulness of the machine, it is necessary to make a support for the workpiece.
Of course, the benefits of an electric sharpener cannot be doubted! After all, you won’t use a new ax or drill every time. And buying sandpaper for this is a bit expensive. But there is a way out, you just have to spend a little time and collect the emery with your own hands. Follow our instructions carefully, provide the necessary protection for the machine and do not neglect safety requirements during operation.
There is a constant need on the farm to sharpen knives and other household items. Some turn to paid services for help, while others find an original solution by making their own sandpaper. How to make emery with your own hands at home? You can learn about this from this article, which contains the experience of a large number of homemade products.
Emery is needed to perform a variety of jobs. For example, this could be sharpening drills. During operation, the drills heat up and, as a result, become dull. Throwing them away and buying new ones is a completely illogical solution. Moreover, with the presence of emery, you can sharpen the drills yourself. This also applies to a kitchen knife. Perhaps more than one housewife asks her husband to sharpen a knife. The usual friction of knife against knife is a difficult task, especially since such sharpening will not last long. For this reason, having your own emery at home is always a plus.
Although, of course, you don’t have to waste time making a homemade device, since you can buy ready-made emery, still, if you have all the necessary parts, why not make the emery yourself?
One of the important components of a homemade emery is an adapter with a flange. It can be made on a lathe. What does that require?
- Make a sketch.
- Indicate the dimensions of the motor shaft diameter.
- The diameter of the internal hole of the grinding stone.
As for making the flange, it can be made separately or directly on the adapter. Depending on the direction of the shaft, the thread cutting direction must be selected. If the shaft moves clockwise, then the thread is left-handed, and exactly the opposite. In this case, the nut will tighten randomly during the sanding process. And this, in turn, will make the use of emery safe.
What if there is no suitable cylindrical material for the adapter bushings? In this case, take a thick-walled pipe. The resulting gap between the bushing and the engine can be filled with woven electrical tape. However, this option is not the most reliable.
To avoid having to reel it in, you can use a metal pipe with an outer diameter of 32 mm. She will dress quite simply and reliably.

Very often, emery is made from a washing machine motor. It is necessary to put sandpaper on the motor shaft and fix it on it. So, you can use a motor from a washing machine “Vyatka”, “Riga”, etc. These and similar engines have sufficient power. You will also need to take a starter from such devices.
The recommended speed for sanding is 1000–1500 per minute. If the revolutions exceed 3 thousand, this can lead to a rupture of the circle. The higher the engine power, the stronger the sanding wheel will be required, as well as the mount for it.
As for power, 100 or 200W will be enough. If it is necessary to sharpen large parts, the motor can reach a power of up to 400 W.

You should be careful when attaching the emery. The safety of its operation directly depends on the quality of fastening. It is recommended to use brackets for mounting to a workbench. You should also use an angle with a rubber gasket to reduce vibration. Be sure to make a protective casing that will protect your eyes and other exposed areas of the body from debris. The casing is made from a strip of metal up to 3 mm thick. Cut out a strip and secure it in the shape of a half ring on sandpaper.
Also keep in mind that sparks may form when sharpening metal objects. To protect the workbench (especially if it is wooden) from fire, it is recommended to install a metal sheet underneath.

To increase the quality of protection, plexiglass up to 5 mm thick can be attached to the engine casing. Having secured it to the hinges, it can be folded back.
It is equally important to pay attention to safety precautions. You cannot work on a workbench wearing clothes whose sleeves are hanging down.

So, we examined with you the features of making homemade emery. If you have your own experience in this work, then write your comments at the end of this article. For beginners, we recommend additionally viewing the prepared video material.
Video
Often a situation arises when it is necessary to sharpen a tool or sharpen knives. To perform these works, a sharpening machine is best suited - it is also called a sharpener or an emery machine. This is the simplest power tool, which consists of electric motor and abrasive wheel. There are many options sold in the retail chain, which differ from each other in price and manufacturer, but are designed to perform one function - sharpening a cutting tool. Do not rush to purchase a factory-made electric sharpener: any home craftsman can make it with his own hands if he has the necessary spare parts.
To make emery yourself, you first need to select a suitable electric motor. Most often this is a motor from an old-style washing machine, for example, Malyutka - it is perfectly suitable for this purpose. Such a motor meets certain requirements: its power is in the range of 100-200 W, and the speed does not exceed 1500 rpm. If the rotation speed is higher, there is a risk of destruction of the abrasive wheel.
High engine speeds are needed for polishing parts, but they are not suitable for sharpening.
To make homemade emery, you can use any another electric motor. It must meet certain parameters.
- Shaft rotation should be minimal. Motors with no more than 1,000 rpm are best suited.
- The motor power should be between 100 W and 1 kW. The most commonly used motors are 400 W motors.
- It is desirable that it has legs for fastening.
- A single-phase or asynchronous motor, designed to be connected to a 220-volt network, is best suited.
Algorithm for assembling emery from a Malyutka washing machine motor
First of all we do frame of the future mechanism. It can be made from a thick wooden board, wood slab, suitable plastic, but a thick metal slab is best. The electric motor is attached to it using brackets, corners or clamps. The connection between the electric motor and the stone occurs via a flange.

Homemade flange
Flange manufacturing- one of the technically difficult operations when assembling homemade emery. It is usually done using a lathe. To do this, it is necessary to measure the diameter of the output shaft and the abrasive wheel that will be used in the sharpening machine. However, if you don’t have a lathe at hand, you can do without it. In the video below you can see how to make an emery flange from scrap material yourself:
Securing the flange on the shaft using a nut, bolt and washer. In this case, it is necessary to take into account the direction of rotation of the shaft: the thread on the nut should be in the opposite direction.
This is done for safety reasons so that during operation the nut does not unwind under the influence of vibration of the machine, which can cause the abrasive wheel to fly off and cause injury.
Finally, all that remains is to mount the electric sharpener in a permanent place and supply electricity. The emery from the Malyutka engine is ready.

In the case of using an engine removed from an automatic washing machine, you can make a sharpening machine in a similar way, the only difference is in connecting the electricity. The motor from an ordinary washing machine has four wires: two are connected to the working winding, and the other two are connected to the starting winding. To determine the working winding, it is enough to measure the resistance of both. The resistance of the starting winding is 30 Ohms, and the working winding has only 12 Ohms. The engines of modern cars have six terminals, two of which are the output of a tachometer with a resistance of 70 Ohms. Finding them won't be difficult. These wires must be insulated.
Connection diagram is as follows: both windings are connected in parallel and connected to the network, and a button is connected to the gap in the starting winding. To do this, you can take a starter or adapt a button from a doorbell.

How to adapt a drill and grinder to an electric sharpener
You can make emery not only from a suitable electric motor available. You can use a power tool for this - it could be an electric drill or a screwdriver.
The latter is less suitable for these purposes: it has insufficient power and a short battery life.
Making a sharpener from a drill begins with purchasing a nozzle.

The sharpening stone is secured in it and then clamped into the chuck. All that remains is to secure it to a stationary base using a special mount, which can be purchased at a store that sells power tools. With the help of such an electric sharpener you can straighten an ax, sharpen a kitchen knife or thread a drill.

In case of emergency, a sharpener can be made from Bulgarian. To do this, you do not need to purchase special devices and mandrels necessary for attaching the emery. You just need to fix it in a horizontal position on a massive base, install a standard cutting or sharpening disk, and the sharpener is ready for use.
Mini sharpening machine
An electric sharpener is sometimes necessary if the master does modeling: When working, you often need to sharpen small parts. A large sharpener is not suitable for doing small work, so they often make mini-emery with their own hands. The assembly algorithm is as follows:
- take the motor from a computer hard drive or a children's toy;
- the tension sleeve of the spoke from the moped is soldered to the engine axis;
- a small grinding wheel is screwed to the shaft with a screw and washer;
- connect the power supply;
- fix the device on the bed, and the emery is ready.

Often, electric motors from a faulty sewing machine are used for these purposes. The advantage of this machine is that the motor has a speed controller, and this expands the capabilities of the device. It can be successfully used and like a polishing machine.
Safety precautions when working with a homemade device
When making power tools yourself, you should strictly follow safety precautions. If industrial units are equipped with protective equipment, then in home-made devices you will have to make them yourself. You should know that operating a sharpener from a washing machine engine without protective casing prohibited. It can be made from sheet metal 2.5 mm thick.
The working wheel experiences strong vibration during sharpening. To prevent the sandpaper from being destroyed during work, when installing the stone, cardboard spacers are placed under the metal washers. You should also make sure that the disc has no cracks.
While working, you should stand to the side of the circle so that if it breaks, the fragments do not fly towards the operator.
The washing machine is broken and cannot be repaired, what can be done about it? The question is quite reasonable; if you can’t sell it for spare parts, but it’s a pity to throw it away, then you can try to construct a useful thing from its parts. In this article, we decided to tell you how you can make household sandpaper from a washing machine motor with your own hands.
The device of the emery and its purpose
Emery is a useful thing in the household. They are very convenient for sharpening metal knives, scissors, drills, shovels and other tools. You can buy a similar device in stores; there is a wide selection. However, the price may force you to refuse such an acquisition. Therefore, you can try to make emery with your own hands from the engine of an old washing machine.
To carry out such work, you need to have a good understanding of how emery works and what parts it consists of. The simplest version of emery has:
- engine;
- bushing;
- flange;
- starting device;
- emery wheel;
- protective casing;
- electrical cable and plug;
- support.
Of all the parts listed, you will need to purchase a high-quality sanding wheel. All other details can be made with your own hands, this will be discussed further.
Grinding the flange
 To fit the emery wheel onto the motor bushing of a washing machine, you will need a flange, since the diameter of the shaft usually does not coincide with the diameter of the stone. If there is no factory flange suitable in diameter, then we make it ourselves. We take a piece of metal pipe, the diameter of which is such that the pipe is easily and firmly pressed onto the motor shaft; usually a pipe with a diameter of 32 mm is suitable. The length of the steel pipe should not exceed 150-200 mm; this will be enough to attach an emery wheel to it.
So, at one end of the pipe, using a tap, we make a thread approximately twice the thickness of the circle. After this, the second end of the pipe must be heated well, for example with a blowtorch, and put on the shaft. You can secure a flange made by yourself by welding, if possible, or with a bolt, drilling through the flange and the shaft for this purpose.
Important! The thread on the flange must be opposite to the rotation of the motor shaft from the washing machine, so that the emery disc does not fly off during rotation. If the thread was cut incorrectly, then on an asynchronous motor the shaft rotation will have to be changed.
The transition part from the engine to the emery wheel is ready, now we screw the nut onto the thread, then the washer. After the washer, we put on a grinding wheel, which we secure with a washer and nut. Tighten the nuts well; for strength, you can screw another lock nut at the end.
Connecting the engine
For self-assembly of emery, craftsmen recommend taking motors from Soviet-era washing machines such as Volga, Oka or Vyatka. This is explained by the fact that the engines on them are powerful. In general, a motor with a power of about 200 W, at 1000-1500 rpm, is sufficient, although a 400 W motor at 3000 rpm can also be used to make household sandpaper with your own hands. But at the same time, the emery stone must be very strong, otherwise it will collapse at such speeds.
A very important step in making emery is connecting the motor to the electrical network. To do this you will need an electrical wire and plug. Connecting the motor from an automatic washing machine and the motor from a Soviet washing machine is slightly different. In a six-wire automatic machine engine, only 2 wires going to the motor brushes and 2 wires from the stator are required. The remaining 2 wires are the tachometer wires.
To find these wires, you need to take a multimeter. Measuring the resistance of the wires, we find the tachometer wires, their resistance is about 70 Ohms and remove them to the side. The resistance of the remaining wires is determined in pairs. Now we connect one stator wire to the wire from the brushes, insulating the connection with electrical tape. We connect the remaining two wires to an electrical wire with a plug at the end.

Important! Such a motor does not require any capacitor; it will begin to rotate immediately after being plugged into the outlet.
To connect the motor from a Soviet washing machine, you need to determine from 4 wires which are working and which are starting:

For your information! A capacitor should not be used as a starting device; it will cause the winding to burn out.
Be careful when working with electrical equipment yourself. If you doubt your capabilities, contact someone who is familiar with a multimeter and understands how to connect a homemade emery machine to the network correctly. You can also find video instructions for connecting the engine on the Internet or watch this video.
Making the installation
 The final stage of making emery is to secure it on a flat surface, such as a workbench or carpenter's table. You can screw the sandpaper to an old, stable stool. On the motor housing of the washing machine there are fasteners with holes. Just before screwing it onto the surface of a table or stool, they place a metal sheet, which also needs to be secured.
For safety reasons, you can attach a metal arc over the sanding disc, which will protect against particles flying during work. Besides, Be sure to wear safety glasses when working with sandpaper.
Thus, it is not difficult to make emery from a washing machine motor with your own hands, be patient, read the tips carefully, and watch the video. In addition to emery, you can use the engine and other parts of the machine to make a homemade wind generator, concrete mixer and other useful household items. This is discussed in the article.
- Types of folding tables with wall mounting, installation algorithm
- Electrostatic smokehouse: operating principle and diagram for self-assembly Cold electronic smoking electrical part
- How to build a barbecue out of stone with your own hands
- Making a powerful simple LED spotlight with your own hands
- Storage ideas: life hacks, tips, DIY gadgets Home storage system
- A South Ural resident built a house out of champagne bottles
- How to build a bottle house