How to build a small garden house with your own hands. garden houses

 Live Journal
 Facebook
 Twitter
The pleasure of owning your own suburban area is tripled if there is a country house on it. Indeed, in this case, you can not be limited only to seasonal work and cooking barbecue in nature in the warm season. Today, the construction of cottages is gaining momentum. Moreover, “dacha construction” houses are built from a variety of materials: from stone to frames made of timber and panels made of chipboard and fiberboard. And in our material we will consider how to build a country house with our own hands and at the same time perform all the work with maximum productivity and economic benefits.
Choosing a building material
The construction of dachas is a task no less important than the construction of a residential capital house. Indeed, the durability of the building will also depend on how well the installation will be performed (even if it is a frame technology). Consider some types of materials that are most often used for the installation of country houses, and we will understand what is better to build a temporary hut in the country:
- Beam. An excellent material for those who do not know what to build a country house from. Moreover, you can use both the cheapest option - planed lumber, and the more expensive one - profiled or glued. A house made of timber will have an attractive appearance, as well as create an optimal microclimate indoors.
- Brick or any blocks. A house made of such materials will be more solid, but its cost will not be justified if it is planned to use the building only seasonally. Although brick (or blocks) have no worse thermal conductivity than timber. Stone dacha construction will be reliable and strong.
- Frames and shields. Your own house built using this technology is considered the most acceptable option for a budget and seasonal building. And if the house is also additionally insulated, then in such a building it will be possible to spend the night in the winter. It is on the example of frame-panel technology that we will analyze how to build a cottage with our own hands. And for clarity, we will attach photos and videos.
A few rules for quality construction
In order to facilitate the construction of a country house did not bring unpleasant surprises later, it is necessary to follow some requirements and recommendations regarding the installation of the house. So, we build a cottage with our own hands, taking into account the following rules / recommendations:
- First of all, we design a building for a summer residence, the construction of which was started. For a seasonal house that will not be used all year round, the optimal parameters are 6x4 m or 6x6 m. A larger cottage will already be a capital building, which will require more investment and effort.
- In garden partnerships, you can mount a house with your own hands only by stepping back 3 meters from the neighbor's fence or from the borders of the neighbor's plot.
- From the frontal fence deep into the site, you need to build a house at least 5 meters.
- All wooden buildings (including frame buildings) should be located at a distance of 15 meters from each other. That is, if a neighbor on the site also has a wooden house, then you need to remove your building as much as possible for fire safety purposes.
Important: for a country house with your own hands, it is better to choose the highest point on the site. Thus, melt and rainwater will not cause trouble for the new summer house we are building. But if the site is very small, and you want to build a good house, then in this case they prefer a two-story house with bedrooms located in the upper part. On the ground floor, a kitchen and a living room are mounted.
To simplify the construction process as much as possible, we recommend building a one-story cottage in the country with a gable roof and a small veranda. And below is a step-by-step instruction for performing the work.
Tip: if there is absolutely no desire to mess around with construction, then a novice master can simply order a ready-made modular house, which is simply assembled already on the site on a prepared foundation.
Building a cottage: installation steps

For those who do not know how to build a cottage, our step-by-step instructions with a detailed description of all points will be useful. Will start with the preparation of the foundation. But first, we will prepare all the necessary materials for summer cottage construction. So, we need:
- Cement and sand with crushed stone;
- Steel bars for fittings;
- Board or boards for formwork;
- Concrete blocks or bricks;
- Ruberoid or bituminous mastic;
- Expanded clay;
- Bar with a section of 100x100 mm;
- Metal corners, studs and screws;
- Chipboard or fiberboard panels;
- Vapor barrier;
- insulation;
- Roofing material (ondulin or corrugated board).
So, in the recommendation “where to start building a summer house”, the first point is the installation of the foundation. Under the frame house, a lightweight type of basis is suitable - columnar. This version of the foundation device will not only significantly save your money, but also serve as a reliable support for the construction.
- The installation of support pillars begins with the marking of the soil. According to the project, 50-70 cm pigeon pits are dug in all corners of the house and at the intersections of the walls. It is advisable to expand the section of the pits downwards.
- Then the soil in the pits is well rammed and covered with a layer of sand 10 cm. Expanded clay of the middle fraction is poured on top. Everything seals well.
- Now formwork is installed in the pits (can be fixed) and covered with waterproofing from the bottom and sides.
- Also in the pits you need to install steel rods in the amount of 4 pieces, connected by transverse rods with a step of 15 cm.
- Ready-made concrete mortar is poured into the pits so that the reinforcement sinks into the concrete by 2-3 cm. The poured pillars are left to dry for 3-4 weeks.
Important: the strip foundation is mounted using the same technology, only in this case it is not necessary to dig holes, but a trench around the perimeter of the house, which we are building.
Frame installation

As soon as the foundation pillars dry out, you can start building the frame of the house. Namely - its lower platform. It is she who will become the launching pad for the walls and roof. Therefore, for the platform, you can take a beam of a larger section - 100x150 mm.
Important: when doing work in the country with our own hands, we do not forget to treat the tree with antiseptics and flame retardants. This will increase the wood's resistance to burning or rotting. Also repels rodents.
- So, on all the pillars of the foundation, without exception, we lay the strapping from the timber. We mount it on roofing material. All elements are securely fastened together. In addition to the strapping, we mount the crossbars for the floor - logs. We grab the lower crown of the house with anchors to each pole.
- Now we cut the supporting vertical beams into the lower harness in increments of 60-70 cm. They can also be fastened with metal fasteners and jibs.
- Now we assemble the frames for the walls, taking into account the door and window openings.
- Following the assembled frame, the dacha construction of the walls of which we carry out, we carry out the upper strapping of the racks from the timber. Here you can use a beam with a section of 100x100 mm. And on the arranged strapping, floor beams are fixed or cut. Thus, we have a finished box at home.
- The next stage in the construction of a country house is the sheathing of the frame with chipboard or fiberboard boards. They are mounted on self-tapping screws, tightly fitting to each other.
- The floor and ceiling are covered with a board of the third grade. In the future, the floors can be insulated with mineral wool along the logs and sheathed with a grooved board.
- And lastly, we lay hydro- and vapor barrier on the casing of the country house, and between them a heater. Siding can be used as an exterior finish.
Roof of a frame house

- Hanging system. Here, the rafters are mounted only on load-bearing walls and no longer have other types of supports. For the solidity of the system, such rafters are fixed with a puff.
- The rafter system is layered. It is arranged if the house has internal partitions that will serve as additional support. When installing a layered truss system, the load on the load-bearing walls of the house is reduced.
- It is better to assemble roof trusses on the ground, and then lift them to the upper trim and mount them there. All farms are fastened together with a ridge beam and fixed to the Mauerlat, the role of which is played by the upper beam trim.
- A film is laid on top of the rafter system, making overlap joints. Then the film is additionally fixed with thin slats, placing them parallel to the rafters. Such a counter-lattice will create an additional ventilation gap for the entire roof.
Important: the width of the overlap of the film must be at least 20 cm.
- Now, a finishing crate is arranged perpendicular to the counter-lattice, on which we will subsequently mount the roofing material. The step of the boards / slats is made in accordance with the width of the sheets of roofing material.
- Roofing material begins to be laid from the bottom of the roof, moving in rows from right to left or vice versa.
- Roof overhangs are covered with plastic or wooden clapboard. The gable sides of the rafters are also decorated with plastic or wooden clapboard.
Home finishing

It remains to mount windows and doors to the house made. They are installed on special supports made of wood, adjusting and controlling the level of the blocks. All gaps between the frame and frames are foamed with mounting foam. After a day, the excess foam is cut off, and the remaining space is sheathed with drywall or any other building material for subsequent finishing.
Important: it is best to install doors completely with a frame and sashes. Thus, it will be possible to align the bearing opening for the block as much as possible.
The interior decoration of the house can be done with the use of drywall and its subsequent wallpapering. Also on the GCR, you can perform plastering, painting or cladding. And the water brought to the house will make your stay in it even more comfortable. It will be pleasant and convenient to be here at any time of the year. A house built using this technology will stand for 30 years or more. Now it remains to announce to relatives and friends about the invitation to a fragrant barbecue.
By the way, if you don’t know how much it costs to build a frame house, then we hasten to inform you that such a building, taking into account the purchase of all materials, will cost about 10 thousand USD. If you don’t know what to build from, and want to make a house from improvised materials that remained on the site, then such a house will cost 1.5 times cheaper.
Buying a summer cottage is a joyful event in the life of every person. And it’s good if a solid house is already present on the site. However, even in the absence of a residential building, you can easily solve this problem by doing the work of building a house with your own hands. It doesn't have to cost a lot of money. There are interesting projects of country houses that allow you to build full-fledged residential buildings with your own hands from available materials.
The simplest country house can be built from logs, cement and sawdust. Even these elementary materials make it possible to build a beautiful, reliable and warm structure. At the same time, such a house will be completely environmentally friendly and safe for human health. Instead of cement, you can use a mixture of clay, straw and sand.

First step
Make a foundation. The design will weigh quite a bit, so the simplest strip or columnar foundation, which is more preferable in such situations, will do.
Second step


Prepare the base for the house. For the lower strapping, it is recommended to use the highest quality timber as possible. Before laying the timber, it is necessary to lay reliable waterproofing on the foundation. Also, the beam of the lower trim must be waterproofed from above.
For additional rigidity, the strapping beam should be braided with wire. The load-bearing walls of the house are made up of wooden poles. At the end, you should get a stable frame structure.
Third step
On top of the waterproofing of the lower trim, lay out the rollers of cement or clay-sand mortar. Fill the gaps between such rollers with sawdust and proceed to laying out the firewood. Before laying firewood, it is recommended to impregnate it with an antiseptic composition.

Fourth step
Take a rounded knife and use it to spread the mortar between the stacked firewood. Over time, the wood will dry out, and you will need to fill the gaps with mortar as they appear.
Fifth step
Lay out the walls of firewood in layers. They laid a layer - filled up all the gaps with sawdust - laid a new layer and so on until the end. As a result, you will get already insulated walls.
sixth step
Sand the edges of the wood with sandpaper. Any kind of burrs will additionally retain moisture, so you need to get rid of them especially carefully.


In the end, you just have to fold the simplest truss system and install the selected roofing material. Give preference to lightweight materials. For example, bitumen is well suited for the roof of such a house.

From the inside, the walls can be plastered, sheathed with clapboard or trimmed at your discretion. Outside walls are usually left unchanged. In any case, finishing is recommended not earlier than after 1-2 years, because. during this time the wood will shrink. You will have to fill all the gaps that appear with the materials mentioned earlier.


The simplest house-hut can be built with minimal financial investment.
First stage. Make a standard pile foundation and tie it with prefabricated beams.


Second phase. Install the floor beams of the house. The basis of such a structure is represented by rafters in the form of the letter "A". Rafters are installed on a pre-insulated floor. If the house will have a greater height, the elements of the truss system are spliced in height.

Third stage. Sheathe the outer side of the walls of the house with OSB boards.

Fourth stage. Pull on the sheathed walls a wind-moisture-proof material such as isospan.

Fifth stage. Sheathe roof slopes with the OBS boards you already know. Such sheathing will be a good basis for rolled roofing material. If desired, you can equip a standard crate on the roof and use other finishing materials - profiled sheet, metal tile, etc.

Before laying the finishing roofing material, the roof must be insulated. Usually mineral wool is used for insulation. In the process of performing these works, do not forget about the need to create ventilation gaps. To organize them, a counter-lattice is equipped - it is enough to nail the transverse strips to the elements of the crate to make a small gap.


From the bottom of the roof, install ventilation grilles that will allow air to circulate normally in the under-roof space.
Excellent earthen house with your own hands

A house made of earth is one of the most ancient variants of residential buildings known to mankind. With the observance of technology from ordinary land, you can get a durable, fire-resistant and fairly warm building that does not require practically any financial investments for its construction.
First stage
Prepare the foundation for the future home. In parallel with this, prepare the main building material for the construction of the house in question - bags filled with rammed earth. For the foundation, dig trenches with a depth of about 50-60 cm. Choose the width individually - it should correspond to the width of the bags of earth.
Fill the prepared trenches with gravel. The backfill must be carefully compacted. Cover the entire area under the future earthen house with an approximately 20-centimeter layer of gravel.
Second phase
Lay waterproofing material over the backfill.
Third stage
Draw the circles of the future walls with a building compass. It is desirable that the house has a round shape. Of course, you can build an ordinary rectangular building from bags of earth, but it is the round walls that are characterized by the highest strength.
Fourth stage
Lay the first layer of pre-prepared bags on top of the previously laid waterproofing material. The mixture in these bags should include soil, sand, cement powder and gravel.

Fill the bags to about 80-85% of the volume and tamp as carefully as possible. Each bag used should be in the shape of a rectangle, like a brick. For better tamping, the mixture in the bag should be slightly moistened with water. Sew up the valves of the bags with ordinary wire.
Be especially careful when laying the first row of bags. Everything must be done in strict accordance with the previously applied markup. Tamp the bags and lightly dampen them with water.
Fifth stage

Lay 2 rows of barbed wire on the first layer of masonry. In this case, the barbed wire will take over the functions of the reinforcing layer. Seal all punctures and ruptures of the bags immediately with gray adhesive tape. This is waterproof tape.
Sixth stage
Start laying out the walls. Install door frames and window frames immediately. Lay each row of bags with earth with a double layer of barbed wire. Additionally, you can secure the wire with staples.


seventh stage
Fill the seams between the individual bags with a mixture of sand, cement, chopped straw and lime.
The bags need to be laid out with some offset seams, approximately the same as with traditional brickwork.
Having reached the height of a person, you can begin to shift each row of laid material to increase the strength of the walls being erected.
The laid walls are plastered. Before applying the plaster, the bags should be treated with cement laitance and allowed to dry. Plastering is carried out on a steel painting grid.

At the junction of the walls, perform additional reinforcement with the same barbed wire.
The interior decoration of an earthen house is usually limited to simple plastering.
In the end, it remains to equip the roof of the earthen house. First install the beam supports - they must be securely clamped between the bags. Sheathe the floors with OSB boards, and lay the finishing material on top. The best coating option for this case is bitumen.


After completing all the basic work, you can cover the walls of your earthen house with finishing plaster or paint.

If desired, even an ordinary change house can be converted into a quite comfortable country house.

First stage. Prepare strip concrete foundation. It is also allowed to use a columnar foundation, but first you need to make sure that the soil on the ground is not subject to severe frost heaving.
Second phase. Let the concrete of the base gain at least half of the branded strength, and then install the change house on the foundation. A crane will help you with this. Adjust the position of the change house with the boards. Pre-treat the boards with an antiseptic and place them under the skids of the building.

Third stage. Assemble the frame of the extension to the change house. To do this, use a 10x5 cm beam. Install the supports on the veranda and triple the horizontal runs under the rafters.
Fourth stage. Sew on the outer side of the walls of the change house a crate for siding or other selected material. For additional insulation, put mineral wool into the crate and cover it with plastic wrap.
Insulate the floor and walls of the extension. From the inside, the insulation must be covered with vapor barrier material.

Fifth stage. Complete the exterior cladding of the house. It is most convenient and rational to use vinyl siding for this.
Sixth stage. Lay out the roof. Metal tile is best combined with siding. Otherwise, when choosing a finish coating, be guided by your preferences and financial capabilities.
Seventh stage. Attach snow guards to roof slopes. Insulate the attic as desired.

Eighth stage. Finish the interior of the house. For example, walls can be sheathed with drywall, covered with a couple of layers of putty and painted. Level the floors and install your preferred floor covering.
As a result, after the addition of an additional room and simple finishing work, the old change house turns into a very comfortable house with a separate bedroom and a large living room-kitchen.

Thus, for the construction of country houses, you can use a wide variety of materials. Craftsmen adapted almost everything that occurs in nature, and even straw, for such work!
Now you know how to build from affordable and inexpensive materials, and you can build a reliable, safe and comfortable house in your summer cottage.
Successful work!
Video - Do-it-yourself country house projects
Where does the landscaping of a suburban area begin? We propose to consider the option of building a small house with amenities and a terrace, which, after the construction of a full-fledged housing, will become an excellent place to relax, store household equipment, or even a cozy guest house.
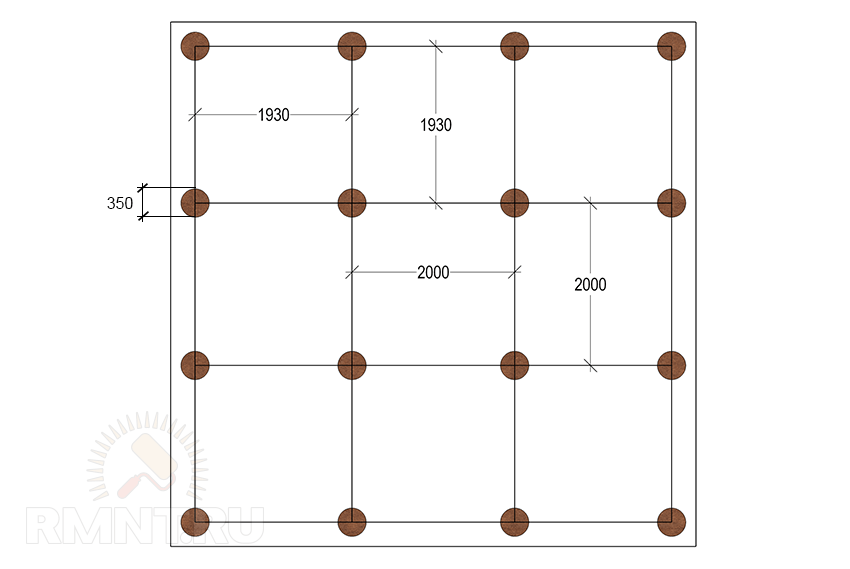
Inside the house there is a separate bathroom (4), a rest room with good natural light (3) and a small change house with an outside entrance (1) for storing small things or a mini-workshop. For a pleasant pastime in the fresh air, we will allocate a place in the plan for an attic (2), approximately 180x260 cm. The total dimensions of the house are 6x6 meters, just under the standard length of the scaffolding.


Foundation tricks
Our building is based on 16 concrete pillars, arranged in a 4x4 square with a gap of 2 meters. The marking of the site is carried out with a grid stretched on stakes, from each of the 16 intersections a mark is transferred to the ground by a plumb line. Four internal wells are dug strictly at intersections, twelve external wells are dug with an inward displacement of 7 cm.
You can dig manually, drill with a power drill or use a crane drilling machine. We drill wells with a diameter of 350-400 mm to the depth of soil freezing plus an additional 50 cm. At the bottom of each well we pour a bucket of crushed stone or river pebbles, then add two buckets (25 liters) of concrete grade 300 with filler fraction 5-8. We stick plastic 110 mm sewer pipes (gray PVC) into the solution that has not yet set. We orient them with sockets up; for long pillars, pipes can be made prefabricated. We align the pipes vertically, as well as at the intersections and the general level of lacing, pour 1-1.5 buckets of sand into the pits, and fill the rest with earth.

After the bases have set, we pour the same concrete into the pipes, it can be seated by vibration or pinning. The column is reinforced with a profile 14 mm rod in the full length of the pipe, an M12 stud 200 mm long is welded to the upper edge. Such a foundation does not react in any way to winter heaving of the soil: a smooth sleeve around the post does not allow the soil to freeze to concrete.
Grill and frame floor
A week is given for the drying of the pillars. On top you need to stretch a small (15 mm) chain-link mesh, painted or galvanized, two meters wide. We stretch it on the studs of the pillars, we sew the edges with wire.

Then, on the foundation, a grillage is assembled from a bar 150x150 mm:
- at the intersections we make a half-tree hem;
- we make holes for the studs with a brace of 20 mm;
- fold the inner grillage of the grillage;
- we horizontally start the outer bars, observing the dressing scheme;
- tighten the nuts over wide washers until the beam crushes the mesh;
- we finally derive the common horizontal plane with linings from roofing material;
- cut off excess studs.

We draw the mesh to the grillage either with wire, or we knock it out from below with galvanized nails. We put a windproof membrane into the cells, tuck it high at the edges. After the space between the bars is filled with a mixture of wood chips and slaked lime 5: 1 and covered with plastic wrap, the edges are shot with staples.

A crate is mounted on top of the film: a 50x150 mm board is placed on an edge in both directions to form cells of approximately 580x580 mm. Eleven boards go to each side, twenty-two in total. At the edges and at the intersections with grillages, the boards are drilled 70 mm with a 10 mm drill, then they are attracted to the base with self-tapping screws. The intersections of the lathing must be carried out as on the grillage - with pruning half a tree, we wet all the cracks and junctions and seal them with summer foam.

The floor frame, with the exception of cells completely located under the terrace, is filled with mineral wool and covered with a semi-permeable (150 g/m) diffusion membrane. The floor is laid with an edged tongue-and-groove board over the entire plane. We make ventilation holes in the cells under the terrace in the frame boards.

Walls, corners, openings and junctions
Further work begins with two walls opposite the corner attic. First, on a flat base of the house, we lay out and assemble on self-tapping screws a frame of boards on an edge with external dimensions of 570x240 cm. We add 2.4 m of racks of 24x150 mm boards with an interaxal pitch of 60 cm to the assembled frame. 60 cm. We will use these short boards as horizontal beams in the frame for joining the skin.
We raise the wall vertically, temporarily fasten it to the base with cuttings from the boards. The bottom board of the wall frame is fastened with 120 mm pins to the ribs of the floor system every 40 cm. The second wall is assembled in the same way and set perpendicular to the first, temporarily tightened with scarves.

Please note that the outer corner is thus "empty". We cover it with foam, put a beam of 60x60 mm, and fasten the extreme boards of two walls to it, having previously made holes for 100 mm self-tapping screws.

We assemble the rest of the walls in the same way, the inner corner is processed in the same way as the outer one. From the outside, we sheathe the house with 12 mm OSB sheets 2400 long, so the vertical seams fall exactly on the centers of the racks. Release the sheets 200 mm above the wall frame, below the sheathing falls at least to the middle of the grillage. At the corners, the edges are displayed along the frame of the adjacent wall.

When one side is sewn up, we scroll a 40x40 mm bar along the vertical edge from the inside and fill the remaining space with foam. From the same angle, we begin the sheathing of the next wall, fasten the edges of the sheets to the connecting bar.

To form doorways, choose a board 50x150 mm and knock down an installation box from it with internal dimensions of 100x210 cm for the front door and 80x210 for internal ones (with a canvas width of 70 cm). Before installation, the vertical rack of the wall is completely cut out (it can be divided into 4 crossbars), after installing the box, 35 cm of liners from the boards are added on top of its vertical racks.

Window blocks with an opening width of less than 60 cm are formed by adding horizontal bars. A block for a wide window is assembled from a 150x50 mm board and inserted into the frame in the same way as a door block, but in this case, fragments from at least two racks must be cut out under it, and T-shaped junctions should be strengthened with scarves.

Everything you need to know about roofing and attics
To save from cold and heat, the ceiling must have a layer of mineral wool insulation with a thickness of at least 200 mm. In this case, it is better to make the roof single-pitched ventilated. There may be an attic, but only as a room for storing materials with a useful height of 40-60 cm.

From a board of 150x50 mm we knock down trapezoidal single-pitched rafters with a height of 60 cm in the back and 110 cm in the front. Two six-meter trusses are being installed above the "full" part of the house and five more will be installed with a removal above the attic.
To obtain a sufficient width of the rib, a counter-lattice from a beam of 50x50 mm is screwed onto the lower boards of the rafters with self-tapping screws. The top board of the truss is longer than six meters due to overhangs of 40 cm at the front and back of the house. Therefore, you will either have to splice the existing forest with overlays, or import a longer one. One and a half meters from the low edge of the trusses, vertical jumpers are installed. The rafters are also strengthened in the front part with similar racks, but they are placed exactly above the walls under the direct lining of the terrace from the floor to the roof. The entrance to the attic is located in its widest part - in the inner corner of the terrace.

Fasten the rafters to the wall frame, adjusting the solution of the latter at the top. Then add intermediate floor beams between the rafters from a 150x50 mm board with a 50 mm counter-lattice. Hem the OSB ceiling with a thickness of 9 mm and screw the outer skin of the house to the ends of the ceiling. Fill all the gaps at the junctions with summer foam, then lay a vapor barrier and mineral wool in the ceiling, nail a windproof vapor-permeable membrane on top. Cover the attic floor with 12 mm OSB sheets with cutting grooves for the rafters. On the vertical beams in the rafters, sew up the vertical walls of the attic with OSB boards, insulate them as desired. Cover the rafters with plastic wrap and lay a cold roof made of metal or profiled sheet.
Interior and exterior decoration
In conclusion, we will give recommendations for finishing work. Outside, you have a flat plane with hidden racks every 60 cm. Therefore, both plastic siding and the block house will fit perfectly.
For interior decoration, drywall suggests itself, but fastening directly to the racks will be a mistake: the wooden frame walks a lot, cracks will appear. The walls can be sheathed with OSB, followed by ennobling MDF panels or clapboard. If you still intend to use drywall - prepare the profile frame in accordance with all the rules.
Each person who has acquired a small plot of land for a summer residence seeks to build a house in a short time, or a similar easily erected structure. So that there is a place where to relax after a hard day's work, or to hide from inclement weather. Well and to be arranged in the household plan naturally. Of course, it is desirable to build a house to accommodate the whole family, and guests who came for the weekend. The task is certainly grandiose, but quite doable if you have accumulated savings for the construction of a country house, because a large amount of new building material will be required.
If possible, you can hire hired workers to build this building.
Of course, this will significantly add financial costs for your family, and if this is not possible, you will have to build a country house with your own hands.
Basically, the owners of cottages build their houses with their own hands in order to save money for hiring a construction team and invite relatives and friends to the construction site to help, which by itself reduces the cost of the construction process.
Even summer residents sometimes use used materials, which can be purchased at half the price compared to market prices, but this will reduce the durability of the structure, also by half.
When building his country house, the author decided not to save on the main material and buy everything on the construction market, so that it would be enough for a century and the house would stand for a long time, please his family and his guests with its comfort and aesthetic appearance.
Of course, wood was chosen as the main material for the construction, which could be better and more beautiful than wood. The author bought bars and boards at a local sawmill, which turned out to be much cheaper than in a hardware store.
Starting construction, I pre-drilled wells under the supporting pillars, inserted them and filled them with cement mortar. I made the binding of the pillars with boards and left for a day to dry the solution. Then he started building, step by step going to the cherished goal.
And so now let's take a closer look at how he built his country house, and what he needed for this.
Materials: board 30 mm, timber 100 by 100, timber 40 by 60, floorboard 50 mm, insulation, professional sheet, rail, fiberboard.
Tools: circular saw, drill, drill, screwdriver, hammer, shovel, electric planer, corner, ruler, tape measure, circular cut-off saw.
And so the first thing he invited was a neighbor and together they drilled wells to install poles.

Then he installed the posts, and filled the holes with cement mortar.

I made a screed at the bottom and at the top so that the pillars stood evenly, after a day after the solution had gained hardness, I proceeded to further construction.

The author makes the top harness.

Then proceeds to create the roof ridge.


Next, he makes the roof sheathing.


Shows the rafter attachment point.

The leftovers from sawing up will also come in handy somewhere.

Then proceeds to the installation of the roof from the professional sheet.


Then he moves on to the device of the floors of the house.


So it turned out a place to store boards from precipitation.

Preparing a batch of boards by spreading them on a circular saw.


And proceeds to finish the cornice.


Sheaths the walls with boards, and closes the gaps between the boards with slats.

Next comes the ceiling lining.
 Lovers of nature and country life who did not have time to acquire at least a frame garden house 6 by 6 ,
but those who have a plot of land usually dream of at least some kind of refuge in their possessions. Making a home with your own hands scares most citizens. But in vain. Today you can find a sea of \u200b\u200binformation about step-by-step construction from experienced craftsmen. It will not only give confidence, relieving anxiety and fear. Using the recommendations of professionals, you can carry out all the necessary manipulations correctly and in the right order, significantly saving on hiring a working team.
Lovers of nature and country life who did not have time to acquire at least a frame garden house 6 by 6 ,
but those who have a plot of land usually dream of at least some kind of refuge in their possessions. Making a home with your own hands scares most citizens. But in vain. Today you can find a sea of \u200b\u200binformation about step-by-step construction from experienced craftsmen. It will not only give confidence, relieving anxiety and fear. Using the recommendations of professionals, you can carry out all the necessary manipulations correctly and in the right order, significantly saving on hiring a working team.
Of course, it is not bad to use the services of specialists. They guarantee (most often) quality, besides, the construction time will be noticeably reduced. But if the budget is limited and you want, or there is a desire to try yourself in such an interesting business, nothing prevents you from rolling up your sleeves and building a garden house cheaply. An additional bonus is that for yourself everything is usually done exactly as it is imagined and dreamed of. Sometimes hired workers find it difficult to explain their vision.
Then the walls are assembled from the timber, fastening the joints with dowels. Between the crowns is laid. In general, insulation is desirable for each successive layer. For an economy class house, a tourniquet or tow is usually used. Next, work begins on.
Roof
For rafters, a board with a section of 150x25 or 100x50 mm is used. You will also need roofing material with glassine. To facilitate the task, racks one and a half meters in size are placed in the center of the building, and a beam is already attached to them. On the resulting structure are located.
The construction of the roof of a one-story garden house on a frame can take only one day. The type of specific roofing material is selected individually, according to one's own capabilities and taste. Do not forget about the climate of the area where the future homeowner lives. Sheets of ordinary galvanized iron are often used.
Finishing
 Use of glassine
 The finished frame is necessarily covered with glassine, and only the selected finishing material is mounted on it. It can be different, in accordance with the budget and preferences of the owner. Looks great, which is attached with self-tapping screws.
One-story frame garden houses, trimmed on the outside with wooden clapboard or look attractive. Both wooden and plastic windows are well suited to the resulting structure. Naturally, doors made of wood or imitation of this material will look. indoors can also cover . And you can sheathe them with drywall, which is then covered with paint or pasted over with wallpaper. The floor is made of boards.
Approximate cost
Garden house projects
Results
Neat frame garden house , made by your caring hands, it is convenient to use for permanent or temporary residence. It is spacious enough to store inventory and household supplies.
It has enough space for receiving and accommodating guests. And if in the future it is planned to erect a grandiose structure, then it can become the place of residence and basing of an entire construction team.
A small garden house 4x6 with your own hands, without the involvement of workers, is not so difficult to build. The main thing is a responsible attitude to construction, attention and patience. And, of course, strict adherence to the recommendations and compliance with the requirements. And very soon your land will be transformed, and will take on the appearance of a real household.
- How to choose a changing table for a newborn
- Preparing for the New Year
- How gas welding is done with your own hands Use gas welding
- What gamma is correct? Yes, what else is "gamma"? Music Lessons - Theory - Scale, Major Scales
- Fireclay brick weight: technical specifications, standard in cm Types of fire-resistant building materials
- Oasis in front of the house: photos and flower garden design ideas
- Decoration of flower beds and flower beds