Dynamic TV backlight. Homemade TV backlight from USB

 Live Journal
 Facebook
 Twitter
TVs with dynamic backlighting around the display frame are one of the proprietary chips of Philips. And unlike many others, it works. Everything comes at a price, however, and TVs with Ambilight and immersive presence are more expensive than many other models.
Russian developers have proposed a method that will equip monitors of any manufacturer with dynamic backlighting. To do this, you don't even have to take the device to the service center: it only takes a little time and perseverance.
In general, such a backlight can be purchased as radio components and configured on your own. But, as practice shows, this is almost comparable to the ready-made options from PaintPack.
There are two main models available: a monitor version (30 LEDs) and a TV version (60 LEDs). There is also a very simple one - for 10 LEDs, but it is suitable only for the smallest monitors.
The TV version is equipped with an external power supply. Also, a larger number of LEDs speaks in its favor, which gives a larger illumination area (it will shine wider and higher, in other words). If such options are not suitable for any reason, you can contact the developers: for a small surcharge, they will offer a modified version.
mindrunway.ruPaintPack, in fact, is a small case, to which removable LED strips are connected from both sides. The box with the filling carries indicators and a power connector, as well as a microUSB for connecting to a PC. There is also a master connector (proprietary) for daisy chaining two devices.
The device case is located on the back of the TV or monitor. Then LED strips are laid in accordance with the instructions, power is connected and witchcraft begins. When connecting PaintPack to a computer via USB, it is necessary to install drivers and configure the device in the bundled program.
 mysku.ru
 The setting is done using the AmbiBox package. It is necessary to go to the "Intelligent backlight" menu, select the screen capture method and one of the operating modes offered in the program:
- Static background - any color can be set, LED glow is regulated.
- Color music - the backlight will flash in time with the sound of the music. The backlight color is set to green-yellow.
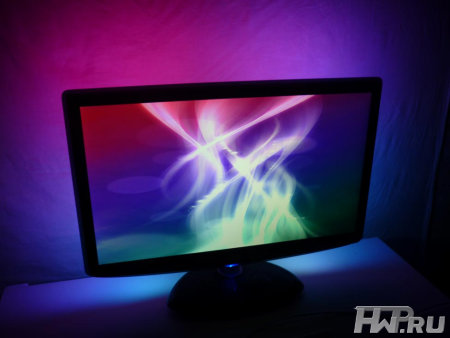
- Dynamic background - smooth flow of one color into another.
- Screen capture is the main mode of operation.
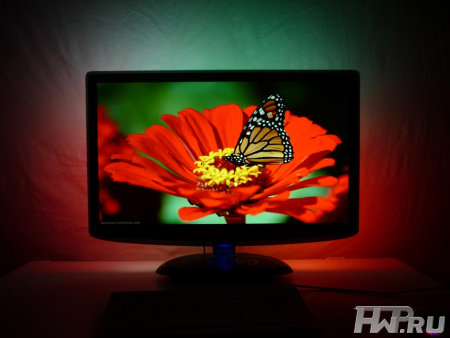
In this mode, it is possible to capture color from the movies and games being watched. The backlight color will change according to the image on the screen, divided into top, bottom and side zones (each separately).
PaintPack is a bit slower than the official Philips counterpart. But taking into account the difference in cost and the possibility of upgrading any device, the choice is obvious.
You've probably seen modern TVs with dynamic backlighting called Ambilight, developed by Philips. The essence of her work is to highlight the space behind the TV with different color combinations depending on the events taking place on the screen. However, for the purchase of such a TV, you need to pay tens of thousands of rubles, so it is not available to everyone.
At the same time, fans of watching movies on the monitor screen and fans of computer games do not need Philips Ambilight TVs.
PaintPack vs Ambilight. Ours are winning!
What should ordinary computer scientists do, who also want to bring into the surrounding space an amazing play of light, magically beating out of the monitor? We present you a new development called PaintPack. This module is designed to implement the same idea as Ambilight technology, but allows you to achieve the "light around" any computer monitor, and not the purposefully bought large TV for this.

A device called PaintPack in a simpler design is a small box with ten ribbon cables with bright LEDs at the ends. These LEDs are evenly spaced around the perimeter of the back of the monitor to provide an even backlight according to what is happening on the screen. The second more advanced version of the Russian analogue of Ambilight is the PaintPack light strip with 30 LEDs, connected in separate blocks of several pieces for convenient placement on the monitor and creating brighter and more detailed backlighting.

This is many times lower than the price of TVs with Ambilight, and at the same time you are buying a device that can be easily removed and connected to different monitors, depending on the need.
PaintPack - for beginner and professional
Using the PaintPack module presents no difficulties even for a person with minimal computer training. In order for the device to work and immerse you in a world of new visual sensations when watching movies or playing your favorite toys, just place the LEDs on the back of the monitor, connect the module to one of the USB ports and install the included software.

For fixing the LEDs, the manufacturer has carefully provided special Velcro made of double-sided tape. The program for controlling the backlight of the monitor can be downloaded for free from the seller's website paintpack.ru. Here you will also find detailed instructions on what and in what sequence must be done for the correct installation and configuration of the device.

Thus, every beginner can connect and configure the PaintPack module who at least once installed the program on his own and knows the location of the USB connector on his computer.

A person who is well acquainted with a computer and related peripheral devices will definitely like the PaintPack module for its wide possibilities for self-tuning to individual needs.
A quick guide to installing and configuring the work of the PaintPack module
The work of the PaintPack module is provided by a special application that can be downloaded for free on the manufacturer's website. The program is periodically updated when new features are added to it.

After the program is successfully installed, you need to attach the device case to the back of the monitor, approximately in its center. Then the LEDs are glued, they can be arranged in any order at your discretion or depending on the availability of free space. The main condition for the placement of LEDs is their uniform distribution along the perimeter of the monitor case and their location at a distance of 15-30 centimeters from the wall. Then you can start the program, turn off the lights and enjoy the magnificent light show.

For most users, the default software settings that are initially set by the manufacturer will be sufficient. If you still want to do fine-tuning the LEDs, then you need to run the previously installed program for this. In the program window, select the item with the settings and see the capture areas for different LEDs on the monitor. You can set each LED to be white or display different colors depending on what is happening on the screen. You can also turn off individual LEDs by simply unchecking the checkbox. This completes the setup, you can test the work of the backlight and then enjoy it when watching movies or clips, while playing games and other computer entertainment.
Various special effects from movies and clips, for example, explosions or dynamic chases, look especially beautiful when using the PaintPack module.
PaintPack is a great gift
We all know how difficult it is to choose gifts for loved ones several times a year. In such situations, manufacturers who release completely new things are great help out. PaintPack is one great example of such a gift. The backlight module is a unique device of its kind. You will probably be surprised that the release of such affordable and versatile Ambilight analogs has not yet been mastered in any technically developed country in the world.
Even in numerous Chinese factories for the production of electronics, devices like the PaintPack are not yet produced. Therefore, if you are choosing a gift for an advanced computer user, then the PaintPack module will surely become a pleasant surprise for him, the existence of which he did not know. This gift will be no less pleasant for a child, girlfriend and even your parents, who will certainly be pleased with the beautiful backlighting of the space behind the monitor.
PaintPack official website -www.paintpack.ru
Roman aka Paintpack
19/12.2011
Ambilight is technology additional background illumination of Philips TVs. This technology is implemented by embedding LEDs on the back of the TV, as a rule, these are modern Philips smart TVs. Ambilight backlight technology is dynamic, which means that when watching a video with the backlight on, the background around the TV will change the color background depending on the color gamut transmitted on the display TV... Today, Ambilight technology has been going on for five generations, evolving by improving the number of colors displayed and the possible effects.
- the generation of TVs was equipped with simple lamp backlighting.
- the generation of TVs with Ambilight received two-channel backlighting. The backlight color is referenced to the base color on the screen.
- the generation was named Ambilight Surround, it is a three-channel illumination, characterized by independent lamps and three directing zones: right, left and top.
- generation - Ambilight Full Surround, background lighting is directed to four zones: top, bottom, left and right. Added a screen-panel to the TV body, this made it possible to achieve a softer background.
- generation - Ambilight Spectra - is able to create volumetric backlighting, thanks to 126 LEDs and a powerful processor that analyzes the picture on the screen, as well as movement, creating a dynamic background projection, expanding the display.
.jpg)
.jpg)
Ambilight technology operates on such characteristics as: color, brightness, contrast, direction of illumination, intensity and rate of change of backlight.
For maximum effect, you need to pre-configure the TV by entering the menu and selecting the "Wall color" section to specify the color of your wall behind the TV. Also, an important factor is the distance at which the TV is located from the wall, Philips recommends leaving 25 centimeters.
If desired, in standby mode, you can use Lounge light Is an Ambilight feature that allows you to use the TV backlight as a subdued lighting in your room.
The backlight works from the USB connector of the TV, it turns on / off with the TV and the brightness can be adjusted.
For manufacturing you will need:
- White LED strip 12-24 volts (color tone to taste);
- Increasing voltage module MT3608 (costs 29r in China);
- USB "plug";
- some wires;
- soldering accessories;
- Voltmeter;
- Ammeter;
- every little thing.
Manufacturing process
First, we measure the size of the TV and "figure out" how to place the tape, cut off the required amount.

The resulting 4 pieces of tape are soldered with flexible wires. Be sure to observe the polarity.

The backlight will be connected from the USB connector of the TV, but there is only 5V and this is not enough for us. LED strips usually need 12 or 24V to work. Therefore, we use a step-up voltage module MT3608, it will increase the voltage from 5 to 12V. Solder the wires from the USB "plug" to the module input (VIn).


We sing along the tape to the output of the module.

In principle, it should already work =)
To be able to regulate the brightness, I glued a "swivel" with a piece of a match ("bum option") to the variable voltage regulating resistor ("homeless option"), thanks to which the resistor can be turned backwards only half a turn. The extreme positions will correspond to the minimum and maximum brightness, you select them yourself. (the yellow thing on the board is a tantalum capacitor, it reduces the voltage ripple at the output and it is unnecessary, the ripple is so minimal).

After everything is assembled, it is imperative to check the current consumed by the circuit at maximum brightness, for this you can use a USB voltammeter or, as in my case, a laboratory power supply. The voltage on the tape should not be higher than the rated voltage.

The current should not exceed the maximum allowable for the connector.

After all the checks, we glue the tape and glue the module onto the adhesive tape.


All is ready! enjoy

Finally
It is not necessary to do exactly as I did and I did not invent the wheel.
You can make everything neater and more beautiful
The backlight does not overheat and does not blink, the conversion frequency is about 1.2 MHz
I am not responsible for a broken TV and work injuries, be prudent and careful.
You can buy a 5V LED strip and refuse to step up the voltage of the module.
You can use RGB tape + a remote control module if you want a remote control and special effects, but this will quickly get bored.
If the power of the USB connector is not enough, then you need to connect a 5-volt relay instead of the tape and through it turn on / off, together with the TV, not only the backlight, but also any other equipment plugged into the outlet, for example, acoustics.
- Connecting a rotary encoder to a computer via USB
- Homemade TV backlight from USB
- Evaluation of methods for measuring low frequencies on the Arduino Brief description of the frequency meter FC1100-M2
- Photoresistor and LEDs on Arduino
- Line transformer tvs
- Complementary FET Hi-Fi Amplifier
- Linear transformer tvs 90 l wiring diagram