A to Z. MacBook Pro

 Live Journal
 Facebook
 Twitter
Today we are starting a series of articles dedicated to people who have decided to leave the traditional Windows system and try their hand at Apple OS X Yosemite.
Most people first encounter Apple technology from friends, classmates, colleagues, or just a stranger. The specific apple design involuntarily attracts the eye and lingers in consciousness for a long time.
Then, as they walk past Apple technology in online stores, most prospective shoppers willy-nilly glimpse the luxurious displays and mysterious Mac OC desktops. Still would! The Windows screensaver has already become something mundane and boring for most Russians, we don't even pay attention to it when we choose regular PC components. And here is a real mystery land: iMac widescreen flat monitors, weightless aluminum Macbook Air and fundamental MacBook Pro.
At the last stage, an internal struggle arises: is it worth risking finances and a familiar interface for the sake of unexplored beauty? In order to answer these difficult questions, we suggest you read the article on the benefits of Mac OC.
And today we will talk about the difficulties you will have to face when switching from one operating system to another. The topic of switching from one system to another will be of interest not only to those who plan to do so, but also to those who have already crossed over to the other side of the barricades.
Apple computers and laptops have a single design established by the company - this is what sets them apart from the gray mass of PCs and laptops that use the Windows platform. The buyer only has to decide on the required power and technical specifications.
Choosing a "box" for Windows, the user has to first study tons of information - in the literal sense, it is necessary to select each component separately: video and audio cards, processor, memory chips and much, much more. A computer for windows is a cooler Lego constructor. Of course, many now want to argue with me that the stores are full of ready-made configurations. But if you devote a little more time to the question, you understand that manufacturers are saving a lot on components, sacrificing one or two parameters in favor of an attractive price. And the result is often very sad: the given production capacity is not even half used. Therefore, literally in the first year of using the technology, the user is faced with the need for an upgrade: the video card stops "pulling" the graphics, the cheap cooler starts making a menacing noise, or from the first days there is an acute lack of memory. We have to admit that buying a Windows PC is a task for enthusiastic people who are ready to devote themselves to a series of updates and modifications.
PRICE POLICY
Reading the subtitle, Windows fans are rubbing their hands gloatingly: here it is! Yabloko, they say, are crazy with their expensive gadgets. Let's do a little marketing research and find out how much you have to overpay to become a member of the apple club.
Monoblock
Monoblock - all-in-one computer: all the necessary computer hardware is enclosed in the back of the monitor. The main advantage of the candy bar is its compactness and the ability to work on a high-resolution display. The disadvantages of the gadget include possible problems with the upgrade of components.
We will compare by basic parameters: display size (21 inches) and processor power (for example, Intel core i5). In this segment, the Windows platform is represented by Lenovo and MSI. The price for the former ranges from 40,500 rubles and reaches 53,990 rubles, depending on the narrow specifications and the internal policy of online stores. For a monoblock MSI will have to pay about 60,000 rubles. Prices for the Apple iMac start at 78,000 rubles. The total difference is from 18,000 to 37,000 rubles.
Notebook
Notebook - a portable personal computer, which, unlike a candy bar, combines not only a monitor and system components, but also a keyboard with a mouse (trackpad). Laptops are compact devices that are preferred by people whose activities require constant mobility. These same characteristics become their advantages: light weight, size and versatility. The disadvantages of this type of technology include a short battery life and fast heating of the device.
In this case, you will have to reduce the sample and select models that are as close as possible to the characteristics of the MacBook Air 13. For comparison, we again take the display diagonal (13), processor (intel core i5), weight (up to 1.5 kg) and battery life (up to 12 hours ). Laptops from Lenovo (from 39.990 - 44.990 rubles), HP (38.290 rubles), Panasonic (from 103.000 rubles), Fujitsu (from 37.590 - 125.100 rudders) can boast of a similar set. Against the background of such a huge price analysis, the cost of the Apple MacBook Air (from 57,000 rubles) fades and we understand that the pricing policy is not something to reproach Cupertino with.
WORK IN OC
So, with the costs and external characteristics sorted out, we turn to the issues that most scare potential buyers of Apple computers - work in the Mac operating system.
Desktop
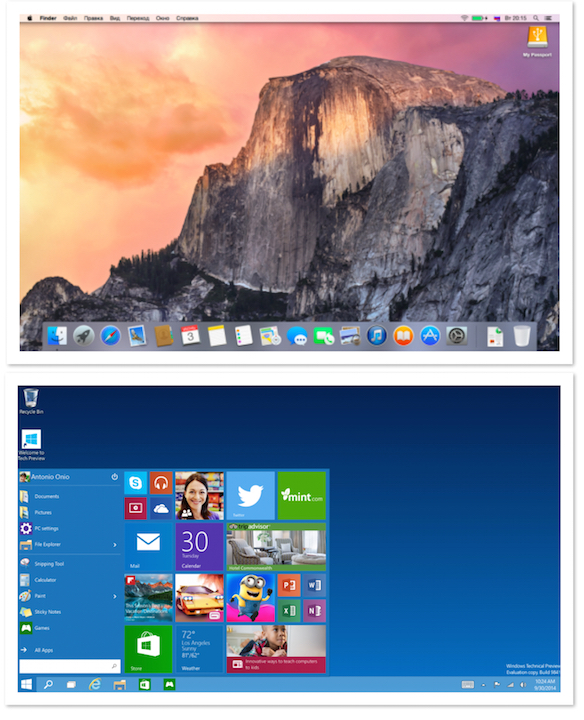
Microsoft has experimented with the Windows desktop over the past two years. The most unpredictable - and, as experience has shown, unsuccessful - was the decision to remove the "start" button in win 8. Then there was an incomprehensible castling with the name of the operating system and Windows 10 was born (release date October 1, 2014). We will compare it with Mac OS Yosemite, which was also released in the fall of 2014.
An interesting design feature has appeared in Windows 10 - the color of the start menu adjusts to the desktop background. Apple uses translucent textures and blurred backgrounds to create a cohesive atmosphere.
Windows users have little choice in their style of work. You can use the Start screen as the main control, or you can revert to the classic form of using the desktop. This choice defines the overall design concept for the latest version of Windows. The start screen is a collection of colorful tiles that create a festive atmosphere on your desktop. It is difficult to judge how much such a color scheme contributes to work and concentration, how much eyes get tired of the bright color set - only owners of the latest Windows operating system can answer this question.
The most striking detail of Mac OS is the icons in the DOCK-panel, which hides from the desktop while working with the system. It should be noted that Apple relied on minimalism - along with OS X Yosemite came flat screen elements based on three colors: blue, white and gray.
Another feature of Windows 10 is virtual desktops. It is understood that the user will be able to customize each of the tables to suit his needs and, if necessary, simultaneously interact with several zones. Not a bad idea, but so far it looks damp in terms of usability of controls.
Fortunately, OS X has long been using a similar system of parallel program control - Spaces, which intuitively responds to user needs and provides efficient work on multiple desktops.
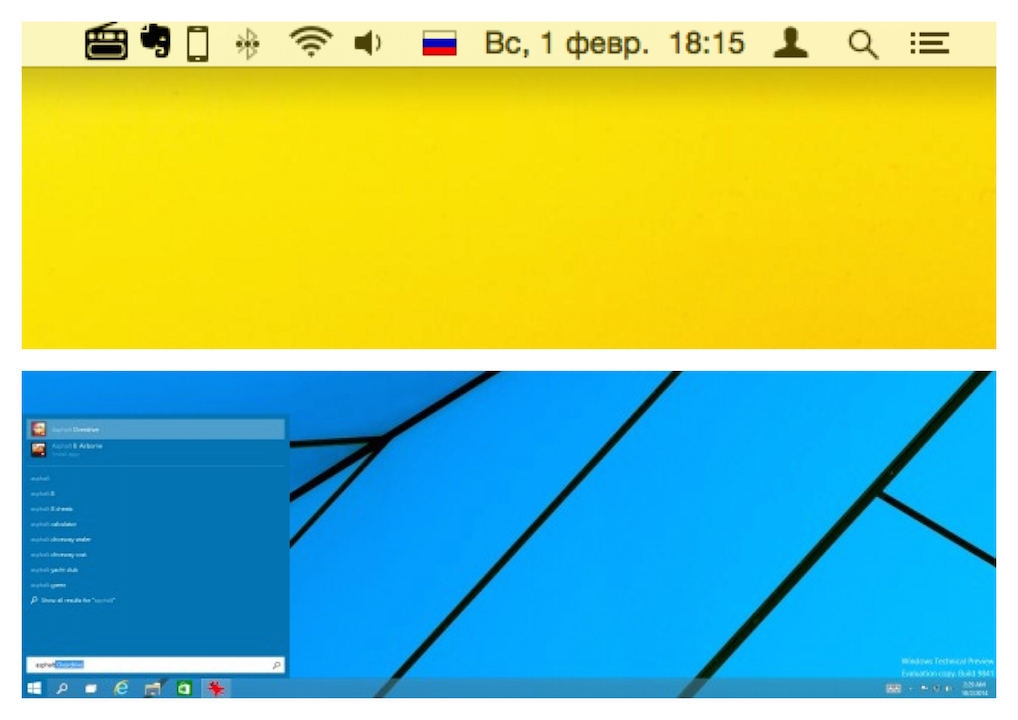
For quick access to system folders, as well as to quickly obtain information about the status and operation of the system, usually use the apple menu ",", which is located in the upper left corner of the screen.
The program menu displays the work of the current program and provides quick access to its functionality. It is constantly in the top bar, while Microsoft chose to leave this element in windows, periodically hiding it from the user's view (example Windows seven).
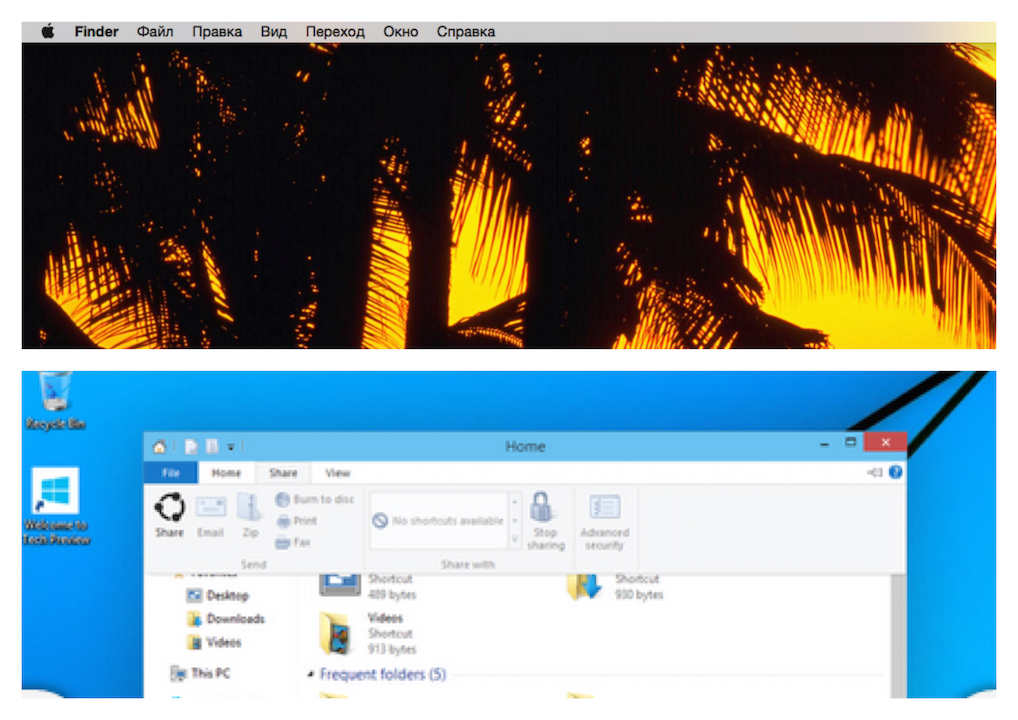
The status menu contains information about the current date and time, as well as the selected language, sound settings, wireless Internet connection (wi-fi) and status icons of some programs. The difference between Windows 10 and Yosemite is in the location of this item. In addition, the OS X string contains two additional links that are actually extremely useful: the user menu and the Spotlight search. The first allows you to quickly move between the desktops of users, the second is responsible for finding information across all files, folders, programs and other elements of the system of Apple computers.
I would also like to talk about fine-tuning the desktop in Apple computers. As mentioned above, every OS X item has a program menu. The desktop is represented by the Finder program. By selecting the item "show view options" the user can customize the visual view of folders and shortcuts, and not only the size of icons, grid and labels, but also the display of object properties and sorting parameters.

Usually, the Windows desktop turns into a set of icons and shortcuts. In this case, the main control element was and remains "Start". But give Microsoft credit for the past few years, they have moved away from the folder-letter style and introduced visualization (the so-called "live tiles") in the form of recently opened programs (center bar) and windows with universal applications.
In Mac OS, the desktop field usually remains empty: shortcuts and folders appear there randomly and for a short time. Although, of course, this is a matter of taste, but the Mac OS environment allows for easy navigation through programs, files and documents. At the bottom of the desktop is the Dock, which can be customized based on user preferences.
Let's talk more about Dock panels in fact, this is the main element that a beginner will have to work with immediately after switching from windows to mac os. This is where the most commonly used software shortcuts are found.

The user can customize its content and size at his own discretion, but at the first stage it is worth understanding the capabilities and basic elements of the OS. Over time, each makovod forms it according to his work and creative needs. By default, the Dock panel contains Finder, Dashboard, Launchpad, Safari, iMovie, iPhoto, Mail, Calendar, Contacts, iMessage, Facetime, iTunes, MacStore, Trash, and Preferences.
In future articles, we will take a closer look at these elements.
Considering that a new version of Mac OS High Sierra was released not so long ago, and taking into account the huge variety of discounts on MacBook for students, it can be assumed that you are one of the lucky owners of a Mac. Perhaps you have just moved from Windows or Linux, or perhaps this is your first computer at all - in any case, this article will allow you to learn a lot of new things.
1. Smart unit conversion with Spotlight
If earlier using Spotlight it was possible to carry out various calculations, then with the release of the new operating system Yosemite, this application acquired an additional function - unit conversion. This program is so smart that in many cases it not only gives an answer to your request, but also offers a conversion to alternative units of measurement.
Enter "$ 1299" and the program at the same second will show you how many rubles are in this amount (building your guess based on which national currency you have selected in "System settings" in the "Country \\ region" section), and a little lower on page you will see other results, for example, in euros, yen and so on.
2. Improved version of Siri
Before the release of Mac OS Sierra, the Dictaphone tool installed in the Mac showed itself in the best light, over and over again surprising us with its speech recognition abilities. But Siri's long-awaited return to Apple desktops and laptops has smashed it to smithereens.
Siri, to which we are all accustomed back to iPhones, can be called by pressing and holding Command + Space or clicking on the corresponding icon in the Dock or Menu. However, the new version of Siri looks much more efficient.
In addition to answering the usual queries, for example, "What is the weather now?" and “Who won the last playoff game?”, Siri on Mac OS Sierra can turn system functions such as Wi-Fi or Bluetooth on and off, and locate individual files on your system based on the file information you tell her.

Siri can even open and close apps at your request, and save the results of your queries in the notification area so you can use them in the future. Just press Command + Space and ask her something.
3. Start Windows
Yes, yes, we foresaw the question: who wants to run Windows? In fact, sometimes it is extremely convenient and even necessary, for example, to play the latest version of a recently released game or launch a certain program that has no Mac equivalent.
You can run Windows with Mac OS using applications such as VMware Fusion, Parallels Desktop, or VirtualBox. It is also possible to do this by dividing the hard disk into partitions and then installing Windows - in this case, you will need Boot Camp located in the Utilities folder.
4. Create screenshots of any size
For someone who uses Windows, taking a screenshot can be a daunting task. For example, you can use the PrtSc key to capture an entire screen, or use the Windows Scissors tool to capture a portion of the image. In addition, some keyboards do not support this function, and opening a special application to take a screenshot is too long and complicated way. Fortunately, Mac makes this process as easy as possible.
To take a screenshot of the entire screen, just hold down Shift + Command + 3 at the same time - the screenshot will be saved on your desktop. To take a screenshot of some part of the screen, hold down Shift + Command + 4 - the screenshot will also be saved on the desktop, and for a screenshot of a separate window, hold down Shift + Command + 4, then press the spacebar and click on the window you want to take a screenshot of.

Finally, if you're lucky enough to own a new MacBook Pro with Touch Bar, then hold down Shift + Command + 6 to take a picture of this small OLED strip. Either way, all you need to do to take screenshots on your Mac is just memorize a few simple keyboard shortcuts.
5. Auto show and hide the menu bar
The menu bar has been fixed in place since the Mac's release in 1984, but with the release of OS X El Capitan, users have the ability to hide it. To do this, open System Preferences, go to the General tab and select Auto Hide Menu Bar. Now it will only be displayed when you move the pointer up the screen.
6. Using unusual symbols and emoticons
Along with the letters and numbers that are marked on the keyboard, you can also use a huge number of special characters. You probably already know how you can put an accent mark over a letter, as in the word "café" (press Option + E and E again, in OS X 10.7 and later, just hold E until you see a menu with additional options) ... But these are not all the functions available to you.
Go to the "Edit" menu, which is in most applications, and at the bottom you will see the "Special Characters" panel with a huge number of different characters that you can optionally include in your document. Unfortunately, not all applications and operating systems support them, but they - for the most part - conform to the cross-platform Unicode standard.
However, emojis (bright and colorful imagery available in OS X 10.7 and later) are a rare exception to this rule. Although they are available not only in Apple devices, but in the case of them there is a possibility that the recipient will not be able to see them, since his device does not support these characters.
7. Create signatures on PDF documents directly in Mail
Although we live in the 21st century, we still put our flourish on paper when we officially agree to something. If you have been emailed a PDF document that you need to sign, then now you don't have to worry about first printing it, then signing it, and finally scanning it to send it back. Now you can sign it directly in email.

Drag the PDF file into the email you want to send, hover over it - a small button will appear in the upper right corner. Click on it and you will see a number of available options, one of which will be "Document Signing". The most convenient way to add a signature is to use the webcam on your Mac: just hold the sheet with your signature over it and wait for the camera to capture it. At the same time, the camera perfectly recognizes the signature, excluding everything unnecessary in the background. In addition, you can use your own touchpad, which makes it much more convenient to write with a stylus.
8. Using Split View
Using two Mac apps side by side has become much easier since OS X 10.11 El Capitan released. This is made possible by the Split View mode. In order to switch to this mode, you need to hold down the green full-screen mode button located in the upper left corner of the screen, as a result of which the window will be minimized, and it can be dragged and docked on the left or right side of the screen.
After that, you need to select another window or application and click on it to attach to the opposite side. When using this mode, the OS X launcher and menus are hidden, which allows you not to be distracted by third-party trifles and get a larger workspace.
Thanks to the vertical line between the windows, you can effortlessly change the width of the windows, as well as their position. This format will be extremely convenient, for example, if you want to simultaneously monitor the progress of a sports game and at the same time continue to do your work / other business.
9. Create annotations for PDF-files and pictures
The Preview program has an excellent set of tools that makes it easy to annotate pictures and PDFs. And, most importantly, the annotations added by this program use standards that are compatible with the Adobe Acrobat PDF application. This application is widely used by companies and Windows users, so it is extremely easy to share annotated documents with colleagues.
Make sure the Toolbar is visible before annotating (otherwise fix it in the View menu). Thanks to this panel, you can draw various shapes, arrows, comic clouds and clouds of thoughts. In addition, you can highlight text with different colors, add strikethrough text, notes, and various types of text boxes.

10. Adding your signature to the required documents
In OS X 10.7, thanks to the "Preview" program, it became possible to add your signature to the document. To do this, launch the program and go to the "Signatures" tab in the "Settings" section, then click on the "+" or on the "Create a new signature" option. Then take a small piece of white paper and write your signature on it in black pen. Present a piece of paper with your signature to the webcam. As soon as you are satisfied with the result in the preview window, click the "Accept" button. If you want to use this signature in the future, make sure you save it.
Now open the document where you want to insert this signature, go to the toolbar and select the signature icon - it looks like an italic x S with a small dash below. Select the location where you want to insert the signature. Once you insert it, you can scale and move your autograph.
11. Image editing
In our opinion, Preview is one of the most underrated Mac programs. This is especially true for the latest versions of OS X, in which it received a huge number of great features. In fact, with the help of this program you can do a lot of things for which we are used to using more complex and expensive applications like Photoshop. Just try opening a picture in this program and see what a wide range of image editing tools it offers.
For example, you can crop a picture. To do this, press the Select Rectangle button and use it to select the area you want to save. Then press Command + K or click on the "Crop" button in the "Toolbar". There you can also find more complex and interesting options, such as, for example, the Instant Alpha tool, which allows you to select and remove the background or other object of the image, as well as Smart Lasso, which allows you to extract an image.
If you have multiple Apple devices (for example, a Mac at home and at work, Mac and iPhone, or multiple iOS devices), turn on iCloud Keychain. This will allow you to synchronize on all your devices the logins and passwords that you enter in the browser, information about credit cards and Wi-Fi connections.

This means that if you, for example, save the password and login of a site on your iPad, then you can quickly enter this site from your Mac. Or, save your credit card information on your Mac and use it safely on your iPhone. Using this function may seem a little difficult at first glance, but the benefits that it will bring you later is definitely worth the time and effort.
13. Create hotkeys for any required function
Keyboard shortcuts are incredible time-savers, but you don't have to settle for just the options your Mac was designed with. If there is a menu option that you constantly use and for which there is no ready-made keyboard shortcut, you can always set this shortcut yourself.
Select the "System Preferences" menu item, click "Keyboard", then select the "Keyboard shortcuts" section. Click "+" to add a new combination and select an application from the list that appears. However, you must know exactly the name of the menu command, which you will need to enter in the next step. And finally, select the previously unused shortcut key that will open the application you need, then just click "Add".
14. Using Automator to Do Bigger Actions with Less Effort
Automator is a program built into OS X that allows you to create a series of standard operations that you can run without your input and make complex tasks easier. In this program, you can create small applications that will store the script of a ready-made action, or add the necessary actions to an existing application as a service - in this case, you can access the functions by right-clicking. With Automator, you can simultaneously rename a large number of files, convert images to another file format, convert text documents to audio files, and much more.
- To get started in the program, open it, and then select the type of document you would like to create. Each type is used for different purposes, so click on all of them in turn for a short description. Choose the option that suits you best and click the "Select" button.
- Start adding elements of your future operation one by one by dragging the available actions from the left side of the screen to the right side, where the process area is. The actions available are based on the app's flavor and file type - just click on an action you're interested in to see what it is responsible for.
- After you add all the necessary actions to your operation, you can try to start the service you created by clicking on the "Run" button in the upper right corner. If any inaccuracies are found that interfere with the task, the program will highlight in red the part where the problem has occurred.

15. Quick import of pictures using "Image Capture"
While importing photos from your iPhone can be done manually, it's easier to do this with the Image Capture program. This feature has been available in Mac OS for quite some time, but, as a rule, many users who are just switching to Mac do not know about it. Thanks to this program, you can directly transfer all the photos taken with your camera at the same time to the folder of your choice. Or, even more convenient, view photos one after another on your computer and immediately delete the originals from iPhone in the event that you no longer need them.
In addition, you can connect to the scanner wirelessly and transfer your scanned documents and photos to a directory of your choice. You can also link your camera to any Mac OS application. Therefore, you can customize Image Capture so that a specific program, such as Photoshop, opens every time you connect your iPhone.
The default settings do not always make everyday work with the operating system as convenient and efficient as possible. In this article, we have collected 30 helpful tips for setting up macOS that can be useful to both novice and experienced Mac users.
Steve Jobs has spent a good deal of his life making Mac computers as easy to use as possible - but many of the really useful tricks are still obscure.
1. Turn on the right mouse button and change the speed of movement
By default, the right mouse button is disabled in macOS altogether, which is quite surprising for new Mac users, and the cursor movement speed leaves much to be desired. In order to configure both of these parameters, go to → System settings ... → Mouse → Select and press.

Here we put a tick in front of the second item “ Simulate the right button (click on the right)”, And below there is a movement speed regulator, twisting to the right, we get just the reactive speed of the cursor on the display.

By default, the Dock is located at the bottom of the display, but you can use the workspace more productively by moving the dock to the left or right of the display. This will increase the working area of \u200b\u200bthe window in many applications, for example, in Safari, the page width is not as important as the height.
To configure the Dock go to → System settings ... → Dock and in the column “ Position on screen"Put a full stop opposite" Left" or " On right».

If at some point while working with this or that application you need to minimize it, then in the upper left part of the window, click on the yellow button between the cross and expand. The program thumbnail will collapse to the right side of the Dock with a nice animation. But in this case, the program will not be minimized into its own icon, but an additional miniature will be created. If this situation does not suit you, then everything is fixable.
Go to → System settings ... → Dock and put a tick in front of the item " Hide Dock window in program icon».

After that, by clicking on the button " Collapse”, The thumbnail will not be created if the program's icon is already in the Dock.

4. Spotlight - macOS search engine

The easiest way to get things done faster on Mac is with Spotlight search. Just press the keyboard shortcut ⌘Cmd + Space (some may have Ctrl + Space), and you can instantly find files, open applications, search the Internet (yes, you don't need to open a browser for this) or all over your computer.
Spotlight can also be used as a calculator or currency converter. For example, enter “1000 usd” in the Spotlight search bar. The search engine will instantly display the current course.

You can read more about search capabilities on Mac.
5. Lost your cursor?
![]()
Just quickly move the mouse left and right, and at the same time look at the screen. The cursor will automatically increase in size, and it will be very difficult not to notice it. If desired, this function can be disabled ().
6. Analogue Ctrl + Alt + Delete on Mac

This Windows shortcut doesn't work on Mac, but there is a great alternative - click ⌘Cmd + ⌥Option (Alt) + Esc, and immediately access the menu for forced closing of "frozen" programs ().
If you are looking for an analog Task manager from Windows to Mac, it explains how to find it.

7. Delete files using hot keys
Still deleting files on Mac by dragging and dropping them to the icon Baskets? There is a way to do the same a little faster - ⌘Cmd + Delete.
8. Taking a screenshot on Mac is easier than on Windows

To take a screenshot of the entire screen, click ⌘Cmd + ⇧Shift + 3to select a specific area - ⌘Cmd + ⇧Shift + 4... By the way, these and many other keyboard shortcuts on Mac can be easily changed "for yourself" in the settings (section Keyboard → Keyboard shortcuts).
With the release of macOS Mojave, Apple's desktop operating system has a new screenshot tool.

If you don't need a shadow in the screenshots, then open Terminal (via Spotlight search or by going to Finder along the path Programs → Utilities), enter the following commands and press the key Return (Enter) after each line:
defaults write com.apple.screencapture disable-shadow -bool true
killall SystemUIServer
The shadow won't bother you anymore.
P. S .: To return everything to its original position, replace true on false.
9. Moving application windows in the background

To move the application window that is in the background without affecting the active application window in the foreground, press the key while dragging ⌘Cmd + left mouse button.
10. Startup on Mac
You can set a set of applications that will be loaded immediately after turning on your Mac. To do this, go to System Preferences -\u003e Users and Groups -\u003e Login Items tab and uncheck / add checkboxes ().

11. How to type the letter "ё" if it is not indicated on the keyboard
If you need a letter "Yo" - just press and hold the Russian letter on the keyboard "E", and after you see the prompt window, press the number on the keyboard "1".
There is a reliable way to check if music accidentally starts playing from your Mac's speakers. To do this, simply click on the sound icon in the upper right corner of the screen (this is called the status menu, and the entire bar at the top of the screen is the menu bar). You will see (checkmark next to the device name) if your headphones are connected to the Mac right now.


Speaking of the menu bar - if it bothers you (for example, you don't like that it takes up useful screen space), you can customize it so that it only appears when needed. To do this, go to System Preferences → Basic, and check the box next to Auto hide and show menu bar .
14. How to change the arrangement of icons on the menu bar
![]()
If you want to change the arrangement of items in the status menu - press and hold on the keyboard ⌘Cmd, and then drag the desired elements with the mouse. By the way, unnecessary elements can be removed.
15. Split View mode, or how to quickly place two program windows on the screen at the same time

Do you need two programs to work at the same time? No problem - in the upper part of the window, press and hold the rightmost (most often green) button for 2 seconds. Choose the second program from the already open - and enjoy working in a "clean" interface without distracting details.
16. Hot Corners on Mac

Function Active corners allows you to hover your mouse over a specific corner of the screen and instantly do things like minimize all open windows, open Mission control, Command centre or put the display to sleep. You can configure active corners in the menu of the same name ( System Preferences → Mission Control).
17. Use the Viewer to view and edit images

Standard program View allows not only viewing images, but also - resizing, adding comments, etc.

It also allows you to import a digital copy of your signature if you need to sign a document in digital format.
18. QuickTime Player allows you to record video and audio from your Mac screen without third-party applications

The built-in QuickTime Player has the ability to record an audio or video file that is playing right now on your screen, i.e. there is absolutely no need to look for third-party software for the same purposes ().

Starting with macOS Mojave, there is another method for recording video from the Mac screen, which we talked about.
19.Precise control of volume and brightness of the screen

If you want to decrease the sound volume on Mac just a little bit, while changing the parameter with the F11 or F12 buttons, hold down the keyboard shortcut ⇧Shift + ⌥Option (Alt)... This will decay the sound more slowly than with normal adjustment. Fn + F11 or F12... The same trick can be done with the screen brightness () ..
21. How to rename several files at once

To rename several (for example, a dozen) files or photos at once in Finder, select them, right-click and select the option Rename objects (number of objects).


You can also create keyboard shortcuts for applications. To do this go to System settings, Choose a section Keyboard, Further Keyboard shortcuts.

Add the program to the list of applications (if it is not there) using the icon «+» , then enter the name of the command for which you want to assign a keyboard shortcut (it must be written exactly the same as in the program itself, including the characters "..."). The last step is to assign a keyboard shortcut to an action in the program ().
23. Voice search with Siri

Of course, talking to your computer in public is a weird thing. But if no one bothers you, then voice prompt is a great way to search for information on the Internet, find photos, messages and other files on your Mac. You can find the multicolored Siri voice assistant icon (the search works through it) on the right side of the menu bar.

For examples of useful Siri commands on macOS, see this.
Recently I noticed that many acquaintances do not know even the most basic tricks that help to work with Apple computers faster and more productively - they use Mac incorrectly.
It would seem that they are not stupid, but they do not want to delve into these or those nuances of managing macOS in particular and the entire device as a whole. We will help you!
To correct this annoying misunderstanding at least partially, I have collected 8 repetitive mistakes, most often made by those who have recently switched to Mac. This article is a test for an experienced user and a beginner.
1. Trying to fit all your software into the Dock

When I started actively using the Mac for work purposes a few years ago, I immediately fell in love with the Dock - a mystical panel for quick access to applications that was not and does not exist on Windows.
Immediately I tried to fit on it almost all the software that I might ever need in theory: a couple of office suites (Microsoft, Apple), a set of graphic editors from the Adobe suite, calendars, notes, remote access, and the devil knows what.
The same mistake is repeated one by one by all my friends. And then they are indignant - they say, such small icons on this Dock, that you won't hit them.
Of course, you have stuffed everything that is possible here - remove the larger half and leave only the software that you really need in quick access and with BIG icons.
For example, my Dock has a few of the instant messengers I use most, Music and File Explorer, Mail and Reminders, Calendar and Notes, Photoshop, Pocket, Chrome, and the iA Writer text editor.
Everything else is available on Launchpad by pressing F4 or via the Touch Bar. Believe me, this is much more convenient!
2. Forgot about Magnet for window management

You can argue as much as you like about the convenience of managing windows on macOS, but I am sure that the developers of this operating system have not managed to implement this task really well - this is my stubborn opinion that has not changed for several years.
All this time I have been using the Magnet app, which I recommend to everyone. Now it costs only 75 rubles, but it gives so many positive emotions from use that it is difficult to convey.
The meaning of the utility is that you have a set of customizable key combinations that allows you to simply resize the window and magnetize it to either side of the screen.
Most often I use maximizing the window to full screen if I plan to actively use it - on 12 and 13 inch laptops this is especially important. Plus - splitting the screen into two parts: one program on the right, and another on the left.
3. Don't use macOS hot corners

I got acquainted with the active corners of macOS quite recently - you wrote about them in the comments, I tried and felt the warmest feelings for them. This is an incredibly handy auxiliary tool for active work.
Hot corners are configured in System Preferences\u003e Mission Control\u003e Hot Corners.
You can choose one of the following options, which are activated when you send the cursor to one of the corners of the screen:
- Mission Control - macOS multitasking
- "Application windows" - all open windows of one application
- "Desktop" - minimize all windows
- Dashboard - widget screen
- "Notification Center" - the same side menu
- Launchpad - All Applications
- "Start screensaver"
- "Disable screensaver"
- "Put monitor to sleep" - sleep mode
For example, when hovering over to the bottom right corner of my MacBook minimizes all windowsrevealing the contents of the desktop. Since I keep all the current files here until the end of the work on the article or something else, this is very convenient for me.
But using the upper active corners is just so difficult - there are buttons to go to the Mac system menu and open the Action Center, so it seems that random actions cannot be avoided.
It is better to use modification buttons here - for example, Command. You just need to hold it first when setting up, and then when using it.
4. Still haven't customized the menu bar

With the installation of additional software and while actively working with the built-in capabilities of macOS, the menu bar from a convenient tool turns into a garbage dump that you don't even want to pay attention to.
It's time to put things in order here too.
Step 1. Remove the excess. While holding down Command, throw whatever you're not using from the menu bar.
Step 2. Add what you want. Basic features can be found in System Preferences:
- Displaying Replay Options ("Monitors")
- Bluetooth display (Bluetooth)
- Siri icon in the menu bar (Siri)
- Volume indicator ("Sound")
- Time Machine icon ("Time Machine")
- Wireless connection information (Wi-Fi)
- Input language (Keyboard\u003e Input Sources)
- Displaying the battery level ("Saving energy")
- Menu for switching users (Users and Groups\u003e Login Options)
- Date and time ("Date and time"\u003e "Clock")
You can change the settings for the icons of third-party applications through their settings.
Step 3. Get organized. Hold Command and move the icons wherever you want.
Step 4. Try Bartender. This is a multifunctional application that will hide useless icons and create additional menus for those that are not needed so often.
5. Bought a cheap mouse instead of a trackpad

At least 50% of the MacBook developers I know haven't even tried the MacBook trackpad - right after buying a laptop they got some kind of dumb mouse and have been working with it for years.
When I switched from PC, I almost did the same. Trust me, do not repeat this mistake.
Why is this happening? This is an attempt to transfer the experience of using Windows laptops to MacBooks. In the first case, almost no model has normal trackpads even in 2018. In the second, there have been no bad touch panels for at least 10 years.
Controlling the cursor with the trackpad is a pleasure - especially if your laptop is Apple 2015 or newer. At this time, the manufacturer added Force Touch - simulating pressing anywhere on the panel. It's insanely convenient.
With the help of the trackpad, I not only freely solve simple office tasks, but also work in graphic editors like Adobe Photoshop.
And with the help of the trackpad, it is fashionable for the computer to control gestures that are configured in "System Preferences"\u003e "Trackpad".
6. Didn't understand the notification system

Almost every app you install on a Mac wants to add itself to the Notification Center and send you Push with or without reason - the situation is no better here than on the iPhone.
I advise you to control these processes through "System Preferences"\u003e "Notifications". Some should definitely be left on, while others should be put away.
I suggest leaving:
- Favorite messengers - today they have become the main method of communication, and it is better to receive notifications of new messages immediately.
- Calendars and To-Do Lists - They will remind you of important events and appointments that you may have forgotten and will help increase your personal productivity.
- Advanced weather widgets - for example, when I receive a weather report in the form of a push notification in the morning before work, I quickly figure out what to wear in my office. It's comfortable.
- Email and other services - most of your workflow can still be done with soap and more.
- Games in any form - except for time management, which informs about the end of any events, the rest is absolutely useless.
- Absolutely all news aggregators - I am sure that you probably do not need to receive such information immediately after the release, it is easier to read when you have free time.
- Video and audio services of all stripes - I think you need to watch and listen to them when you have a desire, and not at the request of the application.
- Stores, travel guides, and more - again, notifications from such apps are, again, only for advertising purposes, so they are not needed on the screen of your Mac.
Constantly pop-up notifications have a detrimental effect on your productivity - I have repeatedly been convinced of this from my own experience.
For example, sometimes it's really easier to go to the mail once a day and answer all letters than to constantly be distracted by them throughout the day. But you must decide this question for yourself.
7. Hear volume change clicks

I don't see a single positive point in listening to clicks, which only indicate that you are pressing the volume buttons.
I don’t know why many novice Mac growers have this feature enabled.
You can disable it in the menu "System Preferences"\u003e "Sound" - just uncheck the "Beep when changing volume" checkbox.
8. Push everything into Mac connectors

Hi guys! I then remembered that a long time ago, when dragons were still flying in the sky, on my blog there was a heading "Friday chill". On Fridays, I tried to write on abstract topics, so as not to overload the heads of my loyal and friendly readers. I will try to restore the tradition and on Fridays present you with such information that would not overload your brains, but, on the contrary, would make them relax, smile or dream.
I would like to talk about another dream of mine, which came true in December last year. But I still could not tell in more detail about this. And, to be more specific, I bought myself a Macbook Air (this is a laptop with a glowing apple 🙂). I really dreamed about it for a long time.
How did it all start?
In general, my love for Apple products woke up after (about 3 years ago), which was a very serious acquisition for me. Then I was just starting to “enter shura-mura” with the Internet. For a long time I despised all these "apple" fanatics, I never understood why to buy these devices when similar ones with the same characteristics are 2-3 times cheaper. These "Yabloko" people constantly made me smile (it seemed to me that they were stupid), and envy, I guess. But, whatever one may say, these devices could impress others, because of their price they distinguished their “owner” well. It's Apple now.
For a long time I was choosing: buy an iPhone or something else. The brother who owned the iPhone 3G persuaded me to take this pretentious thing of the 4th model. She had just left then. And from the very first days I started to fall in love with this magnificent technique.
After the iPhone, I wanted an iPad. And I felt sorry for the money for it, I kept trying to win it in competitions. With the 3rd attempt, on which I still read books and use the navigator.
After two Apple devices, I desperately wanted a laptop from the same company. I don't need a desktop computer, I often change my location. I wanted to have a universal device in which I would be comfortable to work at home, in my office, while traveling. As a result, I set a goal: if I can increase the sales of my company by the Nth amount (remember), then I will take a Macbook. Believe it or not, in 1 week we managed to reach this level, which seemed impossible. I wanted him so much. 🙂
In general, MacBooks come in the following models: Air and Pro. Air is a lighter version, weaker relative to the "firmware", but it keeps the battery longer and wins a lot in price. Pro is for those who need strong performance for video editing, huge image size and more. I realized I needed exactly Air.
And the next step was to choose SSD hard drive memory. 128 GB or 256 GB. The price difference between these models is almost 8,000 rubles. Too much, I thought, I ended up with a Macbook Air 13 ′ 128 GB. And, in order not to "steam" with the memory on the hard drive, I bought myself an external HDD hard drive for 1 Tb for 3000 rubles with USB 3.0 support. It works really fast too.
I quickly figured out the secret of why I crave Apple products. It's not about the characteristics, but about its operating system Os X. It is so harmonious, thoughtful and convenient. When I had a desktop computer, after 2-3 months of installing Windows, the thought arose: "Oh, I would have put another 4 GB of" RAM ", and the processor would be updated." So, with the advent of “MacBook” such thoughts have disappeared altogether: everything works clearly, without any delays, “blue screens of death”. I don't even know what characteristics my favorite device has, because its work is very satisfying to me.
For the sake of interest, I went to see the characteristics, and I will say that they are:
- Monitor - 13 inches.
- Processor - 1.3 Ghz Intel Core i5.
- Memory - 4 GB 1600 Ghz DDR 3.
- Graphics - Intel HD 5000
- Hard Drive - 128GB SSD.
- A full description is possible.
The Macbook Air took a new model, which was released in mid-2013. It cost me 43,000 rubles (as of December 2013). Now many will wake up like: "Yes, for the same money you could buy 2 laptops with similar characteristics!" Yes, I don’t argue. But I get a thrill from working with this device, I don’t regret a single ruble that I invested in it.
First impressions
I bought it! I'm running home! We need to quickly unpack the box! I carefully open it and immediately this very smell rushes “into the nose”. The smell of a new device, which should bring a lot of positive impressions. I lift the lid gently. Looking at my new silvery friend. How handsome he is!
The main advantages are immediately visible:

The first week after the purchase, there were still doubts about the need for this very purchase. The main question that tormented me - what is it? Do I really need it. Everything seemed not so convenient, I was already quite used to Windows. But only a week passed and I began to feel all the charm. I figured out the software and began to enjoy working with this laptop.
I especially enjoy writing. Expand the WordPress post editor to full screen, just a white screen and text, soft buttons that play like a piano with your fingers, and if you add to this what I type blindly, then typing is a pleasure. My thoughts don't run away, my fingers keep up with them, I don't have to press the key twice, everything works clearly and correctly. In a word - the buzz.
MacBook was created in order to create and not get nervous about all kinds of "brakes", "glitches", "blue screens" and other rubbish. Especially if you love writing or drawing, then you will love it. Imagine, I always thought that the background on my site was just white, it turns out there are still horizontal stripes that are very visible on the “poppy”, in general, my site has now become much more beautiful for me, I get satisfaction:
I don’t know if it’s noticeable on your computer, but imagine: I didn’t know for 2 years that my website background is not white. Something like that, gentlemen. 🙂 Again, a poppy is ideal for writers, designers, people involved in video. That is, if you are a creative person, you will remain mega-satisfied. Probably the only one who will not like Apple products is programmers. My suggestion.
Again, I bought the device for 43,000 rubles. I do not regret a single ruble that I spent in it. Do not think that by buying a MacBook, you will start earning 2 times more. Although this is also possible. When I really wanted the car, I could not work normally, it was always in my thoughts, I could not really concentrate. As I bought it, my head was unloaded and the work started. Here, too, this is possible, if you really really want to.
What's installed on my Macbook Air
1. Publishing blog posts.
I wrote posts on Windows using the program. Loved her very much. As it turned out, the Mac doesn't have it. I started looking for a replacement. I tried a bunch of options, everything was not right. The solution turned out to be outrageously simple. It turned out to be unrealistically convenient to write through the WordPress admin panel! I turn the screen to full screen and just write. Even WordPress itself says it succinctly and clearly: “Write.”:
And hotkeys make work much easier, in front of me there is just a white screen and text, nothing else. For Windows computer owners, I also recommend trying this method of writing articles. After the 3rd post, you will start to get great pleasure. Checked.
So the loss of Windows Live Writter was positive for me. I get more buzz in the standard editor. I fully focus on the text.
2. Text editor.
I also use Microsoft Word and Excel. There is no dispute here, indeed these programs are practically irreplaceable. As they were on my "Windows", so they migrated to the "poppy".
3. Browser.
4. FTP client
5. PHP editor.
6. Antivirus.
Antiviruses do not need to be installed at all. All chiki-bunches. 🙂 Do not “worry”.
7. Virtual machine.
Unfortunately, there are some programs that I just need in my work, but they cannot be replaced and so far they only work in Windows. In these cases, the so-called "virtual machine" comes to the rescue. I will tell you what it is below, and first I will list the list of programs that I need, but they are not for Os X:
- Webmoney - yes, there is no full-fledged version on Mac for some reason I don't understand. Of course, you can do without a client, transactions can be carried out by phone confirmation, but still. Updated: Webmoney app is now available on Mac, hurray! Link - https://itunes.apple.com/ru/app/my-webmoney/id807337125?mt\u003d12
- Is my favorite SEO keyword program.
- - favorite program for removing positions.
I was worried, thinking about what to do with these programs. It turns out that everything can be solved very simply. Install the virtual machine on the Mac. Moreover, it is very simple to install and there are quite a lot of choices. I installed myself a free VirtualBox, installed Windows 7 on it, allocated 512 MB of RAM and 20 GB of memory. And that's all. Now I can run a full-fledged Windows on my Mac, and you don't need to restart anything, everything opens in a convenient window as a separate application, or you can expand it to full screen. And transferring files from one system to another, using the clipboard and so on is not a problem. In general, everything is simple:
It is generally very easy to launch it, there "Windows" just flies. The only thing is that I was a little sorry to allocate 512 MB of RAM and 20 GB of hard disk. But I note that I did not notice any deterioration in the speed of work.
8. Mandatory software
All the basic software is also on Os X. That's me, Skype, Firefox, Chrome, Photoshop. I’ll even say more: programs on Mac are made better and more convenient. They are much faster (I remember how long it took me to run Photoshop on a desktop computer).
9. Software for an amateur
Also I have the following installed:
- SelfControl - you can block the URL of different sites for a certain amount of time. Vkontakte, Twitter, etc. during work so as not to be distracted. We start, set the timer for 2 hours, and during this time it is impossible to log into VKontakte, etc.
- Lightshot Screenshot is a very handy program for webmasters to share screenshots. By pressing the button, a screenshot of a certain area of \u200b\u200bthe monitor is taken, it is automatically uploaded to the server and a link to this picture is immediately displayed. We just drop the link to the interlocutor.
- Snagit - with this program I take screenshots for lessons, although you can get by with the previous one. The habit of "arrows".
- Screenflick - I use it to make screencasts (video recordings from the monitor screen).
- iMovie is a video editor. And the official Apple product. In my opinion, the best.
- Mindjet - I use it to create mind maps.
- PuntoSwitcher - automatic translation of a word if it is written in the wrong layout. A very handy program from Yandex.
- CheatSheet is a program that suggests hotkeys in any program. Clamp cmd and that's it.
- Super time management program. Until I say which one, I need to devote a whole post to this. In general, I said that in 4 years of searching I managed to find. In my opinion, I also practically found the ideal program. I'll introduce it very soon.
Everything. Nothing else is installed on my Mac, that's enough. For the rest, I use standard software. If there are any good worthwhile programs, write in the comments, I'm interested.
Conclusion
I completely switched to Mac in about 2-3 weeks of use. He threw everything and made him work only on it. It was uncomfortable at first. But now I don't turn on my desktop computer at all. I only work on one device. I carry it everywhere and always.
I am writing this post and am in such ecstasy. Even if you start writing a book, it seems to me that it will be written by itself. Work should be enjoyable and not be distracted by all sorts of trifles. Hooray!
I remembered myself when all the SEOs around were sitting on Macs. Even then I thought: here are show-offs, boasters and majors! 🙂
If you want to buy yourself a Windows laptop in the near future, think about it. Maybe it's better to wait another six months and save up for this wonderful device. But I warn you: once hooked on Apple appliances, you cannot "get off" from it. Trust me.
Now for me Macbook Air is not a tool, but a real friend.
- Board game Bang! The Magnificent Eight. Bang! Magnificent Eight Bang Magnificent Eight rules of the game
- Vera Nikolaevna Polozkova: biography, career and personal life
- Moon mass Moon mass in tons
- From A to Z. MacBook Pro. How to use MacBook: useful tips How to use MacBook Air
- The albedo effect and global warming
- What key combination to put quotation marks "Christmas trees
- What is an Internet portal An Internet portal is called