Heating pipes in the floor. Laying heating pipes in the screed
 Live journal
 Facebook
 Twitter
One of the important tasks that become during the installation of a heating system is the proper laying of heating pipes in the floor. Not only the heating efficiency of the room will depend on this, but also the durability of the system, as well as its proper operation and safety.
The method by which we will lay it will depend on what material for the heating circuit we have chosen.
You can hide the heating circuit either in the screed or with the help of the floor covering. Where exactly to hide them, we choose depending on the premises and which method is more convenient and requires less labor and financial costs.
Laying heating pipes under the screed
We can hide the contour in the screed. This method is widely used in the installation of underfloor heating systems. The step-by-step process is as follows:
- We carry out a rough screed from a mixture of concrete and expanded clay. Expanded clay is a new generation insulation, which also has a very small mass and helps to reduce the load on the foundation and floors;
- After the screed has dried, we smear its surface with bituminous mastic, thus providing waterproofing;
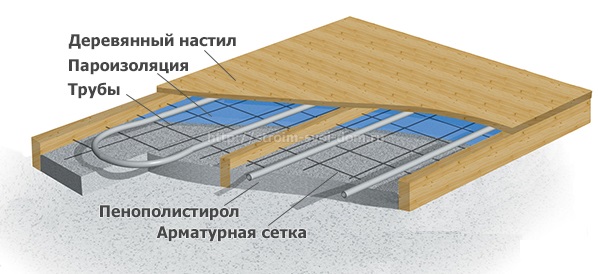
- We put a warming layer on the waterproofing layer. For this we can use penoplex - material from air and expanded polystyrene. Penoplex perfectly holds compressive loads, has high heat-insulating and sound-insulating properties, a small mass and is perfectly processed using the simplest tools. All joints in the insulation layer are treated either with glue or polyurethane foam. Foam board plates with ready-made marking for pipe laying are also sold;
- We install on foam foam either dense polyethylene as a vapor barrier, or penofol. Penofol is a modern insulation consisting of foamed polyethylene and foil. This material is characterized by highly heat-insulating properties, does not pass and does not absorb moisture, is highly ecological and non-toxic. The foil is used to reflect thermal radiation back into the room. Therefore, in the case of unilateral penofol, we put it with the metallized side up. It will provide protection for foam and additionally reduce heat loss. At the joints, glue penofol with aluminum adhesive tape;
- Next, the heating circuit is laid. Its fixation can be carried out using special clips and reinforcing mesh. It is possible to use insulation where pipes for pipes have already been laid. Perforated planks are also used. The process itself is carried out in such a way that the coiled tube is laid on the floor surface and laid in accordance with a pre-calculated scheme;
- Next, fill a layer of concrete with a thickness of 30-50 mm - this allows us to hide the pipes in the screed;
- After the solution has dried, we can begin installation of the floor covering.
The inclusion of the "warm floor" system should be done gradually to avoid cracks in the screed. For laying under concrete, it is best to use pipes made of cross-linked polyethylene either.
Laying a contour under the surface of the floor
If the question is where to hide the heating pipes, but for some reason we do not want to fill them with a screed, you can do this with the help of the flooring.
Let's consider this process in more detail:
- A rough screed is made from a mixture of concrete with expanded clay;
- After the solution has dried, we smear the surface with bitumen mastic and glue the foam plate on it. At the joints we remove the cracks, covering them with glue, or blowing them with foam;
- On top of the foam, we put either dense polyethylene, or penofol. Penofol have a shiny coating up. We glue the polyethylene at the joints with adhesive tape, penofol - with metallic adhesive tape;
- We lay the heating circuit, fixing them with clips, staples, or we use a heater with already marked channels for laying pipes;
- Between pipes we place logs and we carry out installation of a floor covering on them.
If we choose this option, then the circuit should be made of metal-plastic. Polymer pipes in this case are not suitable, since they can be easily damaged and require mandatory protection in the form of a concrete coating.
Conclusion
Ways to hide heating pipes under the floor are quite simple and quite doable on their own. The choice of method depends on the laying conditions - both of them are equally effective and convenient.
On the cost, timing and quality of heating installation Installation of HVAC pipes in a thin floor screedAt one of the facilities, our engineers and installers performed the “delicate” work of installing pipes for heating systems, “underfloor heating”, water supply and sewage. The fact is that the difficult task of placing all utilities in a thin floor screed was solved. Here we will reveal the details of this workflow.
Despite the fact that, as a rule, there is a reasonable framework for free space for installation at an engineering communications facility, for various reasons it is necessary to fit into even narrower and more rigid frameworks. And so it happened at one of our facilities. To place the pipes of the heating system, “underfloor heating”, water supply and sewerage, our engineers usually recommend the thickness of the screed in the range from 130 to 150 mm. Such a screed is usually enough to place the listed systems on the floor. In this case, even if pipe crossings appear somewhere, this fact during installation will not be critical.
At the facility under consideration, it so happened that balcony doors, thresholds, anteroom were already erected (broken off jambs), and stood up the task is to fit all engineering communications into rigid and very narrow frames of floor screed from 80 to 100 mm. This means that pipe intersections in the floor screed should be categorically excluded at all stages of work from design to installation.
Particular skill was shown by our design engineers. Here is the project for heating, “warm floor” and water supply:
A drawing with a pipe layout from a heating project (illustration can be enlarged)

Pipe layout drawing from the “underfloor heating” project (illustration can be enlarged)

Pipe layout drawing from a water supply project (illustration can be enlarged)
As already mentioned above, the employees of our company were faced with the task of installing pipes of all systems in one layer in order to fit into a dedicated floor screed at the facility. The installers coped with this issue well. Of course, there were places where the installers used the distance between the plates, but in general, everything worked out.
Photos of installation work are shown below.


Edge insulation at the walls will be mounted a bit later.
Due to the large number of pipes suitable for collector cabinets, I had to arrange a connection to one of the cabinets “from the back”.

It is possible that not at every facility it is possible to organize the installation of HVAC pipes in one layer for a smaller screed. On the other hand, as this example shows, the solution to this complex problem turned out to be within our forces.
The sewer system of a modern house should be not only functional, but also aesthetic. Of course, an open pipeline can pretty much spoil the appearance of the room, so there are different ways in which you can hide sewer pipes, for example, hide them in the floor screed.
Installation of the sewer pipeline can be carried out in two ways: open and closed. Each of them has a set of advantages and disadvantages. If all communications are in the public domain, then in case of leakage or clogging, the problem is easily fixed. If the installation of the pipeline is carried out in a closed way, the interior of the room looks quite presentable.
Sewer pipes in the floor - The solution is not new, but practical enough. Subject to the use of high-quality materials and the correct implementation of installation work, such a system will last for many years, not letting you know about yourself. However, if you save money, purchase cheap pipes and fittings, you need to be prepared for the fact that malfunctions can arise already a year after installation. And in order to repair the pipeline, the floor covering should be completely dismantled.
Flush mounting should be carried out taking into account all the requirements and recommendations that are established in SNiP. Not in every room can be laidsewer pipe under the floor . Limitations are imposed on:
- warehouses where food is stored;
- living rooms (bedroom, hall, nursery);
- premises where people have been staying for a long period (university classrooms, offices);
- the room where the electrical equipment is installed.
In an apartment or a country house, if concealed installation of the pipeline is provided,screed sewer pipes laid in the bathroom. It is important to ensure that the sewage system is properly sloped so that it can effectively carry out its work.
Note! If the sewer pipe is laid in the floor screed, care must be taken that its design is extremely simple. Avoid a large number of joints, bends, turns.
Often sewer pipes are mounted in the floor screed in the baths and saunas built on the foundation. In such cases, in addition to laying the pipeline, installation of drain channels is also required. The latter serve as a filter, delaying large debris. The internal sewerage of the bath can go into the general system or into a separate cesspool.
Installation of sewer in the bathroom
Laying sewer pipes in the floor The bathroom is carried out in several stages. First you need to draw up a project for future sewage, prepare materials. It is recommended to use plastic pipes with a sealed structure. Do not save on quality, since repairing a pipeline hidden in the floor can be very expensive.
![]()
Cast iron products are rarely used today for the installation of an internal pipeline. This is due to their high cost, heaviness. Tools should also be prepared. If you still use cast iron pipes, you will need a grinder. When working with plastic products you need a hacksaw for metal. During the installation process, you can not do without a hammer and a screwdriver.
If a sewer pipeline is being replaced, first you need to dismantle the old pipes, then you should free the room from foreign objects, clean the pipes, connect them, seal them, connect plumbing fixtures.
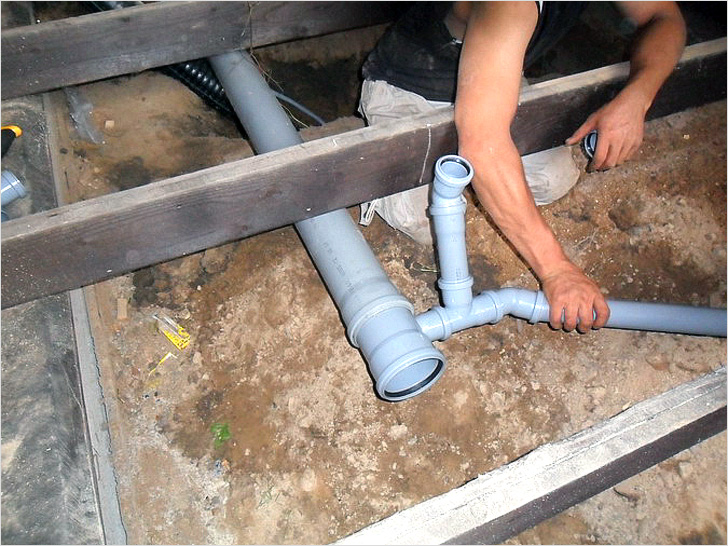
Connection of sewage elements
When screeding, one of the most important steps is to connect the elements of the pipeline. High-quality connected pipes are the key to the effective and durable functioning of the sewage system. The most insignificant, at first glance, errors can result in leaks and blockages in the pipeline. To eliminate the troubles you will need to dismantle the flooring.

Plastic pipes can be connected in the following ways:
- "Into the bell";
- using adhesives;
- using welding.
After the docking is completed, the joints must be treated with hermetic materials. It can be silicone sealant or self-adhesive tapes. Sealing pig-iron elements of the pipeline is carried out using epoxy resin, bitumen, asphalt mastic. After completing installation work, it is necessary to check the reliability of the sewer pipeline, and you can begin to lay the flooring.
Note! When installing pipes under the floor, a certain level of slope must be observed so that drains can flow freely into the cesspool.
Rules for laying pipes in the floor
It’s not easy to lay sewer pipes in the floor screed. This is a very responsible decision. It is necessary to weigh the pros and cons so that you do not regret the chosen installation method later. Should not be taken independently for the performance of work if you have never encountered such tasks before. Use the advice of professionals, but rather call for the help of a specialist to avoid technological errors that will affect the life of the system.
A hidden method of installing a sewer pipeline is an excellent solution in cases where the goal is to preserve the aesthetics of the room. A well-laid pipeline will last for many years.
This article will be useful to those who are going to buy a new apartment and are faced with a new trend in the field of heating. Very often, in new buildings, they began to move away from traditional risers supplying coolant (hot water) to the batteries, and use the laying of plastic pipes directly in the floor. This decision scares many away, since it is not known how durable and practical it is. After all, there is no direct access to the pipes, check their condition and notice the leak in time - too. An article about the advantages and disadvantages of such a solution.
Immediately start with the fact that the rejection of risers and wiring pipes to radiators on the floor is absolutely justified and has a number of advantages. You should not be afraid of such heating systems. Firstly, this solution allows you to install a heat meter for heating and pay for heating not according to the standard, but according to the actual consumption. For example, when the apartment gets hot or when you leave for a couple of weeks, you can turn off the heating and not pay for it. For example, I had months in the winter, when for January or December there was a sum of one hundred rubles in the heating ticket. With a conventional riser heating system, installing a heat meter is technically impossible. The fact is that in the case of wiring on the floor, there is only one central riser, which is located in the entrance, and from it the heating radiates from apartment to apartment. That is, the heating is apartment by apartment. On the tap from the riser and put a heat meter. In the case when each battery has its own riser, it is impossible to install a heat meter, since there are several risers in the apartment, and more significantly, the heat carrier flows flowing from floor to floor, because of which it is impossible to calculate the amount of coolant spent on heating specific apartment. This also implies another significant plus of distributing heating pipes in the floor - if necessary, you or your neighbors from above (from below) can block the heating of your apartment only in the event of an accident or repair, without prejudice to others. While in the standard version you have to block the entire riser from the first to the last floor. Moreover, in order to block the riser, you will have to notify the management company (ZhEK), while with apartment heating this is not necessary - just go to the stairwell of your floor and turn off the tap.
Another significant advantage of the system is its maintainability. The service life of heat-resistant plastic pipes is twice the service life of conventional standard pipes in risers. In the event that a replacement pipe is necessary, the floors will not have to be opened. It is precisely this moment that scares many away. A stereotype works: if the pipe is in the floor, sooner or later it will be necessary to break this floor to replace the damaged section of the pipe. Not at all. All pipes passing in the floor are laid in a special corrugation (SNiP requirement), due to which the damaged pipe is replaced without opening the floor.
Also, the advantages of such a heating system include the fact that pipes passing in the floor heat the floor. In addition to hot radiators, we get warm floors. Especially warming is felt if floor tiles were used as flooring (for example, in the kitchen). Floor heating, of course, is uneven - only where the pipes pass. But you don’t have to pay extra for these “warm floors”.
Well, the last, probably the most obvious, advantage will be that the apartment does not have risers that need to be hidden or put up with the fact that they will spoil the appearance of the room. Indeed, in the case of floor wiring of the supply and exhaust pipes, we only have the radiator in the room, the pipes from which go to the floor.
The only disadvantage of the system is the possibility of damage during some repair work. Carefully drill the floor carefully. Of course, when installing flooring, whether it is a laminate, tile or carpet, this is not required. But there is work related to the construction of sliding wardrobes, door sill devices, when there is still a need to drill the floor. But, firstly, the pipes lie at a certain depth (at least 4-5 cm), and secondly, management company You may be asked to give you a pipe layout diagram for the floor to know exactly where these pipes go (such schemes should be there). And thirdly, in the worst case, if you still damage the pipe - its replacement will take place without opening the floor.
Also, many are afraid that a pipe laid under the floor may spontaneously leak. This is practically impossible, since before filling the floor, water is supplied to the pipes under a pressure of 12 atmospheres (operating pressure during the heating season does not exceed 6 atmospheres). And only after checking the pipes for leaks, the workers begin to fill the floor. Another thing is how well the organization complied with the technology of work. In any case, the organization that carried out the work is responsible and will carry out repairs, if anything, will be at its own expense.
In my opinion, the advantages of a floor-by-floor apartment heating system still significantly outweigh the one minus, which I described a little higher. But the final choice is yours. I hope this article has been helpful to you. When copying an article or its parts, a reference to the source and the author is required.
Often, when they hear the word “heating”, people recall the heavy, rough, cast-iron batteries that were present in everyone’s house in the era of the Union. Radiators heated for a long time, did not keep heat in the apartment, coped with their function somehow. Now everything is different - there is an opportunity to choose among worthy alternatives. The most advanced of them is the "warm floor" system. Therefore, we learn to install heating pipes in the floor screed.
The heat starts from the feet
System operation
Why is laying heating pipes in a floor screed a wise decision? Is it easier to change batteries? Of course it’s easier, but easier is not better. The laws of physics cannot be repealed. The principles of operation of heating networks are fundamentally different. Familiar radiators generate heat, which rises along the walls to the ceiling, warming it first of all. Then the air returns down, but already in a cooled state. Thus, the ceiling is warm and people cold. The convection principle is not the best.
But the pipes for heating in the screed work differently. The heat warms the legs first, and then, cooling, rises. The inhabitants of the house do not freeze, and with this mechanism of heat distribution they feel better.

Before installing, weigh the pros and cons.
Advantages and disadvantages of technology
Before installing polypropylene pipes in the screed, familiarize yourself with the pros and cons of such a heating technique, because you must be sure that you invest resources wisely.
So, the advantages of the "warm floor":
- duration of operation (from 50 years);
- uniform warming up;
- profitability (the content of such heating is cheaper than the classic version);
- lack of moisture;
- simplicity in leaving;
- space saving;
- safety (children will not be injured or get burned by batteries);
- maintaining normal air humidity;
- lack of environment for the appearance of bacteria;
- aesthetics.

Differences in heat transfer between the classic version and the “warm floor” system
There are few shortcomings, but you should know them:
- reducing the height of the room;
- the complexity of repair work (finding pipes in the screed is a difficult task);
- the inability to install in specific places, for example, on flights of stairs.
This is important to know! If there are no restrictions on the mansions, then before changing the heating system in a multi-storey building, make sure that the central system can withstand such a hydraulic load.

Installation scheme of the "warm floor" system
System installation
Work always begins with a plan, procurement of materials, search tools. Warm flooring is no exception.
The wisdom of choosing pipes
Which pipes are the most reliable for arranging heating? You are free to choose copper, but it is very expensive. It is better to dwell on polymer products consisting of polyethylene and polybutylene. Such a “duet” is resistant to pressure - both external and internal: it does not cause trouble if everything is installed correctly. Polypropylene pipes should function in the floor screed, since their only minus is low hardness. No less good are composite structures made of metal plastic.
As for the installation of metal elements, in this case the risk will be unjustified. Water from highways is sometimes replete with "chemistry", and the material may not withstand such an aggressive effect - as a result, rust will appear, and then flow. Hard water also has a detrimental effect on metal. Therefore, polymer pipes - a wise decision, and at a reasonable price.
Video tutorial on choosing items for the network
Room preparation
The network is installed after removing the connection points of other communications, as well as after installing windows and doors. The room should be freed from furniture, the old heating network should be dismantled or left if you want double heating of the room.
Permissible surface irregularities - up to 1 cm. If they are larger, the base will have to be leveled.

Task number 1 - level the floor surface
The rooms located above the cold zone (basement) must be separated by insulating panels so that you warm the house, not the cellar.
The last stage of preparation is cleaning. An industrial vacuum cleaner will cope with this task perfectly. It remains to ask the household not to interfere and proceed with the installation.

The intermediate stage of work
Design installation
Installation of underfloor heating with thermal insulation begins. You already understood that hot air should be above, and not below. For thermal insulation of the network, you can use materials in the form of sheets or rolls. The main thing is to ensure that there are no gaps between the joints of the heat insulator, if you see gaps, cover them with a special tape. Polystyrene or basalt fiber coated with reflective foil is ideal for this task.
How to lay pipes? The uniformity of heating is important, so use options for arranging elements such as a snake or a spiral.
The main thing when laying the network is to adhere to the same step between zigzags or turns. The step size also matters. For rooms up to 20 m², a distance of 20 cm is sufficient. If you install the network in large rooms, it is recommended to mount several spirals / snakes.
Laying is done wet or dry. If you choose the first one - the more common one, in which the heat transfer is maximum, you will have to install a reinforcing mesh. You are free to purchase a factory kit or build a reinforcing structure on your own. The size of the cells depends on the step, but the side of the cell should not exceed the step distance. The fittings are fixed with clips, but if special heat insulators with bosses are used, then fastenings are not needed.
A reinforcing mesh is also installed on top of the network of pipes - for safety, so that the elements do not deform under the weight of the screed. Next, the grid is poured with a solution (gypsum, cement or other building mixture). Screed thickness varies between 3-7 cm.
This is important to know! Before filling the screed, check the piping for leaks.
They also practice the dry method of masking the network.
How to hide the pipes in a dry screed? Use chipboard boards. The technology differs only in that instead of mortar, chipboard sheets are installed on top of the structure. The technique is simple, you do not have to wait until the screed is dry. However, dry laying cannot be called popular, because it has a minus - voids inhibit the heat transfer of the network.

Design form - at your discretion
Using pipes in the floor screed for heating is not a luxury at all, right ?!