Homemade infrared dryer for vegetables and fruits. Homemade dryer for vegetables and fruits

 Live Journal
 Facebook
 Twitter
A self-assembled dryer for vegetables and fruits will become an indispensable assistant for a summer resident during the harvesting and processing season. The global network and the experience of craftsmen offer many such projects, a small part of them can be found here.
With the help of a dryer, you can stock up on tasty and healthy preparations for the winter from meat, fish, mushrooms, herbs, vegetables and, of course, fruits.
Nuances when drying fruits, meat and fish
Drying or curing fresh food is one of the oldest and still popular methods of preservation. Since people first thought about harvesting food for the future, many drying methods have been accumulated.
The first and earliest version of such harvesting is the use of solar energy. Its main advantage is the minimum cost. You will need inexpensive pan material and occasional agitation to keep the product from sticking together.
But there is a minus, which largely devalues all the advantages of this method. Requires even sunny weather, and there are not so many such days in our conditions.
A later, but also an old method, the use of a Russian stove. Several bricks are laid inside, on which a baking sheet with greens, fruits, berries, mushrooms, and other fruits is placed. Alternatively, the same products are hung in bunches near the stove. However, in these conditions, the oven is not in every home.
With the advent of gas stoves, a similar principle of conservation began to be used in city apartments. A baking sheet or grate is installed in the oven, the process takes place on low heat with the door open. With all the pluses, you have to pay for gas, it's not too expensive, but still a minus for the family budget.
More effective option homemade dryer, assembled from available funds according to one of the proven schemes. With this method, a number of nuances are observed, without which it is impossible to preserve the nutritional properties of any product. In this case:
- optimal temperature regime, which removes moisture from fruits, meat or fish;
- conditions are created for the necessary circulation of air flows, which eliminate excess moisture inside the drying chamber;
- there is a rational organization of its internal space, which makes it possible to correctly place the maximum number of products;
- everything that is inside the structure is reliably protected from insects, dust, and other external factors that can negatively affect the contents.
Wherein retains most of the vitamins and nutrients, minimizes the risk of botulism, the bacteria of which multiply in a humid environment, and reduces the risk of mold development.
Features of dryers
To ensure the above conditions and the desired result, a home-made drying unit must meet certain technical requirements:
- inside it should be maintained at a temperature of no more than 70 ° C, this will ensure maximum dehydration, but will not allow overdrying;
- the volume of the chamber must be calculated not only from the amount of products intended for harvesting, part of the space for free air circulation must be taken into account;
- the design of the device should allow you to adjust the drying time, with self assembly this can be achieved by simply moving the trays closer to the source of heat or air currents.
If necessary and if possible, the device can be equipped with heaters and thermostats, electric fans, and other equipment that will make its use more efficient and comfortable.
Types of drying chambers
Do-it-yourself dryers are classified in the same way as their factory counterparts. First of all, they need to be divided into devices using solar energy and electrical apparatus equipped with heaters and fans. The first are different
- simplicity of design;
- require a minimum of special knowledge and experience during assembly;
- economical in terms of materials needed for assembly and subsequent operation.
With all the variety of such devices, their design is generally of the same type. This is a cabinet of different sizes, usually made of wood, with ventilation holes, glass walls around the perimeter or on one side for heat to enter.
Their counterparts using electricity have a more complex device.
According to the principle of operation, they are divided into conventional electric dryers of the convective or infrared heating method and dehydrators, where the function of fine temperature adjustment is provided, which leads to complete dehydration of the product.
convective
In this embodiment, drying occurs with a directed flow of heated air. The design provides for a ten, which can be located above, below or in a horizontal plane.
The easiest way to make such an apparatus is to assemble the chamber, install a heater and a fan heater in it. However, the quality of processing becomes a victim of constructive simplicity. The fruits are dried on the outside, keeping moisture in the core.
They are not suitable for long-term storage, as they quickly become moldy, creating a risk of botulism infection.
This drawback can be minimized by a longer drying time, but this leads to the loss of a significant part of the useful properties and increases energy consumption.
infrared
These devices use infrared radiation, the effect of which is as close as possible to the sun. The impact occurs more evenly, vitamins and microelements are better preserved. Drying results are better suited for longer shelf life.
It is more difficult to assemble such a device, you will have to choose a suitable infrared emitter and choose a scheme for its correct placement.
Dehydrator
Translated into human language, installations of this type are called a dehydrator. It is for the maximum elimination of moisture that the design of these devices is designed. Despite the fact that conventional dryers are often called the same term, the difference between them lies in the presence of a thermostat that controls the temperature.
Thanks to such constructive improvements, drying takes place under optimal conditions in a tolerably short time. Such a device best suited for withering beef, pork or fish.
Result: as free from moisture as possible, evenly dried, able to retain consumer properties until the next harvest and longer.
But to assemble a dehydrator with your own hands, you can’t do it with improvised means, you will need additional equipment.
Necessary materials
You need to start making your own drying unit with a drawing and preparing the necessary tools. For the simplest designs, an approximate diagram is sufficient, more complex ones will require detailed study of individual elements of the device. The set of tools also depends on the complexity of the project, but most likely the mandatory items on the list will be:
- hacksaw and planer;
- different types of screwdrivers and a hammer;
- drill and pliers;
- soldering iron;
- level;
- paint brush.
Materials are also selected based on the project and the selected type of device. For the convective model you will need:
- bars for the frame and sheets of plywood for sheathing;
- the same materials are suitable for assembling trays;
- fine mesh;
- canopies for sashes and self-tapping screws for fasteners;
- electric fans with shadows or 150 W incandescent lamps;
- wire with a plug for connecting to the network.
For the case of an infrared device, the same materials are suitable, but instead of tenons or lamps with fans, you will need to purchase:
- a film that is used to heat floors;
- terminals, clamps and eyelets;
- insulation in bituminous and PVC variants.
The simplest designs are assembled from a minimum set of components. These are all the same wooden materials for the case, in addition to which glass or polycarbonate is required.
Drying cabinet step by step
Since the solar and electric varieties of the dryer have enough design nuances, the assembly sequence of each of them must be considered separately.
Solar
The simplest version of such a structure consists of a plywood case with glass doors and shelves inside. It is installed on the sunny side at an angle so that the heat affects the inner chamber as much as possible.
When the outer frame is ready and fixed in the working position, the dryer for fruits, vegetables, mushrooms and herbs is ready to work.
Electrical
To assemble the electrical version, you can not assemble the cabinet from scratch. An old cabinet or a small cabinet of sufficient size is quite suitable. Some craftsmen adapt old refrigerators for this purpose. Consider the option from the cabinet, as the easiest in terms of labor costs.
As you can see, in order to build a dryer with your own hands, you do not need to make special efforts, and there are many benefits from this device. You can make a dryer yourself from scrap materials without spending a lot of money. Use our tips and instructions and enjoy vitamins at any time of the year.
Do it yourself dryer for fruits and vegetables

Fruits are a source of pectins and vitamins, the consumption of which provides the body with the necessary nutrients. But fresh fruits are available only in the warm season. You can prepare them for the winter through a certain processing, which involves two options. Vegetables and fruits canned or dried.
A fruit dryer is an excellent device that you can build with your own hands at minimal financial cost.
Today, the second method is preferable. A fruit dryer is an excellent device that you can build with your own hands at minimal financial cost.
General device of the dryer
The principle of operation of the dryer is the effect of increased air flow on crushed fruits. As a result, the metabolic processes in the fruits are activated, the moisture leaves, and they dry out faster. There are three types of dryer, each of which has its own device.
The design of a standard dryer consists of 4 main parts:
- fan;
- corps;
- tray for fruits and vegetables;
- electric motor.
The functioning of the solar dryer is based on the penetration of rays through a transparent material and the heating of a sheet mounted on the back wall. This contributes to an increase in the temperature inside the device, when the figure can reach 50 ° C.
Fruits and vegetables, being in such conditions, dry out. Thanks to good ventilation, moisture is removed to the outside, which prevents the formation of mold on the fruit.
A cold air stream penetrates from the bottom side of the structure, it heats up in the case and exits through the upper hole.
This dryer is made up of:
- wooden case;
- pallets for crushed fruit;
- transparent polycarbonate lid.
The infrared dryer is a multifunctional handy device. It can be rolled up. This will greatly facilitate the storage of the device. If necessary, it can also be easily transported. The potential of such a device is 58 ° C, which allows you to get high-quality dried fruits. This device will successfully cope with the function of the heater.
The structural elements of such a dryer are as follows:
- infrared film;
- case from a box;
- transformer;
- wiring.
There may be doubts about the expediency of manufacturing a dryer. After all, if the fruits are placed in an ordinary attic, after a certain period of time they will reach the required state. This option does not require effort and financial investment. But it also has a drawback.
Vegetables and fruits in this case will attract insects. It is impossible to prevent the occurrence of this situation, since constant contact with air is necessary for the complete drying of the fruit. Accordingly, they cannot be placed in sealed packaging.
Undoubtedly, it is possible to treat fruits with a special compound so that insects lose interest in them. But the taste properties of the fruit change. In addition, after such processing, fruits retain chemical components in their structure, and it is no longer possible to call them completely safe.
Necessary tools and materials
For the construction you will need a professional tool
There are several design options. To get a regular dryer, you need to prepare:
- body materials. It can be plywood sheets measuring 60 cm x 80 cm or an old refrigerator;
- metal mesh;
- trays;
- a fan with a motor or 2 incandescent lamps with a power of 150 W;
- self-tapping screws.
For an infrared dryer you will need:
- electrical wire with switch and plug;
- film 100 cm x 50 cm, designed for underfloor heating;
- bitumen and PVC insulation;
- 2 terminals, 2 eyelets, 2 clips;
- soldering iron;
- metal bar.
The solar dryer is made using materials and tools such as:
- wooden bars;
- a metal sheet;
- mosquito net;
- black paint;
- polycarbonate or glass;
- lining or plywood;
- brush;
- self-tapping screws;
- level.
Step-by-step instructions for making a dryer for vegetables and fruits with your own hands
Each variation of the execution of the drying cabinet has its own characteristics, so making a choice in favor of a particular design is exclusively your right. Consider in turn the procedure for the construction of each type of drying device.
Plain
For the construction of a conventional structure, it is first necessary to prepare the hull. Next, you need to do the following manipulations:
Choose the item from which the dryer will be made
Making ventilation holes
Instead of the bottom, a metal mesh with small cells is used. It can be replaced with a grill grate by removing the handles from it. Or make the bottom out of an old door.
Inside we upholster the walls with insulating material.
We fix the guide rails on which the pallets will be fixed. They can be built from wooden slats and mosquito nets.
Fixing the fans to the chassis
We connect the device and test the performance.
infrared device
Infrared Dryer Assembly Diagram
The process of building such a dryer is quite simple, and will not take much time. Mylar film is used as a heating element. You will also need two lattice boxes made of plastic material. All actions are reduced to the following aspects:
solar design
This version of the device makes it possible to use solar energy for drying fruits. As a result of this natural process, fruits retain all the beneficial properties. So, the construction of the structure occurs in this order:
Assembling the frame for the solar dryer
Mounting shelves in a solar dryer
We cover the dryer with polycarbonate
Rules for using a homemade dryer
The rules for using a solar dryer boil down to the following aspects:
Video: alternative fruit dryer construction
It is well known that fruits that have been thermally affected lose a significant part of their nutrients. Get the most healthy foods will allow a way of drying fruits and vegetables.
So they retain their nutritional value at room temperature and take up relatively little space. We told you how to make a device that will help harvest fruits.
Use our instructions and enjoy vitamins even in the cold season.
How to make a do-it-yourself dryer for vegetables, fruits, meat, mushrooms, fish and herbs

Drying fruits and vegetables is in a good way preservation of their useful properties for a relatively long time. To quickly and efficiently dehydrate food, you can purchase a suitable dehydrator at a hardware store.
In addition to harvesting vegetables and fruits for the winter, with the help of such devices you can also dry meat, fish, and cook homemade yogurts. However, a store dryer is a relatively expensive pleasure. If you wish, you can save money by making a similar unit from improvised means with your own hands.
The article discusses options for dryers that you can do yourself with a minimum of costs.
For the manufacture of a dryer at home, the main factor is the availability of a suitable material for the body of the unit. For these purposes, an unnecessary refrigerator is well suited.
Preparatory activities
The case of an old refrigerator is a good option for a homemade electric dryer. Roomy and stable, it will get a second life as an outer frame for home drying equipment.
To make a dehydrator, you first need to get rid of unnecessary spare parts: a freezer, a compressor and a radiator. Dismantling should be carried out very carefully so as not to spill the working substance of the refrigerator. As a refrigerant, for example, freon, ammonia, SF6 can be used. These substances are unsafe for the human body.
Dryer assembly
After carrying out the preparatory measures, a fan of suitable sizes is mounted at the place where the compressor was installed. A device with a diameter of about 120-200 cm and a power of 18 watts is suitable. It can be purchased specially or removed from the old exhaust system. A feature of the installation is the fact that the fan must work to force air masses into the dehydrator.
In the upper part of the refrigerator, you need to cut a hole for a pipe with a diameter of 10 cm. This can be done using a tool available at home, for example, a crown or a jigsaw.
This hole is designed as an outlet for moist air. On the roof of the refrigerator, a piece of metal pipe (with the appropriate diameter) or aluminum corrugation is installed in it.
A sufficient length of the pipe is 2-3 m.
For faster drying, a small hood can be installed at the upper end of the pipe. The top of the air duct should be protected from insects with a mosquito net or gauze folded in several layers.
To be able to load products for drying into the future dehydrator, wooden slats are attached to the sides of the refrigerating chamber body. Pallets will be placed on them. The distance between the slats is selected 10-20 cm.
This is enough to accommodate a variety of vegetables, fruits, mushrooms and herbs, both sliced and some in general.
If it becomes necessary to dry larger pieces, then it is enough to pull out the extra trays from the refrigerator.
It should be noted that when using heating elements, it will be necessary to install an additional fan to speed up the exhaust. If these methods of drying acceleration are not required, then a simple fan can be dispensed with.
If desired, a home-made dryer will be improved with the help of temperature sensors. Also, with due skill, you can equip the equipment with a timer and other automated tools for your convenience.
Pallet making
Trays for the dehydrator should be selected or made according to the size of the refrigerator, so that there is a gap of 2 cm between their edges and the door. The same gap should be provided between the trays and the back wall of the case. This is necessary for the full blowing of products at all levels.
DIY drying cabinet
In the absence of unnecessary equipment with a suitable housing at home, you can make a drying cabinet yourself. For work you will need the following materials:
- plywood sheets;
- slats;
- corners;
- foil;
- electric heating device;
- conventional and fan heater;
- self-tapping screws.
First of all, the cabinet frame is mounted, then it is sheathed with plywood or other wood from all sides, except for the door. In the rear wall, you can pre-make holes for mounting fans. The door is made separately from the same materials and is attached to the body with hinges. Numerous holes with a diameter of 5-10 mm are preliminarily drilled on the surface of the door.
The cabinet is lined with aluminum foil from the inside and wooden slats for pallets are attached to its side walls.
Trays for fruits and vegetables are selected in the same way as when making a dryer from a refrigerator. Their dimensions should not interfere with the free circulation of air inside the dehydrator.
Both fans are mounted on the rear wall of the cabinet: the fan heater in the lower part, and the conventional fan in the upper part.
Parallel connection of devices is allowed, thanks to which they will work from one switch. You can also equip the drying cabinet with light bulbs, which will serve as visual indicators of its operation.
Solar dehydrator assembly options
Solar dehydrators are dryers that use solar energy to operate. They are well suited for drying herbs, fruits or vegetables, even fish.
Such designs are more economical, however, it will be possible to use them effectively only in hot sunny weather.
You can make a very simple design in the form of an ordinary box, or you can make a more “advanced” device equipped with additional equipment.
Simple Solar Dryer
To make a simple solar dryer for a summer residence, you will need a minimum of materials, tools and time. The assembly of the body is carried out by a method similar to the manufacture of a dehydrator in the form of a home-made cabinet. The exception is that there is no need to make holes for fans and in the door of the dryer.
Small slots for ventilation are made in the upper and lower walls of the structure and are equipped with mosquito nets. Another difference is that the bottom surface must be longer than the top, thus achieving the angular position of the door. The drying box must be installed on a stand made of wooden bars, made like a stool.
The door of the box must be made of transparent material: glass, plastic, plastic film. It is mounted to the top like a frame.
Rails for baking sheets are installed in the box. Their number is determined by the size of the manufactured box. Do not leave a small distance between the pallets - this has a bad effect on the circulation of air masses.
In the end, it remains only to choose or make pallets that are suitable in size. After that, you can put a homemade dehydrator in a well-lit place.
Manifold device
A solar dryer with a collector is a more labor-intensive version of the product. The drying box is arranged in much the same way as a simple dryer. But there are a number of significant differences. Such a dehydrator consists of 2 parts: an air heating zone (collector) and a product drying zone. From the front, both zones should be covered with a transparent material.
At the bottom of the heating zone, holes should be made for the free flow of air. An aluminum plate painted black should be installed on the inner wall of the collector. The air, passing along this plate, will heat up and flow through an additional hole into the lower part of the drying zone. Rising up, it takes moisture and exits through the exhaust pipe to the outside.
For efficient operation of the dryer with a collector, it must be moved so that the collector is constantly directed towards the sun. To avoid this, you can improve the dehydrator with additional collector devices from each side.
Modification with fan and thermostat
To make a solar dryer with a fan and a thermostat, you should prepare the following materials:
- glass or plastic;
- plywood;
- corners, bars, slats;
- wheels with a diameter of 40-80 mm (for ease of moving the unit);
- aluminum sheet;
- small fan (diameter 120 mm, 12 V);
- thermostat;
- voltage stabilizer with a KR142EN8B chip;
- solar battery with a voltage of 12 V;
- mosquito net.
For ease of assembly, you should be guided by the drawing indicating the dimensions of the parts of the product, which is presented below.
The first step is to assemble the body of the product from the bars and plywood and seal it. Then, wheels are mounted on the bottom of the dryer. With their help, the product will easily turn towards the sun. The back door of the dryer is made of transparent material (glass or plastic).
If you follow the dimensions suggested in the drawing, then 7 pallets can be installed in this dryer at a distance of 7 cm from each other. For this purpose, wooden slats are mounted in the body. Pallets for this design are appropriate to be made of mesh material and support rails.
A black painted aluminum sheet is mounted on the manifold. A fan is mounted in the upper part of the box and, in accordance with the diagram, an electrical circuit is assembled from a fan, a solar battery, a voltage stabilizer and a thermostat.
When connecting the elements of the electrical circuit, you should be guided by the diagram below.
To improve the performance of the assembled solar powered dehydrator, it must be placed so that the collector and battery are turned towards the sun's rays.
infrared dehydrator
A good dryer for herbs, nuts, mushrooms and fruits can be made using an infrared light bulb. For work, you need the following materials and tools:
- wire with a diameter of 5-8 mm;
- small cardboard box;
- foil;
- metal grid;
- lampholder with mounts;
- thermometer;
- infrared lamp with a power of 60 W;
- screwdriver, knife and awl;
- self-tapping screws, adhesive tape.
The box is glued on the inside with foil and mesh shelves are prepared according to its size. On one of the walls below, a hole is made for the wire and a cartridge with an infrared light bulb is fixed there. A thermometer is attached to one of the inner walls of the box.
Mesh pallet holders are made from pieces of wire. To do this, you need to pierce the walls of the box, thread the pieces of wire and secure their ends with tape.
Using a thermometer, you can monitor the temperature inside the device. It is recommended to dry vegetable products at a temperature of 40-50 degrees.
If the temperature inside the dryer exceeds the norm, you can turn off the light for a while or leave the lid of the box ajar.
This product can be made more convenient for operation by installing temperature sensors. Which will turn off the lamp itself when overheated.
Drying chamber for meat and fish products
Protein products can also be processed in a dryer. This process is called curing. A dehydrator for meat and fish can be made from a plastic box with a lid of a suitable size.
For manufacturing, you need a fan, a piece of pipe or coupling, threaded studs, washers and nuts. There are a number of videos on how to make your own cabinet for curing meat products.
A very simple assembly option is presented in the video below.
Self-manufacturing a food dryer with the right components is a relatively easy process. Assembly options can be much more than considered. It all depends on the imagination and possibilities. Also, any home-made model can be automated so that the drying process delivers as little hassle as possible and practically does not require personal intervention.
Do-it-yourself electric dryer for vegetables and fruits from improvised means

In rainy weather, when you need to dry the crop, what could be better than a do-it-yourself electric dryer for vegetables and fruits? After all, dried fruits are so good in winter! You can also cook compotes and chew like that. We share our experience on how to make an electric dryer with your own hands. This is a very simple design that can be used to dry vegetables, fruits, and mushrooms.
A simple electric dryer for vegetables and fruits with your own hands
Autumn! Ripe apples and pears. But drying in the sun is no longer possible. It's cold, but the dew still falls at night. What dried up during the day, then absorbed again during the night! They tried to dry it over a gas stove, but the volumes are not the same. Therefore, they began to select improvised means for a home-made dehydrator.
What do you need for drying? Warm air and blowing to blow off the fumes. We also need pallets for arranging fruit and a fan heater.
As pallets (baking sheets), we first took 5 available vegetable boxes 400 × 300 × 90. There are large cells at the bottom, so we shot a mosquito net with a furniture stapler:
Warm air through the boxes should go from the bottom up. Therefore, the side walls of the boxes must be sealed. Part of the boxes were covered with cling film:
Then they cut the film at the ends and trimmed it with a simple adhesive tape:
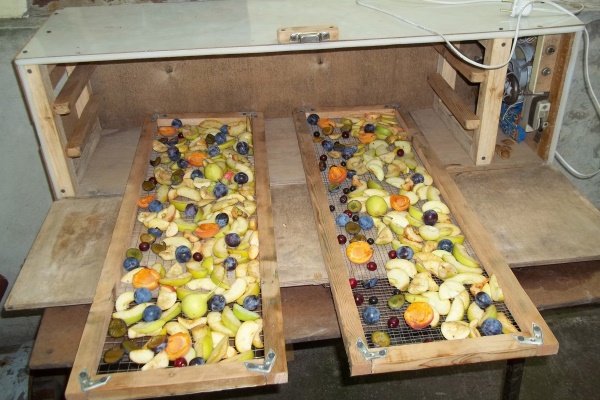
Fruit cut and dried...
... and realized that there were not enough pallets, they decided to add 5 more. They were covered with parchment paper from the inside, also shot with a stapler:
That is, they used for these purposes the material that was found at home. We stack the boxes so that air does not escape between the boxes:
At the very bottom of the stack we put a fan heater with a jet up and provide air access to it from below. A fan heater was found in a store with a capacity of 1000 watts.
After several dryings, we came to the following technology:
- We cut vegetables and fruits into slices no more than 5 mm.
- We put fruits and vegetables on the pallet not very tightly so that air can pass through.
- We rearrange the boxes periodically (once an hour):
- 1 2 3 4 … 9 10
- 10 9 8 … 2 1
- 1 3 5 … 8 10
- 10 8 … 3 1
- Total drying time 8 - 10 hours.
- We stop the dryer when the fruits are slightly damp, they become drier when cooled.
- Loading 6-8 kg, output 0.7-1.0 kg. It all depends on the quality of the fruit.
Previously, we had time to dry about a kilogram of pears. They are late autumn with us, they do not lie for a long time (Talgar beauty). And this year we dried as much as 15 kg. They dried up so that they look like chips. Their grandchildren happily eat them and demand pear chips! So a do-it-yourself electric dryer for vegetables and fruits helps us out a lot.
How to make a dryer for fish, fruits, vegetables, mushrooms and berries with your own hands

For long-term preservation and storage of food products for the future, they resort to various methods of their processing - salting, smoking, drying, drying, etc.
In most cases, processing processes involve air drying. Some products containing a lot of water in their composition are subjected to heat treatment, that is, they are dried at a high temperature in the oven (some fruits, melons, etc.)
Most of the products are dried in the sun or in the wind (salted meat, ham, poultry, fish, many fruits).
Certain difficulties and inconveniences are associated with the drying process. It often happens like this: just put the products out to dry, when the sun suddenly hid or the wind subsided, otherwise it suddenly started to rain, and all the work goes down the drain. But the biggest evil in the summer is associated with flies. They swarm around the exhibited product and can very quickly lay their eggs on it.
Flies are vicious carriers of infection. Contact of flies with products is unacceptable. That is why, before hanging meat and fish preparations in the wind, some people wrap them with gauze, but this does not always provide a reliable guarantee of isolation from flies, and in light winds it makes the drying process difficult.
Anglers are experiencing particular difficulties.
After a successful catch and salting of the caught, it is unrealistic to wrap each fish in gauze to dry, and the likelihood of spoilage by flies is very high, especially if the fish is plastovaned.
But there is a way out.
After a series of experiments, an excellent solution was found.
We made a dryer with our own hands, resembling a matchbox in shape, or rather, the lid of this box, but only several tens of times larger.
How the dryer works
The device and principle of operation are very simple. From the rails, a frame is made in the form of a parallelepiped, placed on the edge (matchbox gray down).
Both side, as well as the upper and lower faces, are sheathed with solid material (plywood, cardboard, roofing material, oilcloth, etc.), and the upper face is a hinged lid (like a piano lid). The end faces are covered with fine mesh or gauze.
Inside the dryer, wires are stretched along the side walls for hanging the product. On the one hand, inside, directly at the gauze, a table room fan is installed, and its conductive wire is passed through the gauze without leaving a free passage in it and is brought out to the electrical outlet.
Food products are put on metal hooks and hung on stretched wires. After a thorough check and expulsion of flies, the lid is closed and the fan is turned on.
The generated intense air flow ensures a fairly quick drying of the product in compliance with sanitary requirements.
Drying time is set empirically. It depends on the ambient temperature, its humidity, as well as on the size of the product to be dried, its moisture content and the required final moisture content.
Homemade dryer dimensions
The dimensions of the dryer are arbitrary and depend on the amount of product intended for drying. In order to save energy, it is desirable to use fans with several operating modes, which will allow you to change the ventilation mode in the dryer.
You can install the dryer on the balcony, on the veranda, in the barn, under a canopy, even in the open air. Loading products is best early in the morning or in the evening when there are no flies. Larger parts of the products should preferably be hung closer to the fan first, then they can be swapped.
The long-term use of such a dryer has made it possible to comprehensively study its operation under various conditions.
Excellent results were obtained in curing mushrooms, drying hams, boiled sausages, salted ducks and chickens, drying bunches of parsley, dill, low potatoes, churchkhela, fruits, marshmallows poured into baking sheets, etc.
The useful work of the dryer when drying fish is simply difficult to overestimate.
I think many will be interested in such a dryer, because the material used for its manufacture is actually junk, the work is simple, there is a fan in almost every house, the power consumption is low, and the benefits are great.
Drawing homemade dryer
About drying apples ...
Some readers claim that when dried, neither vitamins nor beneficial trace elements remain in apples. Is it so? Yes, something is destroyed during drying, in particular, vitamin C. But most of the useful substances are preserved: potassium, calcium, phosphorus, iron, etc.
apple chips
As a child, I spent every summer with my sisters at my grandmother's in the village, there was a large farm: three cows, three calves, pigs, chickens. horses. And the gardens looked more like collective farm fields.
A bed of carrots - 30 meters long! We did everything we were told - and weeded, and watered, and collected Colorado beetles, but we didn’t understand why.
Laughter with laughter, but only at the age of 33, thanks to articles from “My Beautiful Dacha”, I found out why spud potatoes ... When my husband and I bought a dacha, my mother-in-law gave me a pile of books about the garden.
We got the dacha with several apple trees; the harvest is so big that you can’t even take it to the city.
DIY mushroom dryer

For long-term storage and storage of food products for the future, various methods of their processing are used - drying, drying, smoking, salting. Often processing processes involve air drying.
Some foods that contain a lot of water are heat-treated, that is, they are dried at a fairly high temperature in the oven (melons, apples, some fruits). Many other products are dried in the wind or in the sun (fruit, fish, poultry, ham, salted meat).
An excellent alternative to such methods is a do-it-yourself mushroom dryer, which can also be used to harvest other products. Consider how convenient such a device is and how you can assemble it yourself.
Harvesting difficulties
Certain difficulties and inconveniences are associated with the drying process.
It often happens like this: just put the products to dry, when suddenly the wind subsides or the sun hides, or even it starts to rain, and all the work goes down the drain. But the greatest evil in the summer is associated with flies.
They swarm around the exhibited product and before you blink an eye, they will lay their eggs in it. In this case, do-it-yourself dryer for mushrooms will save you.
Anglers have particular difficulties, because after a good catch and salting of the caught, it is simply unrealistic to wrap each fish with gauze to dry, and the likelihood of product spoilage by flies increases significantly, especially if the fish is plastified. But still, there is a way out.
After many experiments, a wonderful solution was found - to make a do-it-yourself dryer for mushrooms, reminiscent of the shape of matchboxes, or rather, the lid from this box, only several tens of times larger.
Dryer Option #1
The device of the dryer and the principle of its operation is quite simple. To make such a dryer, you should:
Device Application
Food products should be put on metal hooks and hung on stretched wires. After a complete check and the expulsion of all flies, the lid closes and the fan turns on.
As a rule, the duration of drying in a dryer for mushrooms is determined empirically. It will depend on the humidity of the surrounding air, its temperature, as well as on the size of the products to be dried, their moisture content and the desired final moisture content.
- The dimensions of the dryer can be arbitrary and depend on the amount of product intended for drying.
- In order to reduce energy consumption, it is recommended to use fans that have several operating modes, which will make it possible to change the ventilation mode in the dryer.
- You can install such a dryer almost anywhere: on the veranda, balcony, under a canopy or even on the street.
- It is better to load products in the evening or early in the morning when there are no flies.
- Larger parts of the products are best hung closer to the fan first, and then they can be swapped.
Dryer Option #2
Let's look at another option, how to make a do-it-yourself mushroom dryer over a gas stove. So let's get started:
- For work, we need aluminum corners of various lengths and a wire mesh.
- To begin with, measure the dimensions of the plate in order to make a dryer, which can later be placed on its surface.
- Drill holes in the corners with a drill or electric drill so that they can be fastened with bolts and nuts.
- Now it came to the grid on which the mushrooms will be placed. Cut it to the size of the slab and the frame itself, with a margin.
- In order to fix the mesh to the frame, use the same aluminum corner, but smaller in size. It should turn out so that from below the grid fits onto the platform from the frame, and from above it is pressed against the patch plate.
- Attach the plate to the frame with the screws through the pre-drilled holes.
- The height above the fire should be determined independently, it can be approximately 60-70 cm (just saw off the legs of the required length).
- Lay out the mushrooms, turn on the gas and that's it, the process has begun.
footage
The useful work of a do-it-yourself mushroom dryer is very difficult to overestimate. Surely, many will be interested in such a dryer, the material used to make it is actually junk, the work is completely simple, the power consumption is low, the fan can be found in almost every home, and the benefits are enormous.
Drying (dryer) for mushrooms, fruits, berries, herbs, herbs from an old refrigerator. How to dry. | DoSam.Ru

A few years ago I made myself a simple dryer for mushrooms, apples, etc., and it still serves faithfully. But its effectiveness all the time seemed to me insufficient, or rather, I wanted to make it even more effective.
And then the other day I got into the hands of an old refrigerator. And I decided to make a forced-ventilation drying cabinet out of it, which will make the drying and drying process very fast, efficient and safe (in terms of getting rid of flies and wasps that strive to visit processed products).
They are known to be intolerant of drafts.
First of all, you should free the refrigerator case from all internal contents. We only need the body itself, usually metal. The only thing that should be left is the seal on the door.
When removing the refrigerator insulation, you should be careful, as it will most likely be glass wool. So that your hands do not itch later, you should wear tight clothes and gloves, preferably disposable polyethylene or rubber, stretched over cloth. A respirator or just a scarf tied over your mouth and nose will not be superfluous.
The inner case - the “trough” may be possible to be used somehow in the future (for example, as a trolley body), although there are a lot of holes in it. And we are left with only a metal locker.
In the niche where the refrigerator compressor used to be, we cut an ordinary exhaust fan. True, in this case it will work as an injection. Generally speaking, here I am faced with a dilemma.
Formally, it is better to use an exhaust fan for drying, which will create a slight vacuum in the drying chamber. The lower the pressure, the faster the drying.
But when installing an exhaust fan, the ability to use a fan heater is lost (which dramatically speeds up drying), you would have to install two of them or install a separate air heater.
So for the time being I settled on a 125 mm blower fan (capacity approx. 180 cubic meters of air per hour, 18 watts of power).
Maybe later, when the "drying season" begins, I'll try to rearrange it to the hood and compare the results.
I specially installed the fan not in the center, so that later I could install either a second fan, or embed a fan heater (for example, from drying an old washing machine).
In the roof of the refrigerator, I cut a hole for a polypropylene pipe and glued it with hot glue. It can be built up by installing a pipe 2 meters high or an aluminum corrugation stretched up to 3 meters.
At the top it will be possible to install a Volpert-Grigorovich exhaust deflector and then the draft (and draft) will be achieved on their own, without a fan. This option will be useful for those who have tight electricity in the country.
By the way, I painted the body of the refrigerator (as long as the can was enough) with black matte paint. Now, when the sun appears, the case heats up noticeably, and even with the fan turned on, the air temperature (in the outlet pipe) is 5-8 degrees higher than the ambient temperature (I measured it with an electronic thermometer in a remote sensor).
So that the door of the refrigerator - drying is securely fixed, I attached a regular hook to it. Such as is usually used on the doors of utility rooms or gates. I bent the tip of the hook a little and made a notch on it with a needle file.
Now, when closing on the hook, the drying door, as it were, is additionally attracted to the body, being sealed, and fixed in this position. (I did not fool around with different magnetic latches or latches.).
By the way, this solution to the problem of closing an old (real) refrigerator can be useful if it lets air through under a worn door seal.
The interior of the dryer is "standard". This is a rack with sliding flat drawers. The bottom of boxes - mesh, from a small grid. Shelves for boxes I made from a narrow board. I had to make a cutout under the protruding edge of the refrigerator.
For the efficiency of the drying process, the design should be made such that all air passes exclusively through the bottom. Fastening shelves - directly to the walls of the refrigerator, self-tapping screws.
Having marked the wall from the outside, I drilled holes in it, through which I fixed the shelves with self-tapping screws with a head in the form of a pressure washer.
I have to say that I got a little carried away here. It was just necessary to close the recess in the door with a sheet of plywood or plastic. Those. make the door just flat so that when it closes it is flush with the front wall of the refrigerator.
I decided to make curly shelves so that the boxes would almost rest against the door and the air would go through them. At the same time, the volume of the drying cabinet increased by the thickness of the door, and the work - by an extra hour or two ... In addition, there were certain difficulties with opening the door - the seal was clinging to the shelves. I had to figuratively file them.
But what's done is done. If someone repeats the design, this should be taken into account.
Testing the dryer from the refrigerator completely satisfied me. A bunch of green dill withered for winter storage in less than a day. I even withered some meat (for beer).
Meat (beef, boiled-smoked), cut into long strips and grated with salt and pepper, withered to a “rubber” state in just a few hours. It turned out something like biltong or sujuk.
So ready for the mushroom - apple drying season!
So if you come across a case from an old refrigerator, spend half a day and you will have a great dryer for mushrooms, apples, berries, herbs and all kinds of medicinal herbs.
Drying is the oldest way to preserve fruits and vegetables. Initially, it was produced only with the help of sunlight, but now special devices are used for this purpose - solar or infrared dryers. They can be purchased at the store, or you can make your own. How to do this, we will consider further.
What is this device?
Modern dryers are presented in a wide variety, but basically they consist of several tiers of mesh boxes located one above the other. The device is closed with a lid, in the middle of which there is a hole for the exit of moist air. The pallet is equipped with the simplest electric motor. It heats the incoming air masses, which are then redirected to the working chamber and act on the ingredients.
In the blanks, metabolic processes are activated, which accelerate the process of their drying. In the process of heating, the moisture from the fruits evaporates, and their final moisture index is on average 5-8%. To prevent a sharp effect of open air flow on the fruits, it is first recommended to cut them and arrange them on trays, and after 3-4 days simply keep them in the dryer.
In general, two conditions are required for drying products:
- create a warm temperature regime at which the processes of evaporation of moisture from fruits and vegetables begin (about 40 degrees);
- create ventilation, through which moisture will be removed from the container in time.
To assemble a dryer of any type with your own hands, you must proceed from these criteria. Beginner craftsmen can start with solar appliances, while more experienced crafters can also handle the assembly of infrared dryers.
Solar beam dryer
It is the most economical option, since the design works due to the heat of sunlight and does not require any additional energy sources. You can assemble such a dryer from a wooden cabinet, which will have sectional trays for fruits and vegetables. Read on for what you need to do.
Assembly
To assemble the solar structure, you will need wooden bars measuring 50x50 mm, but their width and length can be changed based on your own needs. It should be taken into account that the number of trays located inside will depend on the height of the structure.
You can make a wooden dryer according to the following instructions:
- Knock down the bars between themselves to get the outline of the future dryer. In general, three such circuits will be required, and one of them will be used as a door.
- Determine the angle of future shelves. Trays must be placed at an appropriate angle so that the rays warm up the workpieces well when the cabinet is located at right angles to the sun. You can determine the angle empirically, since it depends on the time of year and the territory of residence. To do this, set the frame in the sun and follow its shadow. When tilting it, it is important to determine the moment when the shadows of the two contours converge. At this time, attach the level to the side wall and mark the location of future shelves with a pencil.
- Sew up the side and back walls with plywood or lining. In addition, a thin metal sheet should be attached to the back wall, which will increase the heating of the dryer.
- Build ventilation blocks. In the upper and lower parts of the structure, from the front and back, nail plywood, in which to make round holes of 8 pieces on each side to ensure the release of wet fumes. Close the openings with a mosquito net to prevent the entry of insects.
- Paint the inside of the structure black to create a greenhouse effect in the dryer, which will speed up the drying of fruits and vegetables.
- Install shelves. For free air circulation in the structure, it is required to use mesh materials. For these purposes, it is best to use a mosquito net, which is fixed on the frame.
- Put the cabinet on long legs, which are fixed with transverse wooden beams.
- Cover the front of the frame with a transparent material through which the sun's rays can pass and affect the fruit. For these purposes, you can use transparent slate, cellular polycarbonate or glass. For even more heating, you can first place cans of drinks on the bottom of the cabinet.
- From above, close the cabinet with a roof made of plywood or metal sheets, and then make a door to tightly close the structure. So, by simple manipulations, you can assemble a solar dryer.
For better exposure to sunlight on fruits and vegetables during drying, the structure should be leaned against some surface. If there is none, you can use pipes by attaching them to the sides of the dryer.
Operating principle
The assembled dryer operates as follows:
- The rays of the sun penetrate the structure through the transparent coating and heat the rear metal sheet.
- The temperature in the container rises and exceeds 40 degrees, and therefore the fruits gradually begin to dry out.
- The moisture that comes from fruits and vegetables is vented outside through the ventilation windows, so that the food does not get moldy. So, ventilation needs to be given special attention so that cold air enters through the lower hole, heats up and exits through the upper hole, also removing moisture to the outside.
Thus, natural air circulation is carried out, and the heating and ventilating effect is simultaneous. This dryer model allows you to provide all the necessary conditions for drying fruits and vegetables.
The drying process cannot be accelerated by increasing the temperature to 50 degrees and above, since this will lead to the destruction of a large amount of vitamins and pectins in the preparations, which will ultimately reduce their nutritional value.
In the following video, the home master clearly shows how you can assemble a simple but productive dryer from wooden beams:
Infrared dryer with heating elements
This type of dryer emits infrared radiation of a certain wavelength, which is actively absorbed by the water contained in the products, but is not absorbed by the fabric of the dried blanks. So, when moisture is removed at low temperatures (40-60 degrees), vitamins and biologically active substances are preserved in fruits and vegetables. In addition, they retain their natural color and aroma even after drying.
device using infrared heating elements has the following characteristics:
- the level of preservation of useful substances: 80-90%;
- vitamin loss rate: 5-15%;
- reduction of blanks in volume: up to 3-4 times;
- weight reduction of blanks: 4-8 times;
- storage of products after drying: up to 2 years in sealed containers.
Heating element selection
To make such a dryer, you will need an infrared heating element in the form of a flexible lavsan film. It can be purchased at the radio market. The optimal characteristics of this element are as follows:
- power consumption: 30 W;
- supply voltage: 12 V;
- infrared surface temperature: up to 65 degrees;
- operating temperature range: from -40 to 50 degrees;
- dimensions: 28x20 cm;
- weight: up to 15 g;
- warranty period: 2 years from the date of purchase;
- service life: 50 years.
Such a heating element will become the heart of an infrared dryer, which you can assemble with your own hands in several stages.
Assembly
Two lattice plastic boxes are used as the basis for the design. Their optimal length is 48 cm, and the width is 29 cm. They have a convenient initial shape and fit the dimensions of the heating elements. In addition, the boxes are made of plastic, so it is convenient to work with them.
Having prepared the heating element and two boxes, you can start assembling the dryer:
- Cut off part of the wall of one drawer, as this will keep the optimal distance from the surface of the heating element to the products inside the drawer. This distance can be from 7 to 10 cm. So, if the standard height of the sides was 11.5 cm, then after trimming it should be 7-10 cm. Also cut the corner supports of the box. The optimal length is 13.5 cm. The finished box will later be the main (lower).
- Take a second box with a side height of 18 cm. Cut off part of the wall, but do not touch the supporting corners. Install on the main drawer for a compact and lightweight structure.
- Prepare a holder for infrared heating elements. For this, you can use double-folded cardboard with a thickness of 6 mm, since it will provide greater rigidity. So, you need to cut out three cardboard partitions along the contour of the box - the top, middle and bottom.
- Take ordinary food foil and glue the partitions as follows: the lower and upper ones on one side, and the middle one on both. You can use double sided tape to attach the foil. The foil is used as a reflector as it helps direct the infrared rays generated by the heating elements onto the food.
- Attach the heating elements to the foil partitions using double-sided tape. Do it as follows: attach 2 elements to the upper and lower partitions (4 in total), and 2 elements to the middle one on each side (4 in total). In this case, it is necessary to make all the conclusions of the heating elements in one direction, so that it is easier to connect. At this stage, the assembly of the dryer is completed, so it remains to connect.
It should be noted that there may be free areas on the partitions that could not be covered with heating elements. You should not worry about this, since there is a small spread of infrared rays, so they will heat the entire area of \u200b\u200bthe trays, that is, all workpieces will dry under such influence.
Connection
When assembling the dryer, only 8 heating elements were used. Each of them consumes 30 watts, so the total power of the device is 240 watts. In addition, it must be borne in mind that drying will require a voltage of 12 V. To ensure it, it is advisable to use a 220/12 V step-down transformer with a power of 250 W. Here are its characteristics:
- manufacturer: Feron;
- input voltage: 230 V;
- output voltage: 12V;
- power: 250 W;
- dimensions: 84x29x42 mm.
The connection stage must be given special attention, because in case of incorrect or unreliable connection, the device simply will not work, and the failure of the heating elements can lead to damage to the step-down transformer.
In order to properly perform all the work, you first need to understand the connection diagram of the heating elements. Since they must work in parallel, the two elements can be connected as follows:

In the case of a dryer, 8 heating elements will need to be connected, with each polarity connected to a transformer. Therefore, the exact circuit of a 240 W dryer will look like this:

Having dealt with the circuit, you can proceed directly to the connection of the wires to each other. In this case, it is worth using flat female-male connectors, since with their help you can make a high-quality connection without the ability to solder, only using pliers and electrical tape. In addition, with such a connection, one of the heating partitions can later be turned off so that only one drawer works. This is convenient if you want to dry a few products.
Connection work is carried out in the following order:
- Connect the ends of the wires to each other, using the above diagram, and secure with a male connector on the heating elements.
- Additionally secure with electrical tape of different colors to prevent confusion when connecting the female-male connector to the transformer. In general, duct tape will help keep moisture out of the joints.
- Make the connection on the transformer with 4 connectors for each polarity. To do this, you need to use 4 wires of different colors, which will facilitate the connection process. Care must be taken when connecting the transformer connection to the cable that will be connected to the 220 V network.
- The design is ready, so it remains only to assemble the entire system. To do this, you need to insert partitions into the frame: the top one - on the top box with the heating element down, the middle one - between the boxes, the bottom one - under the second box with the heating element up.
- Plug in the transformer.
Examination
To test a homemade dryer, you can use a thermal imager, as it will allow you to clearly see how the device works in the infrared spectrum. If the connection is made correctly, on the right you can see the operation of the 12 V heating elements. In this case, the photographs will show that they create infrared radiation over the entire surface of the dryer, which is required for drying fruits and vegetables.
With the help of a thermal imager, it will also be possible to determine how much the entire structure heats up. Normally, the cardboard reflector will heat up to 34 degrees. This will mean that the bulk of the infrared rays are directed in the right direction, that is, on the products. In the very center, the structure can heat up to 45 degrees. If you bring your hands to a running dryer, you can feel a pleasant warmth. There should not be any unpleasant odors.
In order to increase the efficiency of the design, it is possible to install a layer of foam plastic 2-3 cm thick on top and bottom of the dryer in order to direct infrared rays by more than 80-90% towards the workpieces.
Homemade dryers from improvised items
You can assemble an electric dryer from old household appliances. We will consider various options below.
air grill
It is required to perform a series of simple manipulations to turn an air grill of any modification into a dryer. The instruction looks like this:
- Remove a baking sheet from the stove, on which to spread vegetables, fruits, berries or mushrooms.
- Remove the cover with the lamp and fan from the air fryer.
- Take the high grid from the kit for the baking sheet and place it exactly in the middle of the baking sheet, while it must rest firmly on the steel, and not swing.
- Place the grill cover on the grid and connect to the outlet.
- Open the handle to block the inclusion.
- Place the baking sheet with the airfryer lid on the floor, stool or table. At the same time, it is important to monitor safety in order to prevent fire. It is worth keeping away curtains, pets and children.
- Start the convection oven according to the instructions at a low temperature, while caution is required, since the heat will be quite strong.
- Set the makeshift dryer timer to 60 minutes. At the signal, mix the workpiece, and after 20 minutes turn it on again. Continue until the product is completely dry.
Fridge
If you have an old refrigerator and don’t know where to put it, then it can be easily turned into a dryer using the following instructions:
- Remove the freezer and compressor from the refrigerator. In such devices, as a rule, a double-glazed window is used as a heater. When removing it, you must act carefully, after putting on tight clothing and rubber gloves.
- In the lower and upper parts of the refrigerator, make windows through which air flows will enter the structure, and then exit.
- Fix the door using a regular hook. If it is slightly bent and a notch is made on it, when closed, the door will fit as tightly as possible to the refrigerator, ensuring a hermetic closure of the case.
- As a bottom, install a fine-mesh metal mesh.
Grill grates
A primitive appliance can be assembled using a grill grate. Proceed in this order:
- Remove the wire handles from the grill.
- On the grid, fix the fan, which is equipped with a motor. You can get a similar element from old technology or make it yourself. If there is no fan, two 150 W incandescent lamps can be used as a replacement. It is worth considering that in the case of using lamps, drying will take a little longer.
- Install trays at the top of the box, which will be affected by the air flow from the fan.
Heating film
It is used for the installation of underfloor heating. Based on it, you can make a simple and economical dryer.
You will need the following materials:
- heating film 50x100 cm in size and 110 W;
- electrical wire with plug and switch;
- insulation kit.
Experienced craftsmen recommend using bituminous insulation, which is used for installing infrared floors. On top of this material, it is worth laying PVC insulation, which can be purchased at the points of sale of the heating film. In general, the assembly of the dryer is as follows:
- Connect the wire to the heating tape using 2 clamps, an eyelet and a terminal - rings.
- Connect the wires with a soldering iron. During the soldering process, it is worth placing a metal bar under the film to prevent it from overheating.
After connecting the wires, you can get a dryer, the temperature of which can reach 58 degrees, which is quite enough for drying products. Such a device is rolled up, so it is easy to store or transport. In cold seasons, it can also be used as a heater.
The following video offers step-by-step instructions for assembling an electric dryer from improvised means:
Each home craftsman can assemble a productive dryer for vegetables and fruits with his own hands, and for this you can use the most affordable materials and tools. There are many ways to assemble such a device, so everyone can choose the option that suits them.
In contact with
Today, any technique can be found in the store. This also applies to the dryer for vegetables and fruits. With your own hands, however, you can also do it. At the same time, the equipment will cost much cheaper than the factory counterpart, because you will use improvised materials in your work.
In general, such a unit consists of tiers, which are mesh boxes located on top of each other. There is a cover on top, in the central part of which there are holes for the exit of moist air. Electrical engine blows air that enters the working chamber through an opening in the floor. Having studied the features of the device of the dryer for vegetables and fruits, you can make it with your own hands.
Does the dryer need tiers
There are not always so many fruits and vegetables that a lot of space is required to accommodate them. In this case, the dryer is replaced by an air grill of any modification. It is necessary to borrow a baking sheet from the stove, on which everything that needs to be dried is laid out. It can be fruits and vegetables, berries and mushrooms.
From the air grill, remove the cover with the fan and lamp. You will also need the mesh that comes with the kit. It should be installed in the central part of the baking sheet so that the element rests on the steel and does not wobble. On the grid, install the cover of the air grill and connect to the network. In this case, the handle must remain open to block the inclusion.
It is important to make sure that the dryer is located in a place where ignition cannot occur. Keep it away from children, pets and curtains. On a table, stool or floor, you can place a baking sheet with a convection oven lid. It is launched at a low temperature, while the heat will be strong enough.
The impromptu dryer timer must be set to 1 hour. On a signal, the products are mixed, and after a quarter of an hour everything should be repeated. It is necessary to act according to this scheme until everything is dry. The advantage in this case is that you don’t have to do anything with your own hands, and you don’t need to allocate extra space in the room. If you do not have an air grill, then you can purchase a cheap model for testing, and soon from chicken breasts with spices fried without oil, you will not be able to refuse.
An alternative dryer

If you need a dryer for vegetables and fruits, you can easily make it with your own hands. For this you can use alternative way. You can replace the air grill with a hairdryer or a kitchen hood motor.
To begin with, the technique is set to the minimum mode. It is not recommended to use the grate as described above, since the outlet of the hair dryer is rather narrow, so the spout can be melted. The device is suspended on a rope, while it should be directed to the right place. The downside here is that such equipment does not have a timer, so the device may not withstand long work.
If there is a thermostat based on a bimetallic plate inside, then you can prevent overheating of the equipment. The plate can be borrowed from an oil heater, an iron or an electric kettle. Online stores offer thermostats for adjusting the temperature of the heating system. In the case described, this is fine. Otherwise, a do-it-yourself dryer for vegetables and fruits will fail rather quickly. After all, a fuse can blow if the motor windings overheat. Therefore, a hair dryer is not so preferred, but an acceptable solution.
Using improvised tools to make a dryer

The problem in the manufacture of the dryer rests on the fact that it is quite difficult to select the power of the spiral. Most models of dryers (their body and grids) are made of plastic. This suggests that the temperature does not rise too high. Therefore, it is necessary to first study the characteristics of the purchased model.
The average power can be 600 W, there is no timer in the unit, as well as automation. The capacity of each of the 5 tiers is 1 kg. The temperature does not rise above 70 °C. Before you make a dryer for vegetables and fruits, you must prepare the following materials:
- motor;
- nichrome spiral;
- heat resistant plates;
- steel;
- a jar of olives or tomato paste.
As for the engine, you can take the cooler by removing it from the system unit. It is recommended to take a more powerful motor. The nichrome spiral should have a resistance of 90 ohms. As for the heat-resistant plates, they must be made in the likeness of those installed in the hair dryer. To do this, some masters use a halogen lamp.
The body is recommended to be made of steel. The grid under tiers is made of food steel. No need to use a mosquito net, which was previously made of metal. Welded electronic products should not be used for racks. Copper wire with lacquer insulation will not work either. You should stock up exclusively on edible salt or edible aluminum.
When drawing a dryer for vegetables and fruits, you must indicate its dimensions. Perhaps they will be determined by the parameters of a tin of olives, pasta or other canned products. As an alternative solution, a sheet of steel can be rolled up to obtain the dryer body of the required dimensions.
You should not use soldering to connect the edges, but you can rivet. It is important to remember safety when assembling the described equipment. To do this, a temperature control mechanism is installed. A bimetallic plate from an oil heater is suitable for this. However, if you are looking for a thermostat with a handle, then this solution will be the best.
Work methodology

Fulfilling useful homemade in the form of a vegetable dryer, the reflector will need to be installed above the outlet in the bottom. In terms of area, the part should be larger than the channel, this ensures that the fruit does not fall on the spiral, otherwise you may encounter a fire hazard. The sidewalls should also be protected with a mesh. A bimetallic plate must be installed on the reflector. The power supply of the spiral must be carried out through an impromptu relay. The problem can only be inertia.
If the reflector is made of tin, then the bimetallic plate will constantly click. Inertia can be achieved by using 6mm steel or something similar. Between the grids for the dryer, the distance must be expressed, which is determined by the needs. Five centimeters for vegetables will be enough.
What else to consider

The CPU cooler is powered by direct current. You can use a mobile charger. In this case, the voltage will be slightly less than 12 V, which will cause a decrease in speed. The fan for the dryer is installed under the spiral. If there is no desire to communicate with direct current, then an asynchronous motor should be found, since there may be some problems with collector motors, expressed in the fact that they are very noisy.
Low noise motors are installed in refrigerators, fans and some range hoods. When choosing this site, you need to focus on hearing.
Security measures

When performing a dryer, you must also take care of safety. For this, the metal case is grounded. In addition, moisture can get inside, while the plugs will simply knock out.
Making a dryer from window frames

Another technology for making a dryer is the use of window frames. As a base, you can use cellular pallets, which are made of a metal mesh. The cell size can be 8x8 mm. Such a miracle of technology may involve the presence of 6 pallets that are mounted on rails. They can be attached to the side frames.
Using three strips of thin steel, gables should be made. On the bottom of each strip, it is necessary to make longitudinal bends that will not allow rain to penetrate inside. Such useful homemade products necessarily provide for the presence of a roof, which is made of two sheets of polycarbonate. The principle of operation of the device is to ventilate, for this you need to install a box. Through the mesh pan, air will penetrate inside, removing moisture. Through the roof, where there are gable and side slots, excess moisture will fizzle out. To increase the intensity of traction, the back wall should be pasted over with a black film.
Conclusion
A mesh dryer can be a universal solution for harvesting vegetables and fruits, as well as mushrooms and berries, which can be prepared for long-term storage. You can use steel as the basis for the box, as in the first of the described options, or a window frame. The latter can still be found in some sheds. The use of improvised materials can reduce the cost of the dryer to almost zero.
If you grow, a dryer for fruits and vegetables is an indispensable thing in your household. We offer you a scheme for assembling an electric drying cabinet from Ilya Tretnikov
8 principles of fruit and vegetable dryer operation
The most important task is to understand how drying works. Without this understanding, you can't move. I do not suggest repeating after me and I do not think that my method is the most perfect, but by understanding the drying processes, you will understand what tasks need to be solved.
1. Products dry out due to the evaporation of water from their fibers. This requires two factors:
- heat that will remove moisture from the center of the product and go to the periphery,
- blowing, which will release the walls of the product from the accumulated moisture and take it out of the space of the drying cabinet.

To solve this problem, an electric fan and an electric heater are required, it is also called a heating element. You don’t have to invent a wheel, but you need to take it and go to the nearest household appliance store and buy a simple device, popularly called a “dutik”, that is, an electric electric fan, of course, made of plastic and made in China. It already has both a heating element and a fan, and also an important, essentially free, part is a drying case.

2. Humidity increases not only on the walls of the product, but also in the cabinet itself. This means that the cabinet must be ventilated, i.e. have openings so that the accumulated moist air can escape outside the drying space of the cabinet. To do this, simply make holes in the case. Holes can be placed on the roof of the dryer (as in Ezidri) or on the opposite side from the fan (as in Excalibur). I used the last option and made holes with a drill right in the doorway.

3. The temperature in the middle of the cabinet must be controlled so that the product does not boil and remains alive.
The optimum temperature for drying is 40 C.
To solve this problem, you need a device called a thermostat. There are a lot of options here. For example, you can buy a thermostat for a home incubator, it not only regulates heat, but also has an electronic display that shows the temperature. And everything is much simpler and you don’t have to invent anything, again: the “dutik”, a miracle of Chinese engineering, is already equipped with a thermostat and a special overheating fuse, in case the screw does not turn. So the device is quite safe.
Looking ahead and answering frequently asked questions:
1) do not be afraid - nothing will burn;
2) and if not ecological? - Ecological and does not exist, the difference is only in quality. 
4. Products must be dried on a baking sheet, which lets air through, that is, to be a mesh. I have reviewed many options, but the cheapest and most reliable is a wooden frame (like a photo frame) and a mosquito net.
Regarding the environmental friendliness of the mosquito net: I had no complaints, and if there is any doubt, there are companies that sell the same food net specifically for this purpose.
The baking sheet is connected with self-tapping screws and two slats "in the tail". The mesh was nailed onto a baking sheet with an ordinary manual furniture stapler.
Note:
- the grid at the place of punching with the bracket must be folded several times so that it does not align;
- First, nail one side with a stapler, and then, pulling hard, the opposite. So you need to do it first along the width of the baking sheet, and then along the length.
- In no case do not use nails - this is unreliable, only self-tapping screws.

5. The baking sheet should fit comfortably and hang securely in the dryer. To do this, use wooden rails the length of the width of the side wall of the dryer and the thickness of the rail - a square of about 1 cm. I used a thickness of 5x8 mm. Fasten to the wall body with short thin self-tapping screws. At the end of the rails, you can put a vertical limiter from the same rail, if the design is exclusively square, so that the baking sheet does not drive into the heater screw.
6. Space for air dispersal is the distance from the fan heater to the edge of the pan. This distance is necessary in order to evenly blow all the baking sheets, both in height and in width. This distance must be at least 20 cm.
7. Wooden case for drying- this is the most affordable, cheap and malleable material. I used an old Soviet wardrobe that was sad on the balcony. The particle board from which the cabinet is made contains glue and formaldehyde, so I additionally upholstered the inner walls with natural foil without lamination. 
Food kitchen foil was also used for these purposes, but it is not convenient and short-lived. There is also self-adhesive foil glued to paper - this is the most convenient option, but I did not find one here. The next models will be made exclusively from natural wood, because the first attempts were experimental. I advise you to use a tree that is perfectly dried, and before installation it must be oiled with drying oil or linseed oil and dried thoroughly. These measures are to ensure that the drying is durable and absorbs less moisture.
8. A little creativity. This principle will help you from start to finish. Imagine everything in your head first, and then start creating improvising. It may not turn out as planned, do not worry, because this result may be better than expected.
Actually, these are the basic principles of operation and design of drying.
This is our first homemade drying for 12 kg of fruit. On top is EZIDRI for 5 kg of fruit. 
Calculations and installation of a dryer for fruits and vegetables
I did everything intuitively, without clear calculations and planning. Firstly, the lessons of geometry and mathematics are something far and unattainable, and secondly, I did not know what would happen. Therefore, we will not pay attention to calculations and diagrams in this article, besides, the description will take up a lot of space. I will write only a few basic principles, which are quite enough:1. Don't use nails- this is an unreliable material for this design, only self-tapping screws of different diameters and lengths. Before screwing in the screw, make a hole smaller than the diameter of the screw, then this will guarantee the integrity of the part and prevent cracking. 

2. Two drying designs are shown here: one for 13 kg - has a square shape, the second for 40 kg - has a square body for a baking sheet and a pyramidal attachment for fan heaters and air acceleration. The latter design has certain advantages, because the pyramidal shape of the attachment accelerates the air better and it does not “lose” in the corners, and also serves as a kind of direction of air flows.
3. One fan is enough for drying with a depth of 57 cm, width of the inner working surface (v.r.p.) - 41 cm, height v.r.p. - 39.5 cm. Accordingly, deco size: 41x45 with a wood thickness of 1.7x1.7 cm.
So, from 57 cm of the total depth we subtract 45 cm of the length of the baking sheet, we get 12 cm to disperse the air. In my case, square drying for 13 kg is enough.
Two fans provide a dryer with a pyramid attachment of this size: depth - 42 cm, width w.r.p. - 61 cm, height w.r.p. - 83 cm. The distance for air dispersal from the wall of the attachment to the main body (respectively, into the baking sheet) - 23 cm. The size of the baking sheet: 41.5x60.5 cm.
4. Electricity and thermostat. I don't know how to draw diagrams, I'll try to explain. By purchasing a "dutik" you provide yourself with a bunch of useful details, for example, a switch for a fan, a light bulb, a thermostat and a bunch of wires. 
The thermostat itself is already built into the fan and is manually adjustable. The adjustment knob is located on the front panel of the fan heater next to the OFF / 1st / 2nd speed switch. The thermostat setting knob is the thermostat, which is located in the middle of the case. This simple metal device will need to be placed inside the working chamber of the dryer. Manually using a thermometer to adjust and calibrate the thermostat - it sounds abstruse, but it's very simple.
Now the important point! By default (that is, in the factory assembly), the thermostat, when the set temperature is reached, opens the entire fan heater, that is, turns off both the fan motor and the heating element. We do not need such a result. To do this, it is necessary to rearrange the contacts in such a way that the thermostat shares only the heating element, i.e. turned off the coils when the temperature reaches the maximum allowable, while the fan will continue to spin, and when the temperature drops, the thermostat will turn on the coils again and they will heat up. This method is much more economical, even compared to Ezidri. Of course, professionals use seven-storey keys for this in order to “not click” by opening and closing the network, because this has certain negative consequences for the life of the heating element, but we are only amateurs, so this option will satisfy us.
5. Leave only one spiral, the one that is better blown, the second must be turned off from the network. 
6. Dryer switch it is better to distribute as follows: off / on only the fan / on the fan and heating coil.
7. We use two light bulbs: one shows that the dryer is turned on at all (either to the first or second position, except for “off”), and the second turns on when the heater is working, and turns off when the thermostat has disconnected the heater and the fan is running.
8. If you make a variant for two "dutiks", you must also leave only one spiral in each "dutik". I connected the "dutik" in series, but there is a suspicion that in this case the voltage on the second one is less - it will dry unevenly, so I advise you to connect it in parallel. The thermostat should open the heating elements on both "dutiks" at the same time. You can check the uniformity of temperature and blowing using two thermometers - one at the bottom of the other at the top. Of course, thermometers measure the temperature outside with the doors closed, since we have ventilation holes in the doors.
9. Feet for the dryer Be sure to lift it off the floor.
10. Use a mains filter with a built-in fuse. Expect that the maximum power of the included two "dukes" with the included spirals reaches 2 kW.
11. Use "dukes" with a flat body, without waves and concavity, otherwise you will not be able to screw half of the electric fan body to the body of the dryer.
This drying can be used for all types of fruits, berries, herbs, vegetables and
If you are a supporter healthy eating, and even more so independently engaged in the cultivation of healthy food, the dryer for vegetables and fruits will be your indispensable ally. I want to offer you a variant of a home-made electric cabinet for drying fruits, vegetables, herbs, berries and mushrooms from Ilya Tretnikov.
Materials and tools:
- plywood sheets for the body
- wooden slats
- self-tapping screws
- mosquito net
- drill
- furniture stapler
- heater
- foil
- power cord with plug
- electrical tape
Preparing the main elements
1.
Wooden case for dryer
It can be an old bedside table or a wooden case knocked together on your own.

Be sure to drill a lot of holes in the "roof" or wall opposite the fan for the free exit of moisture from the products.

To avoid harmful emissions from the walls of the case when heated, it is recommended to sheathe it from the inside with foil without lamination. In addition, it is an element of additional thermal insulation.

2. Net trays
With their own hands, they are made of a wooden frame and a mosquito net. It is better to connect the frame rails with self-tapping screws, and fasten the mesh with a furniture stapler. So that the grid does not get out of alignment, its edges are wrapped several times. Stretching the mesh on a wooden frame is first in width, and then in length.

3. Rails for placing trays in the dryer
They can be from the same wooden slats 5 * 8 mm in profile. Their fastening to the wooden case is carried out using self-tapping screws.

Let's get down to calculations and installation
Step 1. Go without nails
For this device, nails are completely unreliable. In this case, the author of the master class is recommended to use self-tapping screws. So that the self-tapping screw does not damage the integrity of the structure, drill a hole with a smaller diameter from the diameter of the screw leg and only then screw it in.

Step 2. Decide on the design of the future dryer
Ilya Tretnikov suggests considering two types of dryer designs for vegetables and fruits. The first type - up to 13 kg when loading products, square. The second type - the design is complicated and the loading volumes of fresh products are possible up to 40 kg. This option is complemented by a pyramidal installation for fans that provide uniform air circulation. Thanks to the pyramidal shape, the air flow receives a specific direction of movement and reaches the farthest corners.
Step 3. We select fans
According to the recommendations of the author of the master class in the dryer, up to 57 cm deep, the inner working surface up to 39.5 cm high, and 41 cm wide, only one fan is enough to get high-quality products at the exit. Accordingly, a tree with a thickness of 1.7 * 1.7 cm is used, and we get the deco size - 41 * 45 cm.
Basic calculations:
Dryer total depth (57 cm) - pan length (45 cm) = space for air dispersal (12 cm). If you make a dryer for fruits and vegetables with a load of up to 13 kg, this is enough.
When constructing a dryer for fruits and vegetables, together with a pyramidal structure and dimensions: the width of the inner working surface is 61 cm, the height of the inner working surface is 83 cm, the depth is 42 cm, 2 fans are installed. A baking sheet measuring 41.5 * 60.5 cm.
Basic calculations:
Total dryer height (83 cm) - pan length (60.5 cm) = room to disperse air from the main body to the wall of the attachment (22.5 cm).
Step 4. Thermostat and electricity
In order not to delve deeply into physics, Ilya Tretnikov recommends simply buying a “dutik” heater, as it is popularly called, and immediately getting a set of all the necessary parts.

The main thing is the thermostat built into the fan, which is placed in the middle of the heater body. Its author is a master class and places it inside the working chamber of the future dryer. Using a conventional thermometer, Ilya manually adjusts the thermostat. To do this, it is necessary to rearrange the contacts so that the effect of the thermostat extends only to the heating element. This means that when the maximum temperature is reached, only the coil will automatically turn off, and the fan will continue to operate. When the coil cools, the thermostat will start it again. At this point, you should pay special attention, since the factory assembly of the heater involves turning off the thermostat and the heating element and the fan. The method created by Ilya is much more economical in terms of electricity consumption.
Step 5 Installing the Coil
Step 6 Install the dryer switch
It is better to distribute the functions of the switch in this way: fan on / heating coil on and fan / off.

Step 7 Dryer Operation Indicators
Ilya uses 2 light bulbs:
- the first is an indicator of the overall operation of the device, that is, it lights up when the “on” position, does not light up when the “off” position
- the second - the indicator of positions "on" / "off" for the heating element.
Step 8 Installing Two Fans in a Pyramid Design
When creating a dryer with a pyramidal design, Tretnikov uses 2 fans, each with one heating coil. But the adjustment of the operation of both heating elements will be performed by only one thermostat. That is, it is very important to obtain as a result the simultaneous opening of the heating elements, since otherwise the drying process will become uneven. To make sure that the temperatures are uniform, it is enough to place several thermometers on different planes throughout the entire cavity of the dryer.
- Setting up the burglar alarm Is it possible to adjust the sensitivity of the motorcycle alarm
- Women's harem pants - what to wear and how to create fashionable looks?
- Spaghetti with bolognese sauce Spaghetti bolognese with marinated tomatoes
- How to clean pink salmon caviar from the film
- Blue clay its properties and uses
- Different shawl on the head in Muslim
- Steam omelette for a child